Create and run a project
- Contenu
- Create and run a project
Creation of a project
The first step in adding a project to your site library is to choose its location. The "Project Library" (or "Document Library") section of the browsing pane displays the available folders. You can create new folders as necessary.
- Select the collaborative site (ie: Project Management);
- Navigate the library tree structure and click on the destination folder. When you select a folder, the item list displays the current contents of that folder;
- Use the menu Create... and select the type Project...;
- Fill the form:
- Familly and Sub-familly (you must select an existing value);
- Project Manager;
- Observers, users/groups who are notified when there is on the task;
- Project template;
- Planning mode:
Planning : task dates are calculated from the start date of the project;
RetroPlanning : task dates are calculated from the end date of the project;
- Click on Create to save the project.
- By pressing the button Documents, you can add folders and documents in your project;
- By pressing the button Data lists, you can add tasks and deliverables:
- For each task, you can define properties.
- For each deliverable, you can define:
- the % Completion: when submiting a deliverable, this percentage is added to the completion of the task;
- the Documents;
- You can start the project by setting its state to InProgress;
- You can submit task or deliverable by setting its state to completed.
Here are 2 videos which show what has been explained above (don't forget to zoom):
- "Create a project" : http://www.youtube.com/embed/DXAP0rzbpQw
- "Project start, submit task, deliverable" : http://www.youtube.com/embed/Yj6CU2zyXG8?rel=0
Now the project has been created, its related tasks can be added.
Tasks
Create tasks
To add new tasks to a project, click on "Tasks" on the project's left headband. Then, press new row and complete the form according to the information given below:
(please find more information by clicking on the word when it is in colour).
- Name and description;
- Prev. Tasks used to defined previous tasks;
- Parent used to define parent task;
- Resources, users/groups who do the task;
- Observers, users/groups who are notified when there is activity on the project (see the section "Project activity" of this documentation);
- Legend to define the color of your task;
- Workflow Name used to assign the user (Adhoc: assigned users, New product: allow the user to create a product from an existing one);
- Duration and Work of the task (Capacity is calculated);
- Manual date (if empty, the task follows its predecessor).
Role assignation
You can use these roles:- Project manager by choosing the group PROJECT_pjt_projectManager;
- Project creator by choosing the group PROJECT_cm_creator.
When the task is set to "In progress", the system reads the property of the project and replaces the role by the user defined in the property.
You can create custom role in that way:- add a group PROJECT_prefix_name
- add a property prefix:name on the project
Parent : en cours de création / under construction
"Parent" is used to bring together several tasks. The tasks can be done in the same time.
The tasks call « sons » state the planning (the beginning and the end of the task call « Parent »)
For exemple, you have 1 Parent and 2 sons
- the son N°1 starts the 10 and ends the 12
- the son N°2 starts the 12 and ends the 15
The parent :
- will start the 10
- will end the 15
You can’t start a son after his parent
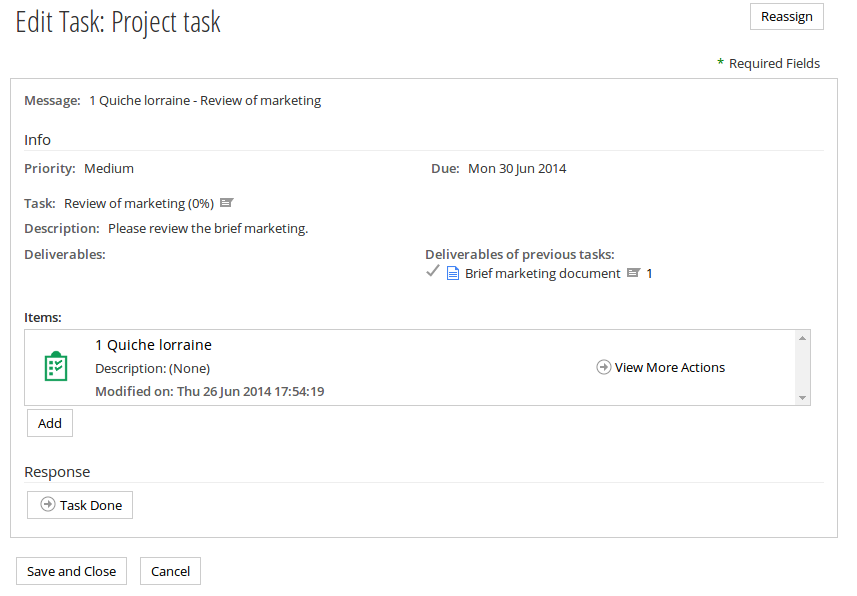
Work on task and submit work
When a user is assigned to a task, he receives:- a task in the dashlet "My Tasks";
- an email.

- navigate to the project;
- submit the task by clicking on the button "Task Done";
- add comments on task and deliverables;
- change state of deliverables;
- open deliverables.
Task budget and time tracking
Expense of task
beCPG allows to manage budget by adding budgeted time, fixed cost and resource cost on each task.
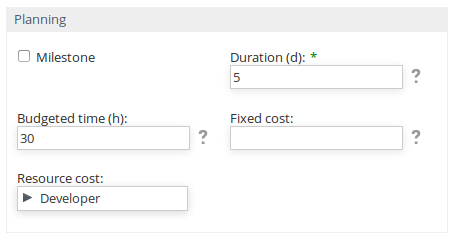
Then it calculates budget of tasks and project.
Budget = fixedCost + budgetedTime x resourceCost
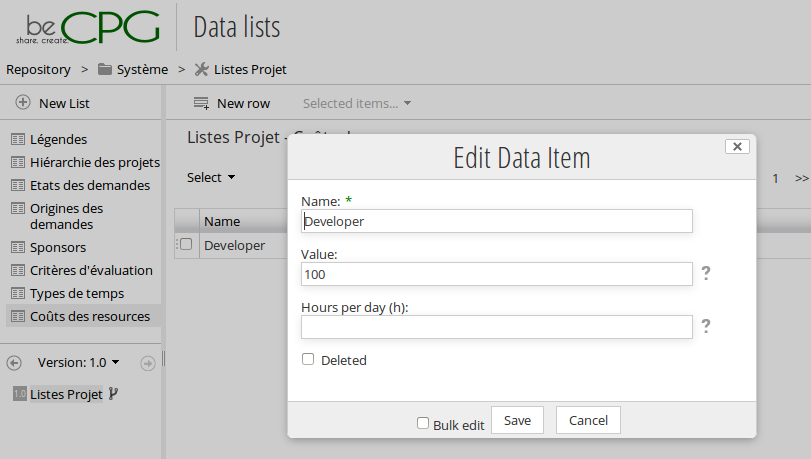
Costs of resources
Costs of resources are defined in the administration (ie: developer, project manager): beCPG Admin console > Project lists > Resource cost
Add each resource with:- Hourly cost (the cost of the resource for 1 hour);
- Bill rate (how much 1 hour of the resource is billed);
- Hours per day (number of hours worked per day). It takes 8 hours per day when there is no value.
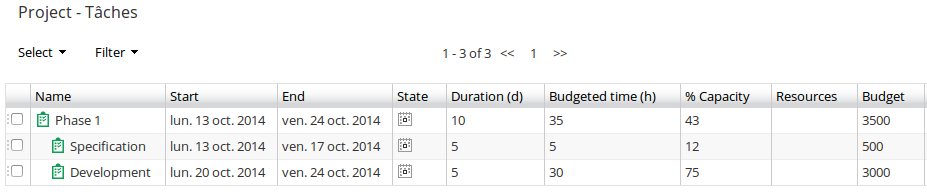
Time tracking
Add time spent in the datalist "Log time".
![]()
Logged time is summed up in the datalist Tasks.
![]()
Types of time (ie: Design, Development, Support) are defined in the administration: beCPG Admin console > Project lists > Time types.
Task delegation
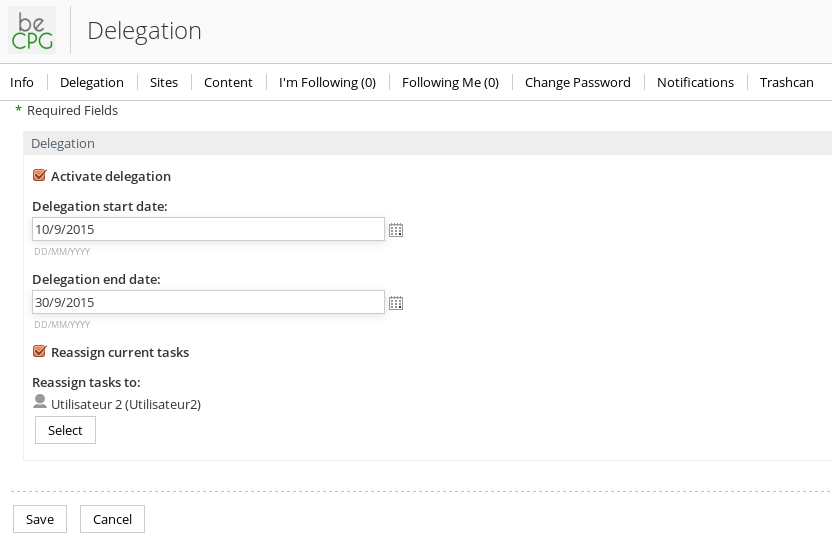
You can delegate tasks (to which you were assigned) on the "Delegation" page of your user profile.You'll have to fill the form :
- Activate delegation;
- Delegation start date;
- Delegation end date;
- Reassign current tasks;
- User the tasks will be reassigned to.
The reassigned tasks will be displayed in the "My tasks" dashlet of the user and he will get an email notification.
If the current tasks reassignation is not activated, only the new tasks will be reassigned to the choosen user.
Project activity
Observers
The project observers:- are defined on the project and on tasks;
- can be persons and user groups;
- are notified by email when:
- the state of task is changed;
- a new comment is added.
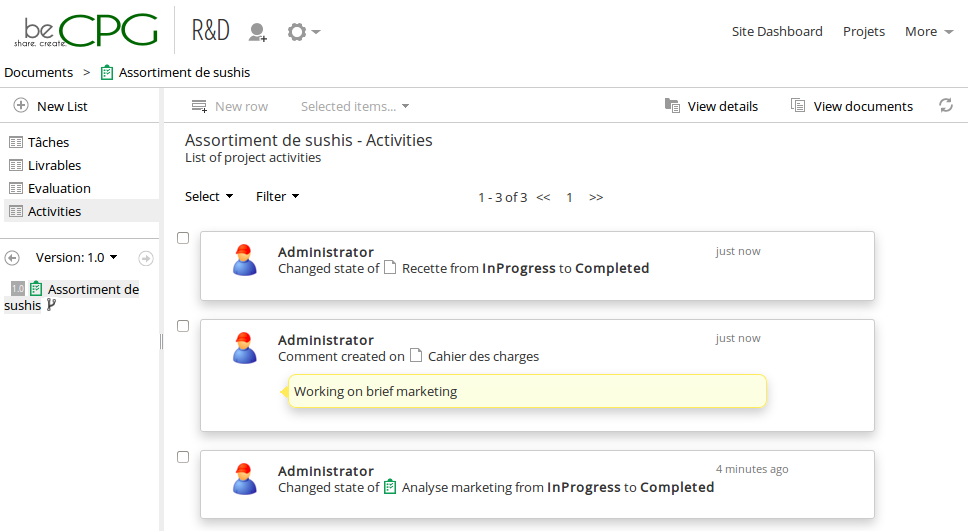
Project activities
Activities are displayed in:- the dashlet "My activities".
- the project list "Activities".
Budget, invoices and expenses
beCPG manages the budget via 3 lists : budget list, expense list and invoice List.
The list budget manages 6 fields :
Name: name of the budget. This field is managed with mutltilevel option.
Budgeted expense: refers to the planned amount of expenses. This field is filled by the user.
Actual expense: refers to the real amount of money spent. This field is available in a read-only mode.
Budgeted invoice: refers to the planned income. This field is filled by the user.
Actual invoice: refers to the real income. This field is available in a read-only mode.
Profit: is the difference between the actual invoice and the actual expense.
In this example, I am adding 3 budgets : Budget, SubBudget1 and SubBudget2. SubBudget1 and SubBudget2 are the children of Budget.


The list Expense manages 5 fields :
Expense type: this field is related to the budget list. In order to add an expense, you have to associate it to a budget.
Expens name: the name of the expense.
Expense amount: the amount of money spent. This field is related to « Actual Expense » in the budget list and the task list. If you add an amount to an expense, it will automatically be added to the actual expense of the corresponding budget name and the corresponding task (in "Budget list" and "Task list").
Associated task: in this field, you can choose the task associated to your expense. The expense amount will be assigned to the right task in the "Actual expense" of "Task list".
Associated document: in this field, you can associate a document (bill, statement…) to your expense.
Here, we are adding 3 expenses :
Expense is associated to « Budget ». It has an amount of 500.
Expense1 is associated to « SubBudget1 ». It has an amount of 200, and associated to Task1.
Expense2 is associated to « SubBudget2 ». It has an amount of 300, and associated to Task2.

The list "Invoice" manages 5 fields :
Invoice type: this field is related to the budget List. In order to add an invoice, you have to associate it to a budget.
Invoice name: the name of the invoice.
Invoice amount: the amount of income out of this invoice type. This field is related to "Actual Invoice" in the budget list and the task list. If you add an amount of income, it will automatically be added to the "Actual Invoice" of the corresponding budget name and the corresponding task (in "Budget list" and "Task list").
Associated task: in this field, you can choose the task associated to your invoice. The invoice amount will be automatically assigned to the right task in the "Actual expense" of "Task list".
Associated document: in this field, you can associate a document (bill, statement…) to your invoice.
Here, we are adding 3 invoices:
Invoice is associated to « Budget ». It has an amount of 400.
Invoice1 is associated to « SubBudget1 ». It has an amount of 500, and associated to Task1.
Invoice2 is associated to « SubBudget2 ». It has an amount of 600, and associated to Task2.

In the budget list, we will have changes in Actual expense, Actual invoice and Profit fields.

Actual expense:
For SubBudget1 : we have "Actual expense" = 200 which is the amount we have filled in the expense list for the SubBudget1.
For SubBudget2: we have "Actual expense" = 300 which is the amount we have filled in the expense list for the SubBudget2.
For Budget : we have "Actual expense" = 1000 = 500+ 300+ 200. It is the sum of the amount we have filled in the expense list for Budget (500) and the amount of the children (200 + 300).
Actual invoice:
For SubBudget1 : we have "Actual invoice" = 200 which is the amount we have filled in the invoice list for the SubBudget1.
For SubBudget2: we have "Actual invoice" = 300 which is the amount we have filled in the invoice list for the SubBudget2.
For Budget : we have "Actual invoice" = 1500 = 400+ 500+ 600. It is the sum of the amount we have filled in the invoice list for Budget (400) and the amount of the children (400 + 600).
Profit :
It is calculated as « Actual invoice – Actual expense ».
In the Task list, we will have changes in Actual expense and Actual invoice.

Actual expense:
For Task1 : we have "Actual expense" = 200 which is the amount we have filled in the expense list and associated it to Task1.
For Task2 : we have "Actual expense" = 300 which is the amount we have filled in the expense list and associated it to Task2.
Actual invoice:
For Task1 : we have "Actual invoice" = 200 which is the amount we have filled in the invoice list and associated it to Task1.
For Task2 : we have "Actual invoice" = 300 which is the amount we have filled in the invoice list and associated it to Task2.
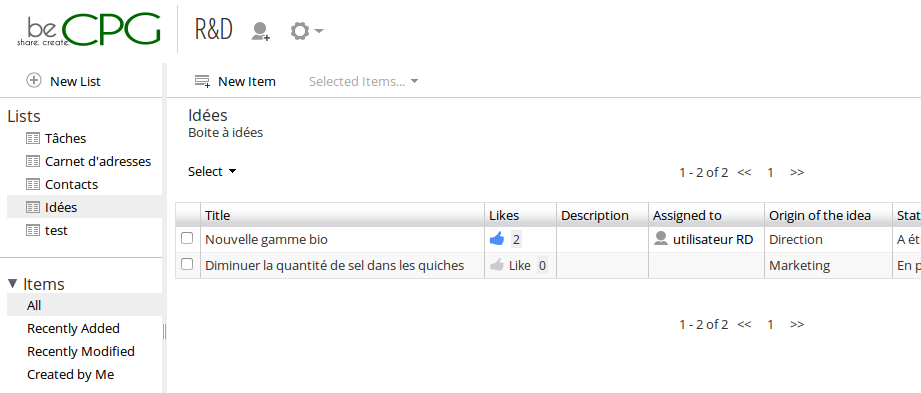
Submit new ideas likes rating
The first step in adding new idea to your site is to add a new data list. The "Data Lists" section of the browsing pane displays the available data lists. You can create new data lists as necessary.
- Click on action New List, select the type Request List and fill its name and description. Click on Create to add the new list.
- Select the new list.
- By clicking on the action "New item", you can add a new item in the list.
- The "Request List" has a field Likes which allows you to vote.
This video presents "how to vote for new ideas": http://www.youtube.com/embed/lq_XlO2Yr68?rel=0.
Create a project template
The first step in adding a project template to your site library is to choose its location. The "Project Library" section of the browsing pane displays the available folders. You can create new folders as necessary.
- Navigate the library tree structure and click on the destination folder. When you select a folder, the item list displays the current contents of that folder. When using the Create Content... action, your project template will be added here.
- Select the type Project.
- Fill the form that appeared. Click on Create to save the product.
- You are now on the details of the project. In order to have a project template, click on the action Manage Aspects, then select the aspect Entity Template.
- By clicking on the action View files, you can add folders and documents in your template.
- By clicking on the action Data lists, you can add the tasks and the deliverables.
Here are 2 videos that show what we explain above (don't forget to zoom):
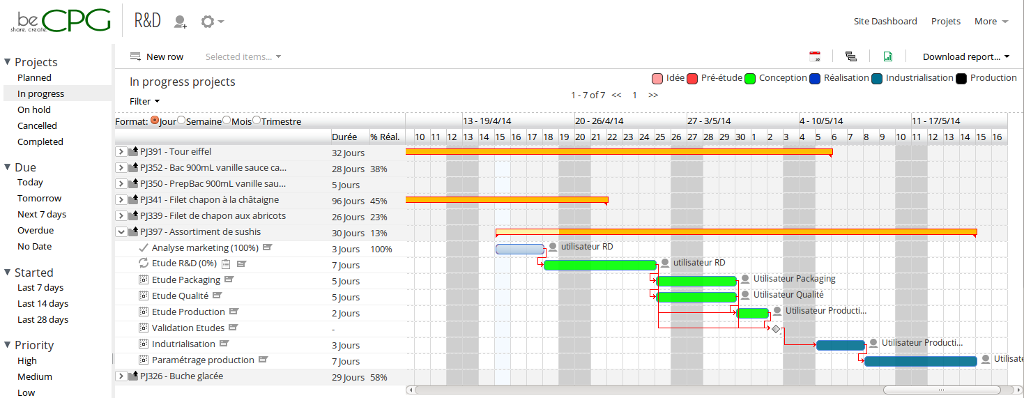
Project overview
The page "Project List" allows users to see projects, active tasks and deliverables.That page is available from :
- the menu beCPG to see the complete project portfolio;
- the collaborative site to see the projects stored in the site.
This page has 2 views:
- Project list:
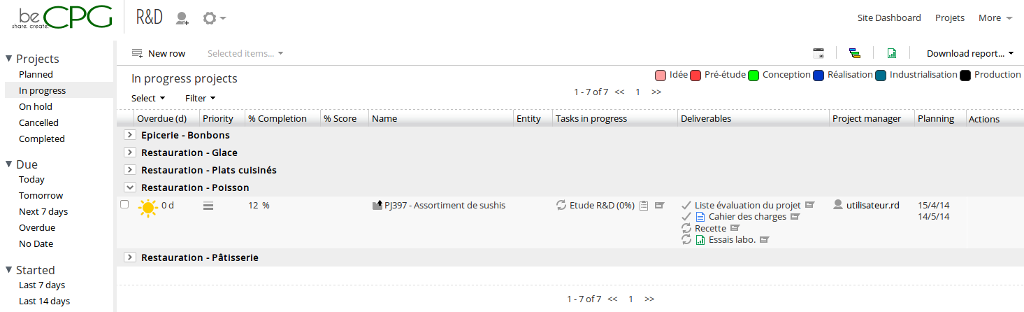
- Gantt view:
beCPG analysis allows to do BI on projects with OLAP cubes.
For more information about OLAP, click here