PLM Documentation
- Contenu
- PLM Documentation
Introduction
This document presents the use of beCPG software. It is intended for beCPG software users.
My dashboard
My Dashboard summarizes the beCPG application.
Each user can customize it with the button "Custom dashboard" by adding dashlets.
There is an overall scoreboard to beCPG and a dashboard with collaborative website.
- My tasks with the tasks of workflows to which the user is assigned
- The activity of my sites, including the creation, deletion, modification of content (documents, products, wiki pages, forum posts, etc ...)
- Product Catalog
- The list of projects
My Dashboard is accessed through the "My Dashboard" button on the top bar.
Other dashlets exist:- My calendar with the events shared calendar to which the user has access
- My Documents "Favorites", "Locked by me" and recently "Modified"
- My profile with information on the user
- My Sites with a list of sites that are accessed
- ...
Repository
The repository stores the documents, products, customers and suppliers of the company.
It consists of 2 parts, the warehouse that stores the validated data (not changing) and collaborative sites where the data is stored under development.
Warehouse
The warehouse is accessible via the button "warehouse" of the upper band.In the warehouse include:
- The Data Dictionary folder: it is a system folder
- The Documents folder
- The guest room folder
- The users Spaces folder where users can store their personal documents
- The Exchange folder to import data into the application (file "A treat")
- The Products folder where you store the products according to the type of product, the status of the product, product family and the subfamily of products.
- The "Validated" folder has validated products.
- The folder "Rejected" has rejected the products that you want to keep.
- The "Archive" folder has validated products that are no longer used or marketed.
- The folder "As developments" has the products under development in which the project is frozen, but will be taken up later.
- The Sites folder: it is a system folder where collaborative websites are stored
- The Companies file that stores Suppliers and Customers
- The System folder where the systems data is stored
Collaborative sites
Collaborative sites are accessible via the "Sites" button on the top bar.
Collaborative sites allow teams to work on documents and products under development. Documents and development in process are accessible via the "Resource Center" tab.
Besides the documentary space include:- The dashboard site
- Wiki pages
- Blogs
- The shared calendar
- Links
- Discussions or forum
- The data lists
- Members of the site

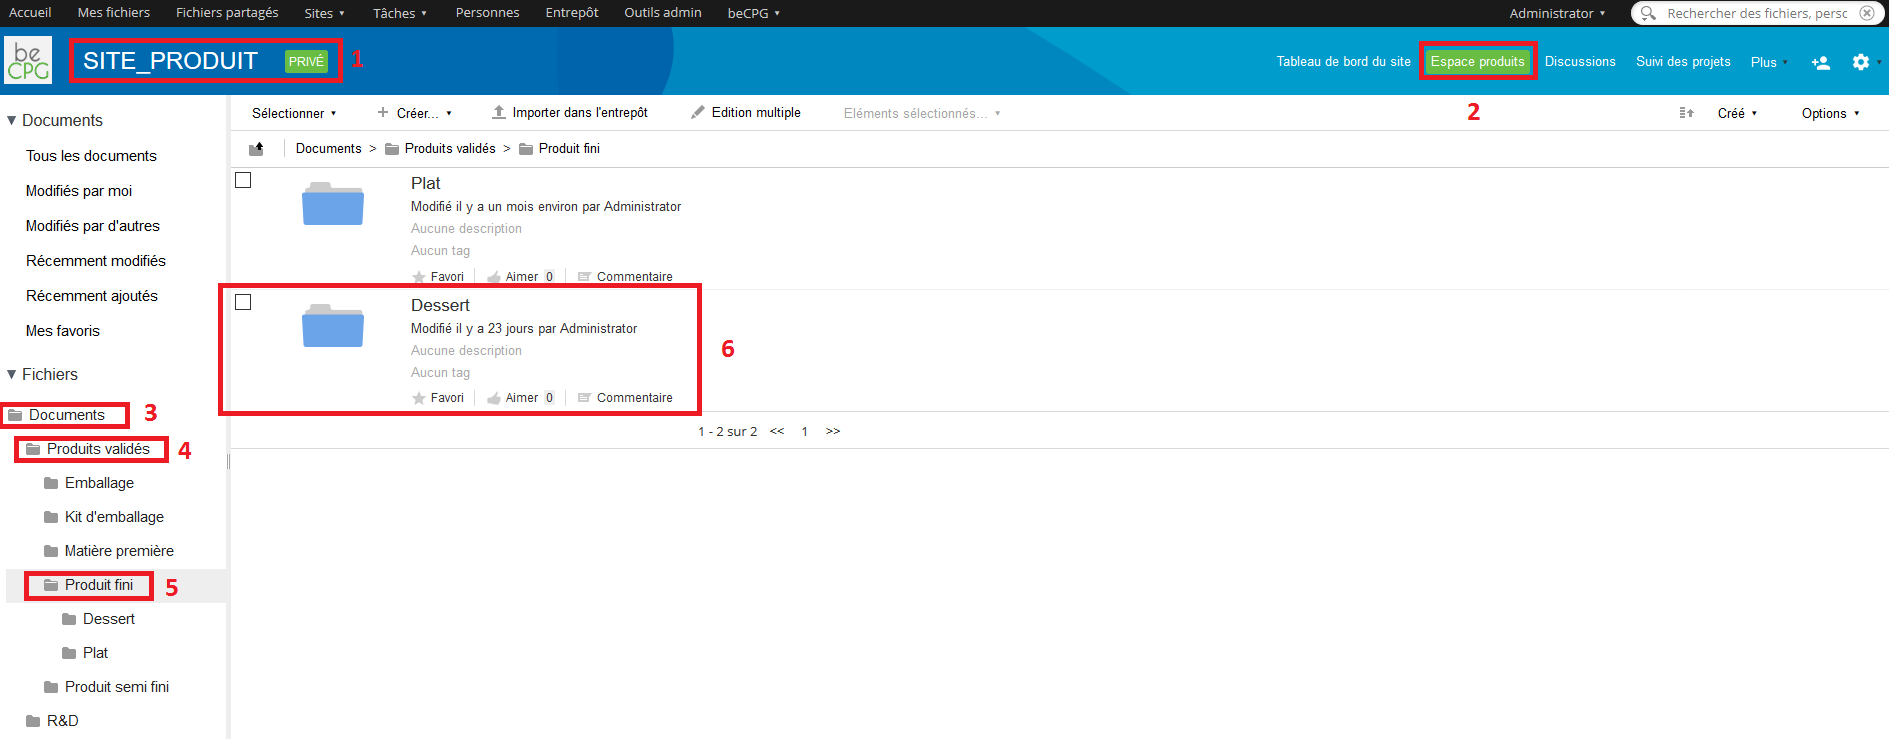
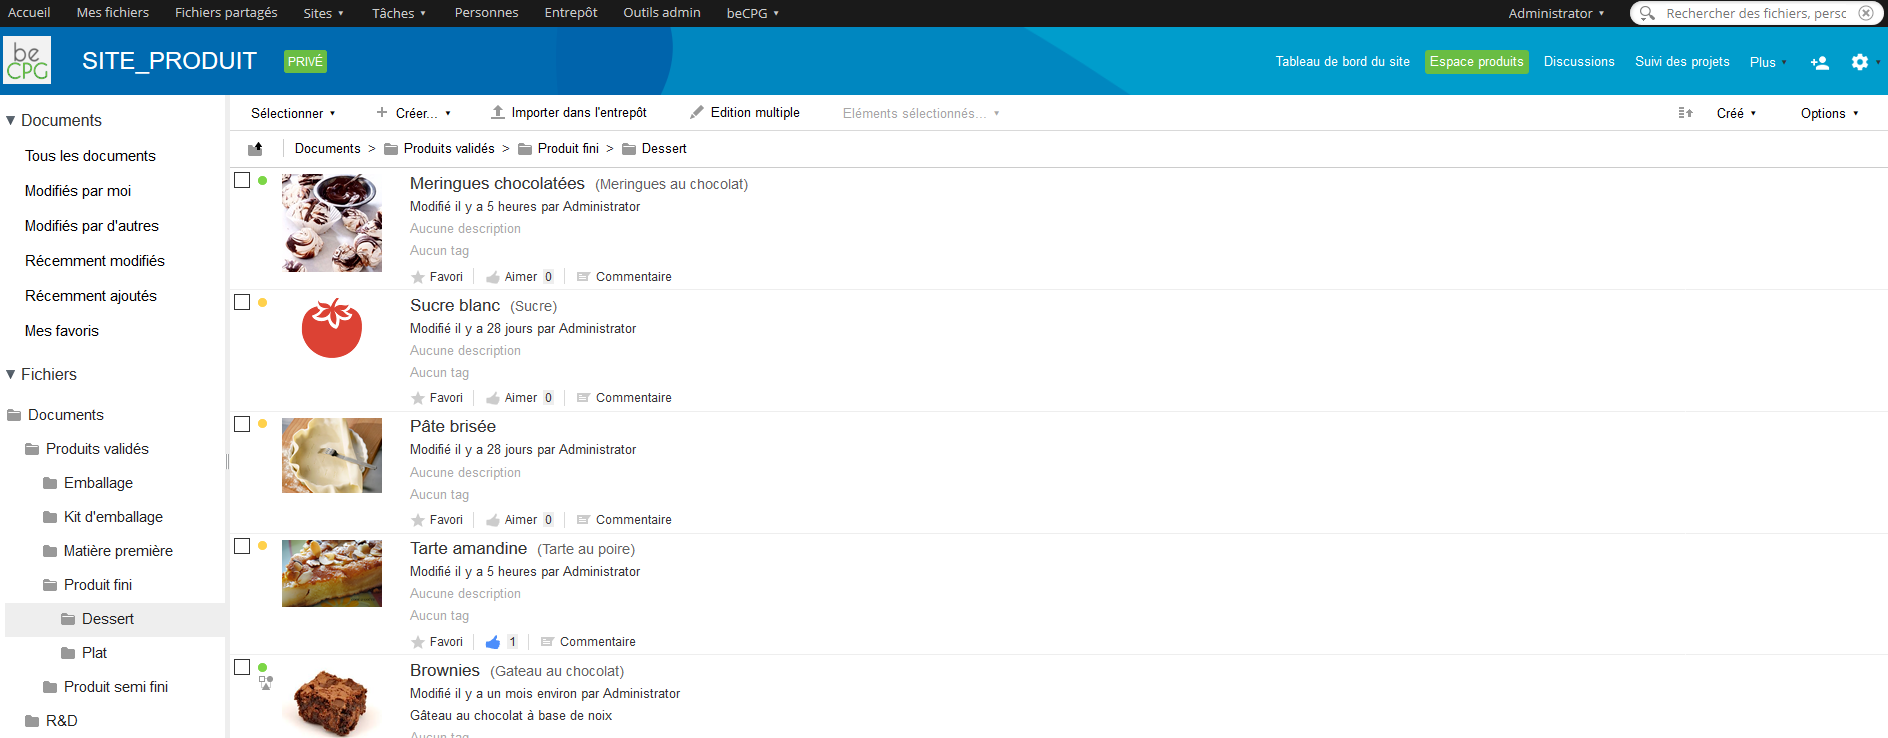
Browsing the repository
There are 4 ways to browse the contents of the warehouse:- Shortcuts
- Folder Tree
- Hierarchical classifications that display elements associated with the categories
- Tags
- Shortcuts to documents (Shortcuts)
- Navigation in the folder tree (Navigation)
- Actions on selected content (Action 1)
- The display of the content (Content)
- The pagination when all the results can not be displayed on a single page (Pagination)
- The selection of the view (View). This allows you to show or hide folders, view a simplified view or detailed
- Actions on content (Action 2)

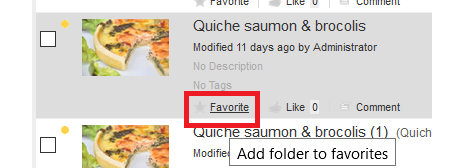
Each content can be set as the favorite and will be accessible via the "Favorite" shortcut.
Search
The research is available in the top right of the screen.

- Search Simple looking into the document metadata and content of documents. It is similar to the research that we found on the internet via search engines.
- Research Advanced that lets you search by content type (document, folder, product) in the metadata. Eg validated products having flour name.
- Look for products whose name respects "AND sushi (tuna salmon OR OR bream)" refers to:
- Tuna Sushi
- Salmon Sushi
- Sushi bream
- But will not return "Sushi" or "Cucumber Sushi"
- Look for products whose name respects "AND NOT bream sushi" refers
The following actions are possible on the results of a search:
- Tuna Sushi
- Salmon Sushi
- Sushi
- Cucumber Sushi
- But will not return "Sushi bream"
- Sort according to certain metadata (name, title, etc ...)
- Export results into an Excel document via the button "Export results" according to the rights to your profile
- Navigate on an element of the result
- Options via the button "Switch to advanced search»
Research on the characteristics and components:
- Search for all products that have an ingredient of a certain origin (eg Spanish strawberries)
- Advanced search> Select the type "Product"> ingredient information to the field and the original field> Search
- Search for all products that have the ingredients ING1 and ING2
- From the "ingredients" of a product> click action "Where Used" of an ingredient> select cases to "Ingredient"> Add to elements ING2> select the AND operator> search
- When using Search> Select the type "Ingredient"> select ING1 and ING2 + AND operator> Search
- Search for all products with the raw materials MP1 and MP2
- Advanced search> Select the type "Product"> learn MP1 and MP2 code code> Search> Job Stories> select "Product - composition" + AND operator> Search
Product consulting
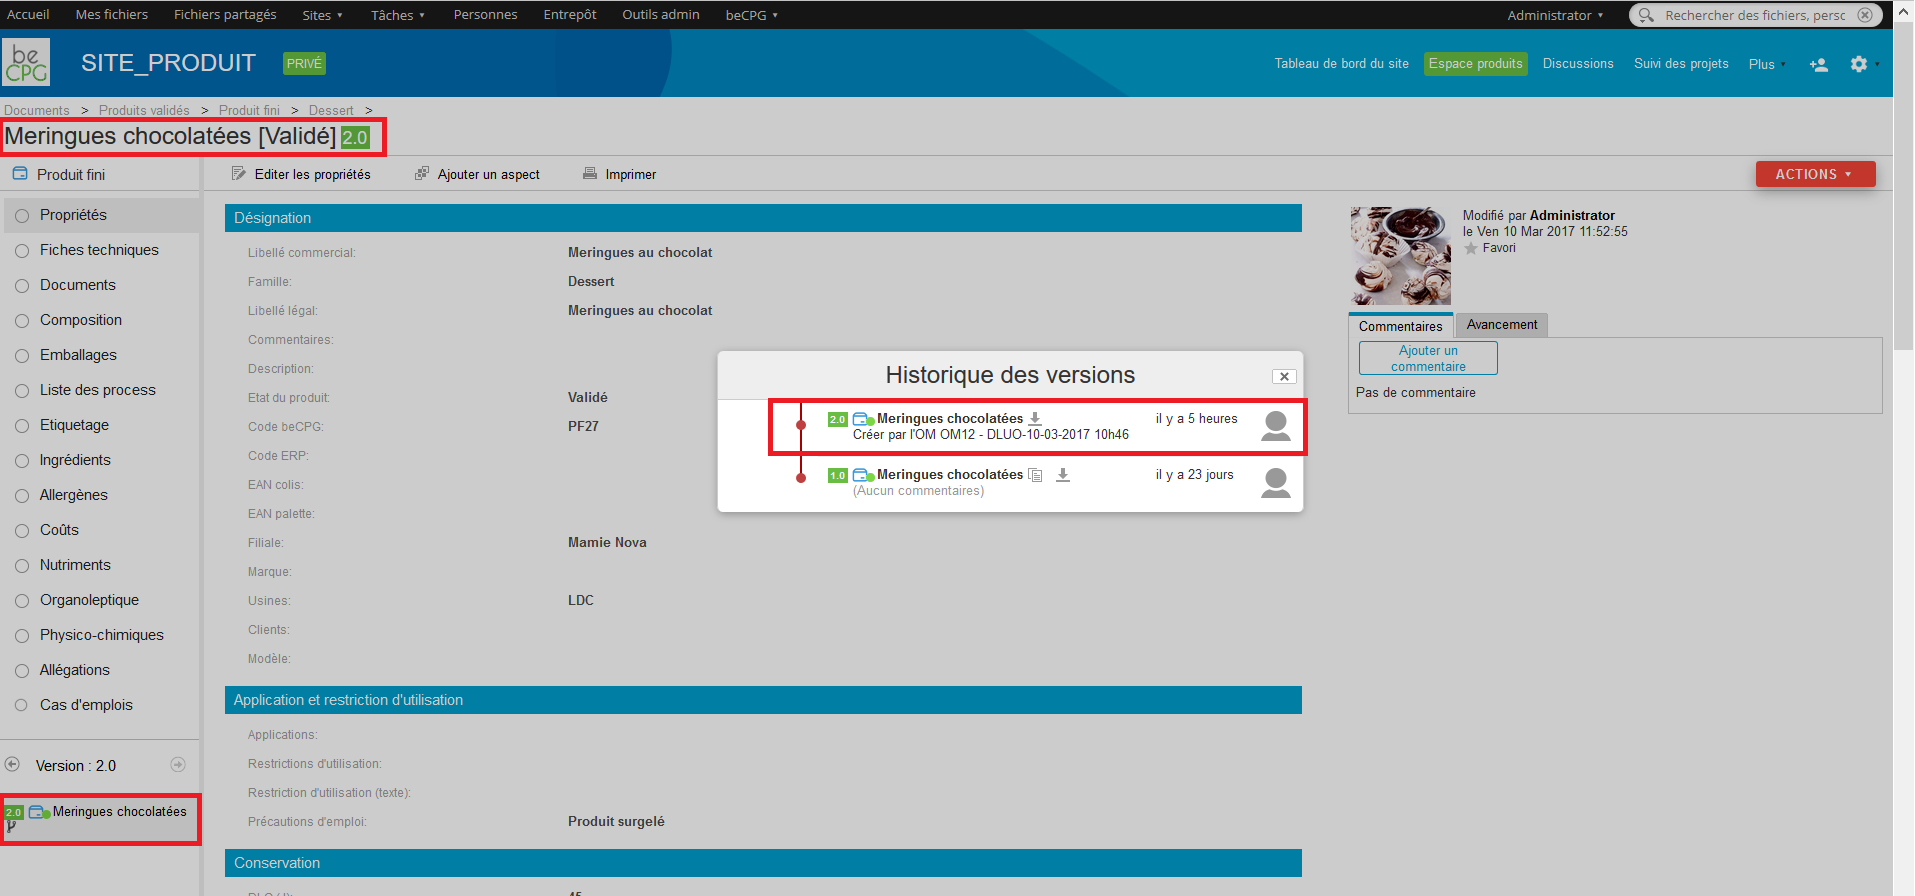
The "Properties" page is displayed per default when one clicks on a product. this latter is made of 4 sections:- Designation: gathers the generalities about the product (name, ERP code, supplier etc.);
- Consumer informations: gathers the information related to the consumption of a product (weight, shelf life, precautions of use etc.);
- Tare:
- Audit: gathers data related to the creation and to the modifications brought to a product.
It's also possible to add others sections, such as "Nutrient profiling score" which allows the calculation of the 5C score and the display of its associated logo such as visible on the below screenshot:

- Technical sheets: to generate the product's technical sheets;
- Documents: to store the documents related to the product (images, brief etc.);
- Ingredients;
- Allergens;
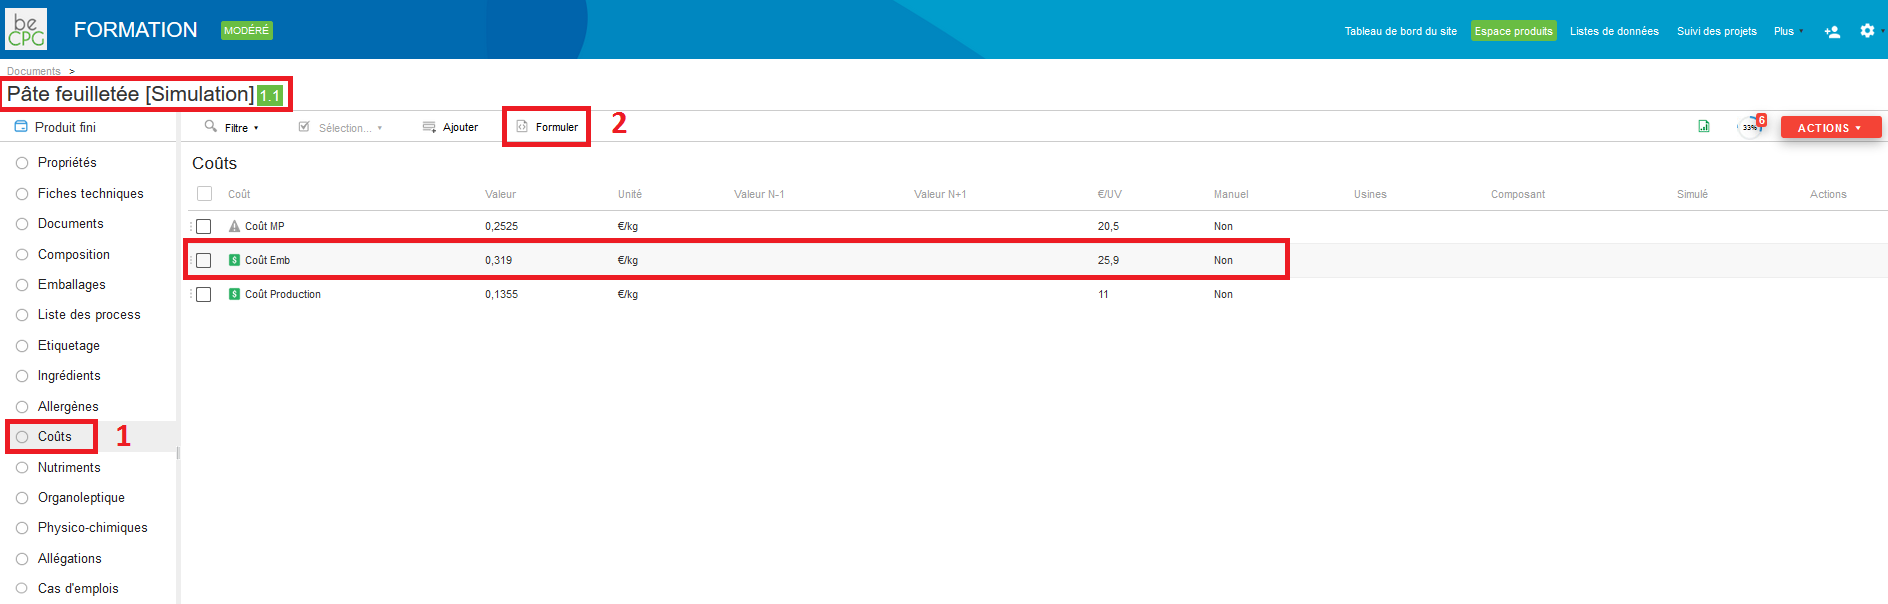
- Costs;
- Nutriments;
- Organoleptic;
- Physicochemical;
- Label claims;
- Where used: to know in which products this one is used;
- Activity: to consult the different users' activities on this product.
- the dynamic characteristics which are formulas based on the product's characteristics;
- the products requirements which are not respected.
It's possible to add dynamic characteristics on product templates and/or on the product in itself.

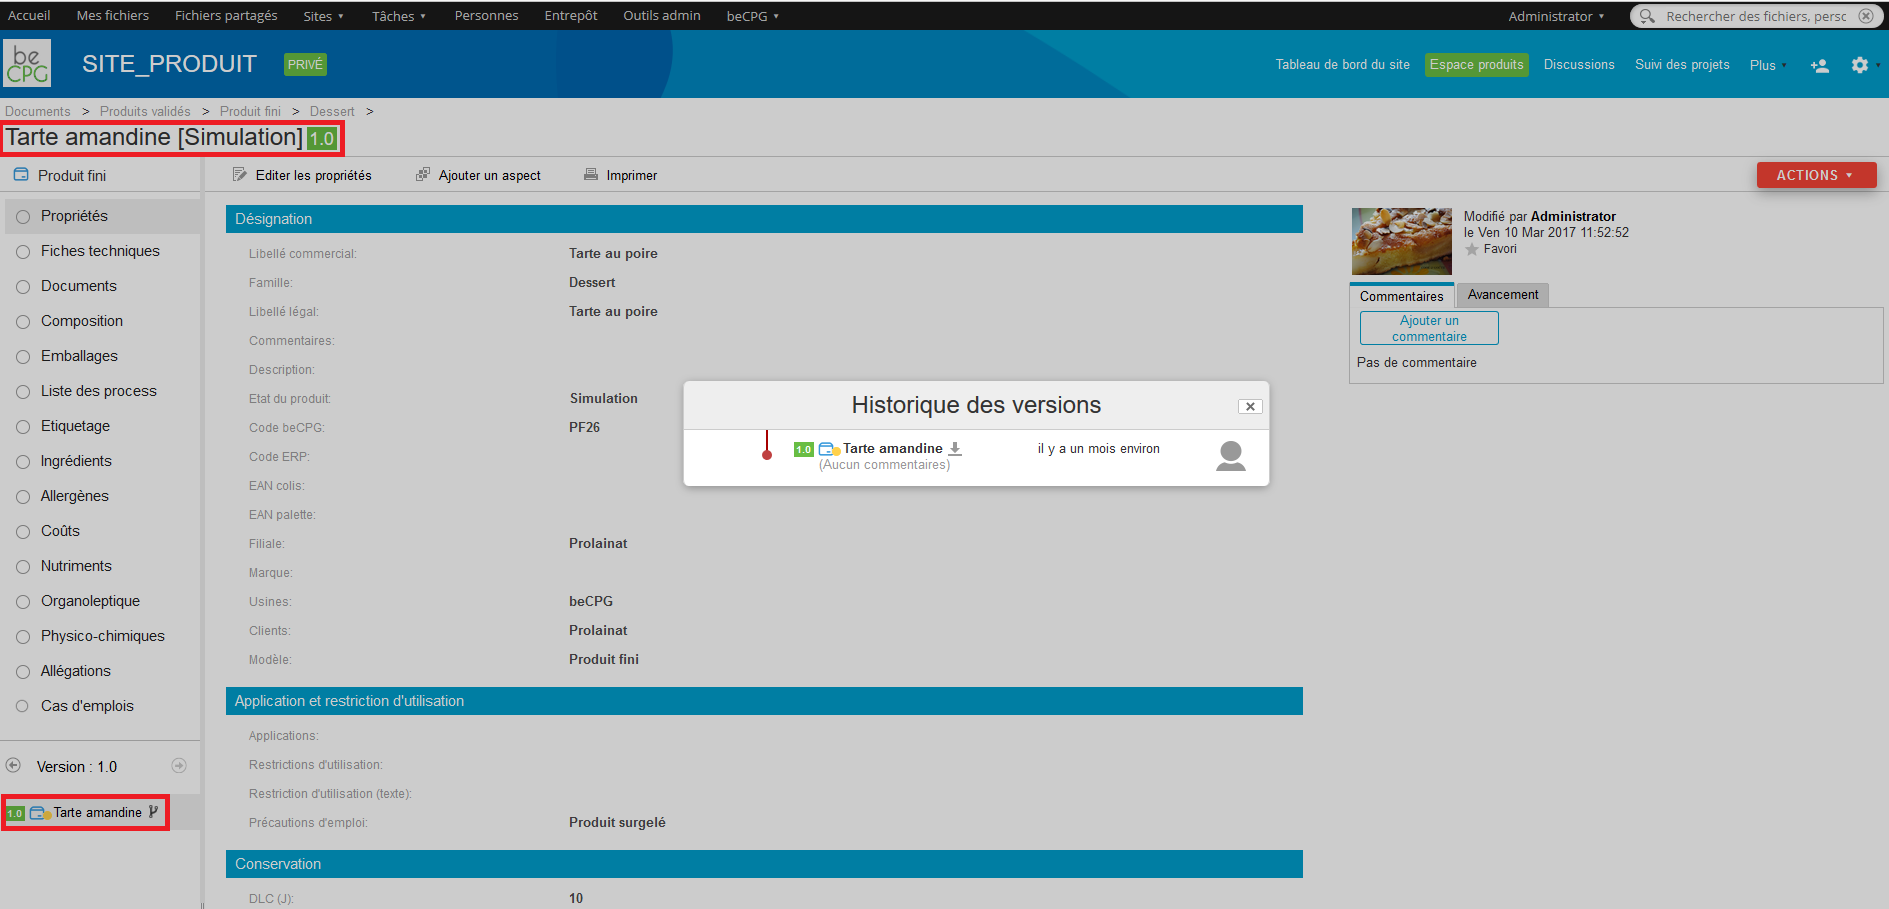
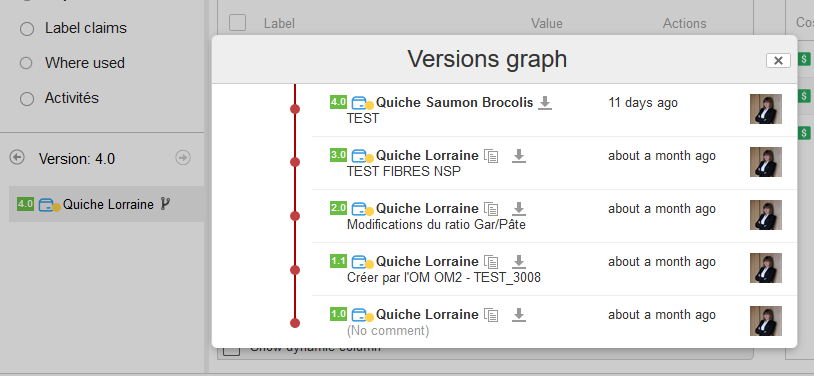
The section at the bottom left of the screen allows the navigation within the different versions of the product (by a simple click on the right and left arrows). By pressing the tree (at the right of the product's name), the versions historic is displayed. This latter displays, for each anterior version, the modification date, the reason for the modification and the person who revised the product.
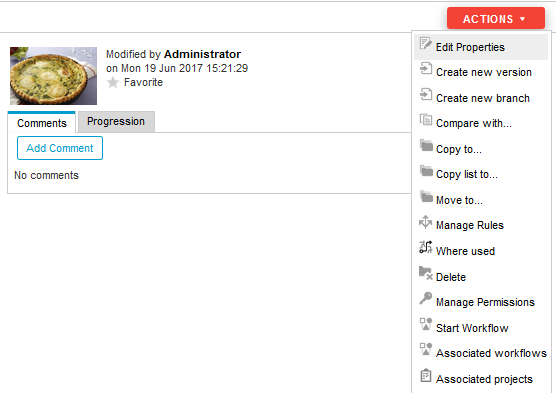
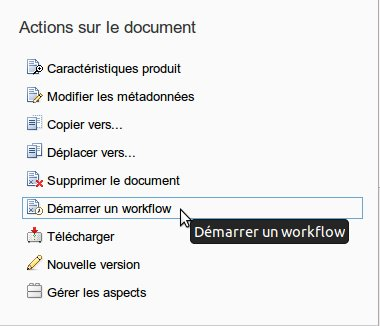
At the top left screen, an "Action" button is available. It allows:- Properties edition: the shortcut for this action is the "Edit the properties" button;
- New version;
- New branch,
- Compare with: to compare the product with, maximum, 4 others;
- Copy to: to copy/paste the product in its integrality to another place;
- Copy the list to: to copy/paste ony one list (nutrients, allergens, etc.) in another product;
- Move to: to move the product in another place;
- Manage rules: to attribute specific rules to a product;
- Where used: to consult entities using this product in their composition (the shortcut of this action is the "Where used" list);
- Delete entity;
- Manage permissions: to define specific permissions on this product;
- Start a workflow;
- Associated workflows: to know which are the workflows linked to this product;
- Associated projects: to know which are the projects linked to this product.

Creating a Product
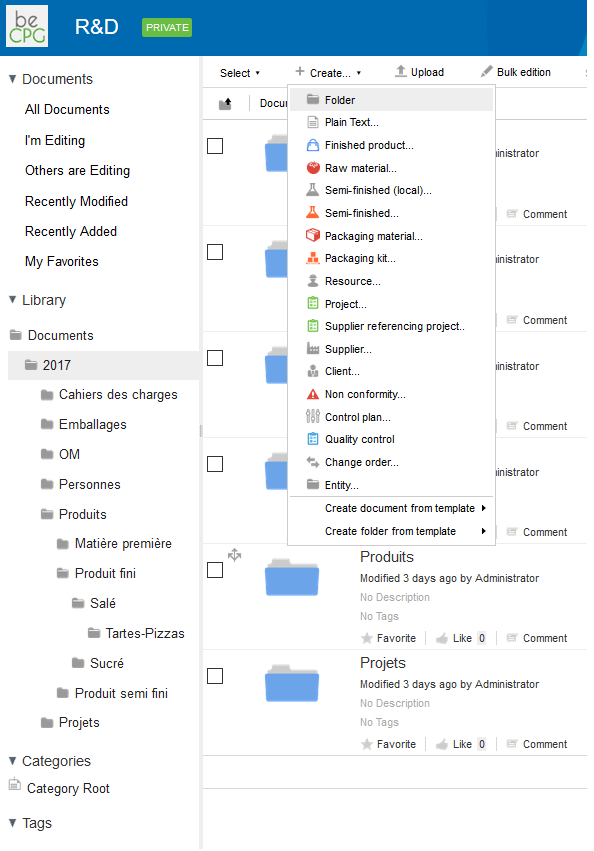
The creation of a product is via the "Create Content" button available when displaying the contents of a directory. Before creating a product, it must be placed in the directory where you want the product to be stored.Several product types can be created:
- Raw material: food purchased from a supplier (eg: flour, meat)
Semi finished #: unsold product consisting of semi finished raw material that has undergone an internal transformation to the business (eg pulp quiche or quiche filling, used in several finished products) - Finished product: product sold consists of raw materials, semi-finished and packaging (eg quiche)
- Packing: packaging purchased from a supplier (eg film, tray)
- Packing Kit package consists of several packages (eg tray + film)
- Semi local finish: semi finished having no components for consolidation point in a finished product. For example, a quiche lining which is used in a quiche in which the filling is made only for this quiche. In this case, no need to create a solid finish that will only be used in this quiche. We use the local semi-finished trim and raw materials are defined as local semi finished.
Versioning tool
Creating a new version of a product
It is possible to create a new version of a product via the button "New version" accessible from the consultation page of a product.
The system then created a "working copy" and states that created the copy job.

- "Ranger the new version" to store the changes
- "Cancel the new version" to return to the original version
- "View the original document" to view the original version

Comparison of a product to its previous version
It is possible to compare one product with its previous version via the button "compare" the version history, accessible in the details of a product.- The system then generates a document describing:
- The structural comparison of product composition
- Comparison "flat" metadata and product characteristics
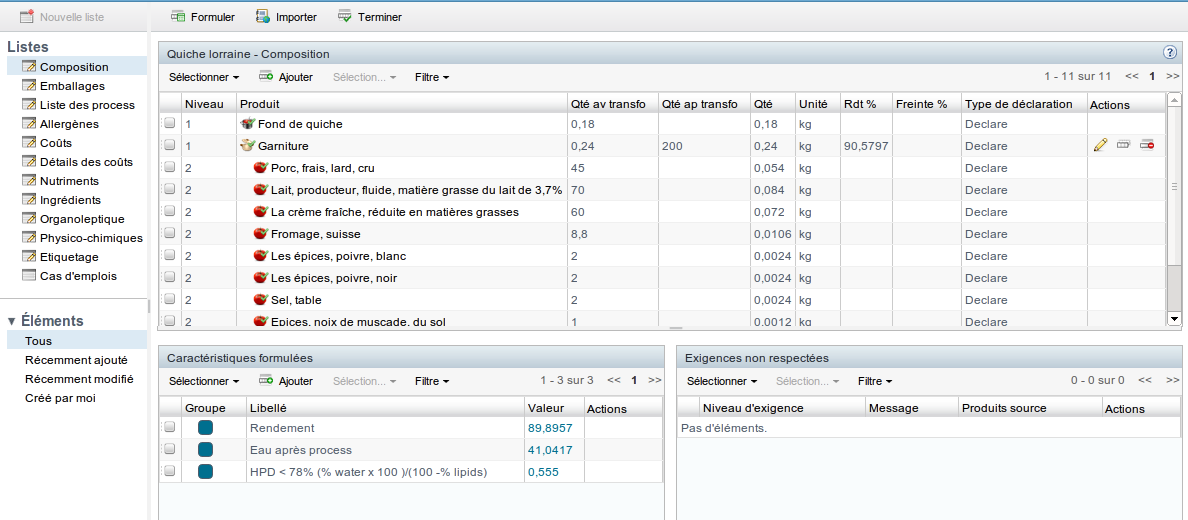
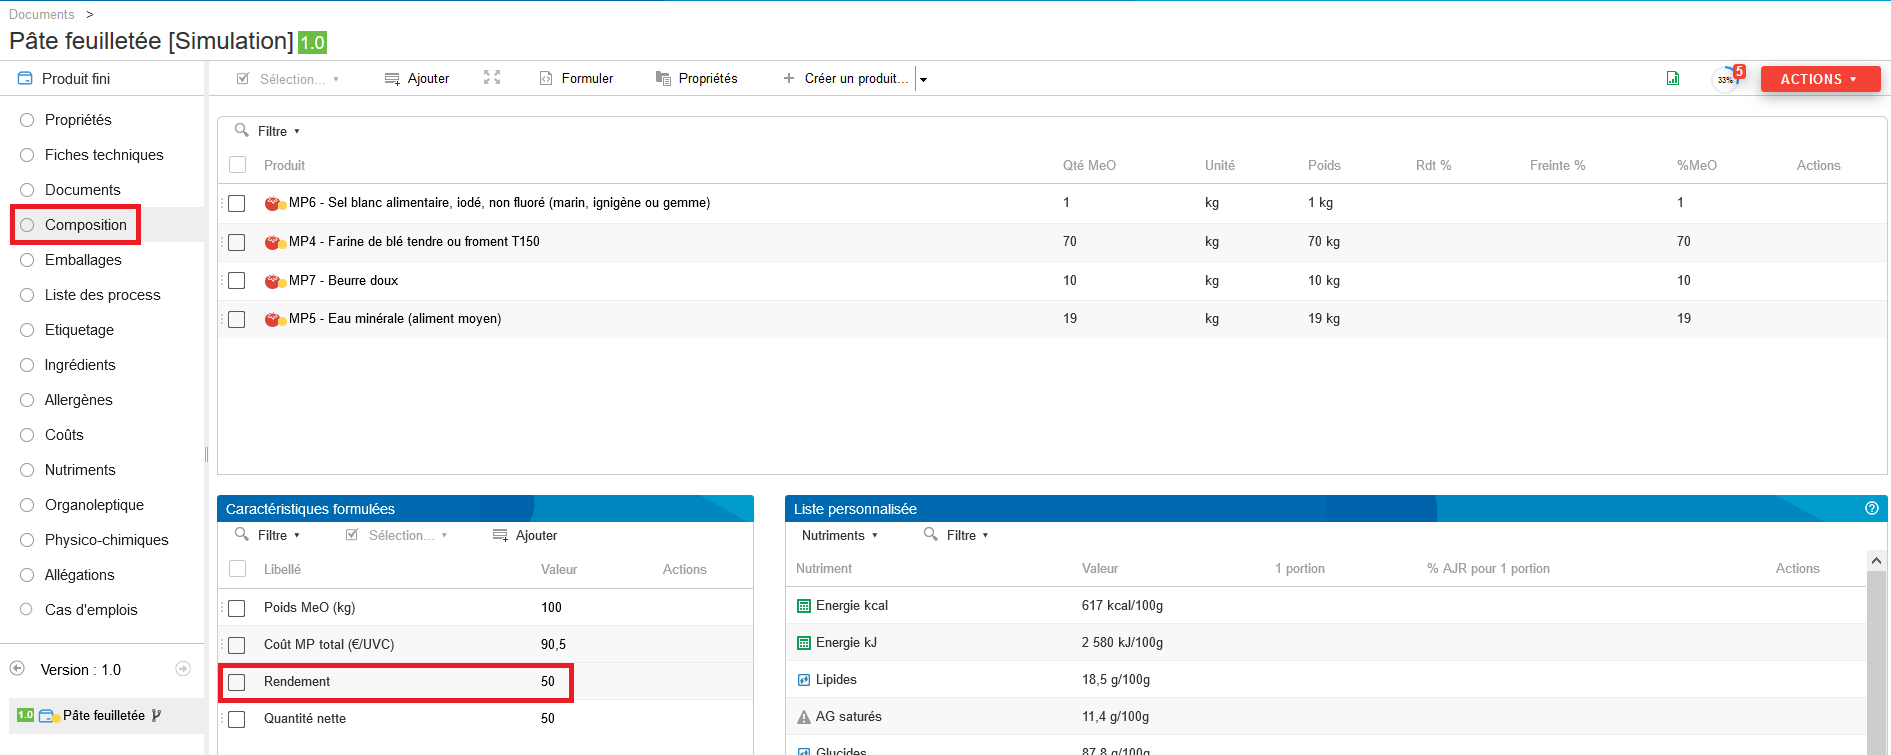
Formulation of the composition / recipe
The wording used to describe the composition of a product and calculate the product features:- Costs
- Nutrients
- Ingredients list
- Ingredient Declaration
- Allergens
- The level of product in the composition
- The components used
- The amount used in the recipe
- The implementation unit (kg, g, L, mL, P, m, m², Perc)
- The type of statement:
On the formulated product, there are 3 fields necessary for the formulation:
- Include: the component ingredients are included in the ingredients of the formulated product
- Detail: the component ingredients is listed under the same component it
- Consolidate: to consolidate the group statement (paste, trim, for example)
- Omit: the component ingredients are not included in the ingredients of the formulated product
- Do not include: the component ingredients are included in the ingredients of the formulated product but are not displayed (for example, water, sulfite)
- Quantity after processing: it is the amount of product obtained after the conversion step taking into account the performance-related losses.
- Product Unit (kg, L, P) product sales unit. It is this unity that defined the unit price (€ / kg € / L) and nutrient unit (/ 100 or / 100mL).
- Product density: the density to convert a liter or a piece of product in kg.
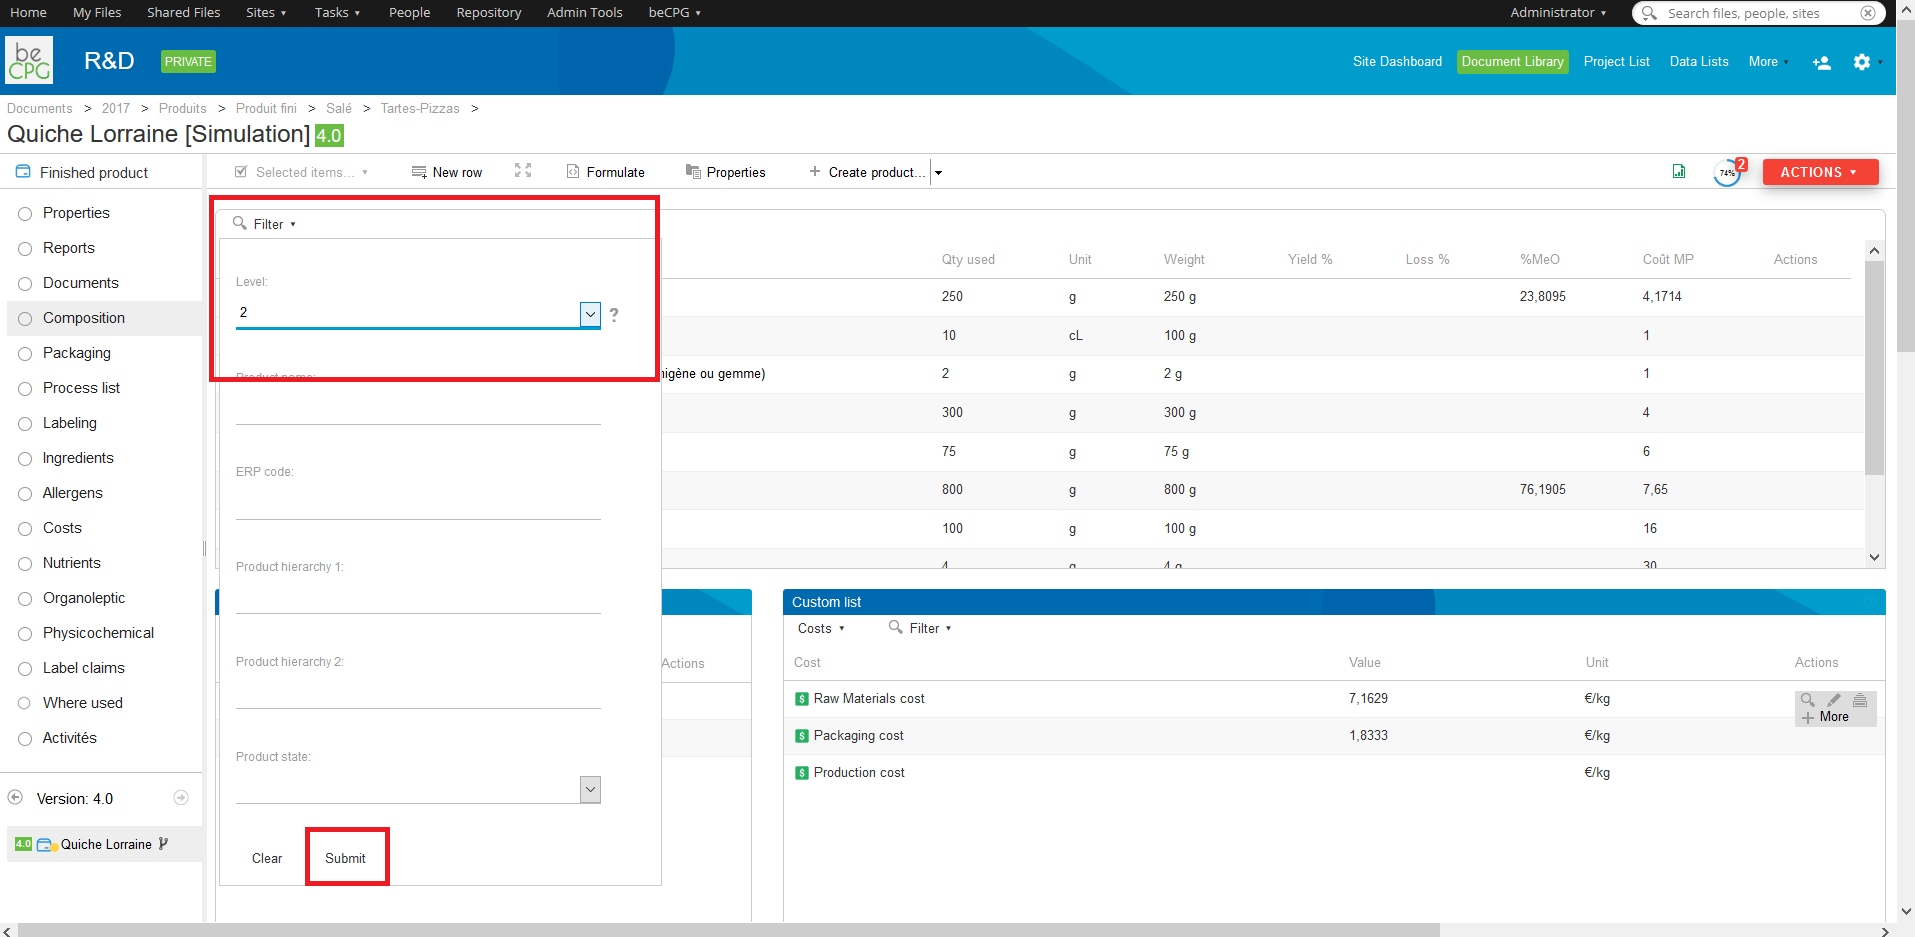
Filters and Tier 2 items
The section lists of data filter allows filter the list and also display level elements greater than 1.
Show Tier 2 items allows you to see the composition of a semifinished present in your composition.
Import raw materials from nutritional databases
beCPG provides nutritional databases CIQUAL and USDA.The import of raw materials is available from the composition of a product:
- Click the import button
- Type the letters MP 1st you want to import
- The system suggests MP
- Select the MP you want to import
- Click OK to import the MP (you can select multiple MP before importing)
- A message tells you that the products have been successfully imported
- You can add the MP to the composition
Made features
Features made simple
This allows to add features or formulas, for example:- Profit
- Yield
- HPD <78% (% Water x 100) / (100 -% lipids)
Once the product composition is set, the system calculates the characteristics of the product from the characteristics of the components when you click on the "Make" button.
Features made in columns
These characteristics also make it possible to add columns in the composition or packages (to copy, copy / paste into the notepad editor):
- MP cost (€ / kg):
dataListItemEntity.costList.size ()! = 0? New java.text.DecimalFormat ("0.00 ##") size (dataListItemEntity.costList [0] .value dataListItem.qty * / (* entity.qty entity.density)). ""
- MP cost (€ / kg):
dataListItemEntity.costList.size ()! = 0? New java.text.DecimalFormat ("0.00 ##") size (dataListItemEntity.costList [0] .value * dataListItem.qty). ""
Ech * Quantity (kg)
New java.text.DecimalFormat ("0.00 ##"). Format (* dataListItem.qty entity.compoListView.dynamicCharactList.? [title == 'Nb Ech'] [0] .value)
- Cost Emb (€ / kg)
dataListItemEntity.costList.size ()! = 0? New java.text.DecimalFormat ("0.00 ##") size (dataListItemEntity.costList [0] .value * (dataListItem.packagingListUnit.toString () == "PP" 1 / dataListItem.qty.? dataListItem.qty) / (entity.qty entity.density *)): ""
- Cost Emb (€ / UVC)
dataListItemEntity.costList.size ()! = 0? New java.text.DecimalFormat ("0.00 ##") size (dataListItemEntity.costList [0] .value * (dataListItem.packagingListUnit.toString () == "PP" 1 / dataListItem.qty: dataListItem.qty)). ""
So there are 2 types of dynamic characteristics:
- 1 characteristic value
- Type characteristics Column (to add columns in the composition)
- Entity: Air formulated product
- DataListItemEntity: access to the component and its donnnées lists (eg dataListItemEntity.costList provides access to component costs
- DataListItem: access to the element of the composite list (Composition, Packaging)
In this mode the sum (RANGE FORM) and avg (RANGE FORM) are available:
  sum (children (DataListItem) "entity.costList [0] .value + dataListItem.qty")
 or sum (entity.compoListView.compoList.? [Parent == # root.dataListItem] "entity.costList [0] .value + dataListItem.qty")
More information about the language spel:
http://docs.spring.io/spring/docs/3.2.x/spring-framework-reference/html/expressions.html
Format of results
By default, the system displays 4 significant digits.It is possible to specify the format of the results, below are some examples:
- New java.text.DecimalFormat ("0.00 ##"). Size (1.22222222) display 1.2222
- New java.text.DecimalFormat ("0.00 ##"). Size (1.2200) will show 1.22
- New java.text.DecimalFormat ("0.0000"). Size (1.2200) 1.2200 display
On this page you will find more information about the possible formats:
http://docs.oracle.com/javase/tutorial/i18n/format/decimalFormat.html
Packaging
Packaging levels
Products' packagings are organized into 3 levels, defined by Wikipedia as:
Primary packaging
This type of packaging is generally identified as the consumer sales unit (CSU), which means the smallest quantity offered to the consumer. It can be the consumer sales unit directly, but in most cases, it refers to a consumer units reunification into a commercial lot (-_Example : a carboard pack filled with 12 natural yogurt?. This packaging wraps the minimal products quantity which a client can buy : it will be removed by the final consumer.
According to the 94/62/CE directive « Packaging and packaging wastes » : « The primary packaging is the packaging conceived to form, on the ales outlet, a sales unit for the final user or the consumer ».
Secondary packaging
The secondary packaging gathers intermediary grouping of CSU which should be easily handling and movable to the store shelves by distributors or sales outlet operators (_Example : American box?. This packaging is studied to facilitate the layout and the recycling done by the distributor.
The most common secondary packaging :
- Carton packs with easy opening or opening with flaps ;
- Boxes or flow-packs allowing the gathering during promotions.
According to the 94/62/CE directive « Packaging and packaging wastes » : « The secondary packaging is the packaging designed to constitute, at the sales outlet, a group with a great number of CSU » .
- Whether it is sold unaltered to the final user or the consumer ;
- Whether it only helps to fill the sales outlet displays,
It must be removed from the product without having its characteristics altered ».
Tertiary packaging
It corresponds to logistics handling variants packaging : these ones allow the transportation of a huge quantity of products to stores or to the industrial. It can be complete pallets from a single reference, of « variegated » pallets (comprising a determined range), and their accessories (films, identification labeling, shrouds, angle iron, etc).
The most common tertiary packaging :
- transportation boxes (American box) ;
- pallets ;
- retractable films ; logistics labels, etc.
Packaging formulation
The packaging formulation allows the calculation of :
- The cost linked to the packagings ;
- Tares, net weights and gross weights by packaging level ;
- Dimensions by packaging level ;
Simple packagings
To add simple packagings to a product, there are two possibilities :
- Go to the product « Packaging » section and click on the arrow situated at the right of « Create a new product », then, choose « Packaging ». Fill out the name of the packaging (mandatory field) as well as its description, its unit and click on « Save ».
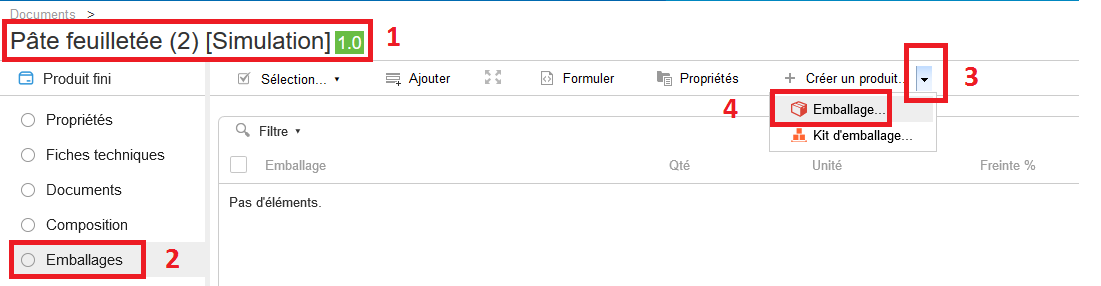

- Go to the product « Packaging » section and click on « Add » which allows you to select a pre recorded packaging (according to the step previously described).

In both cases :
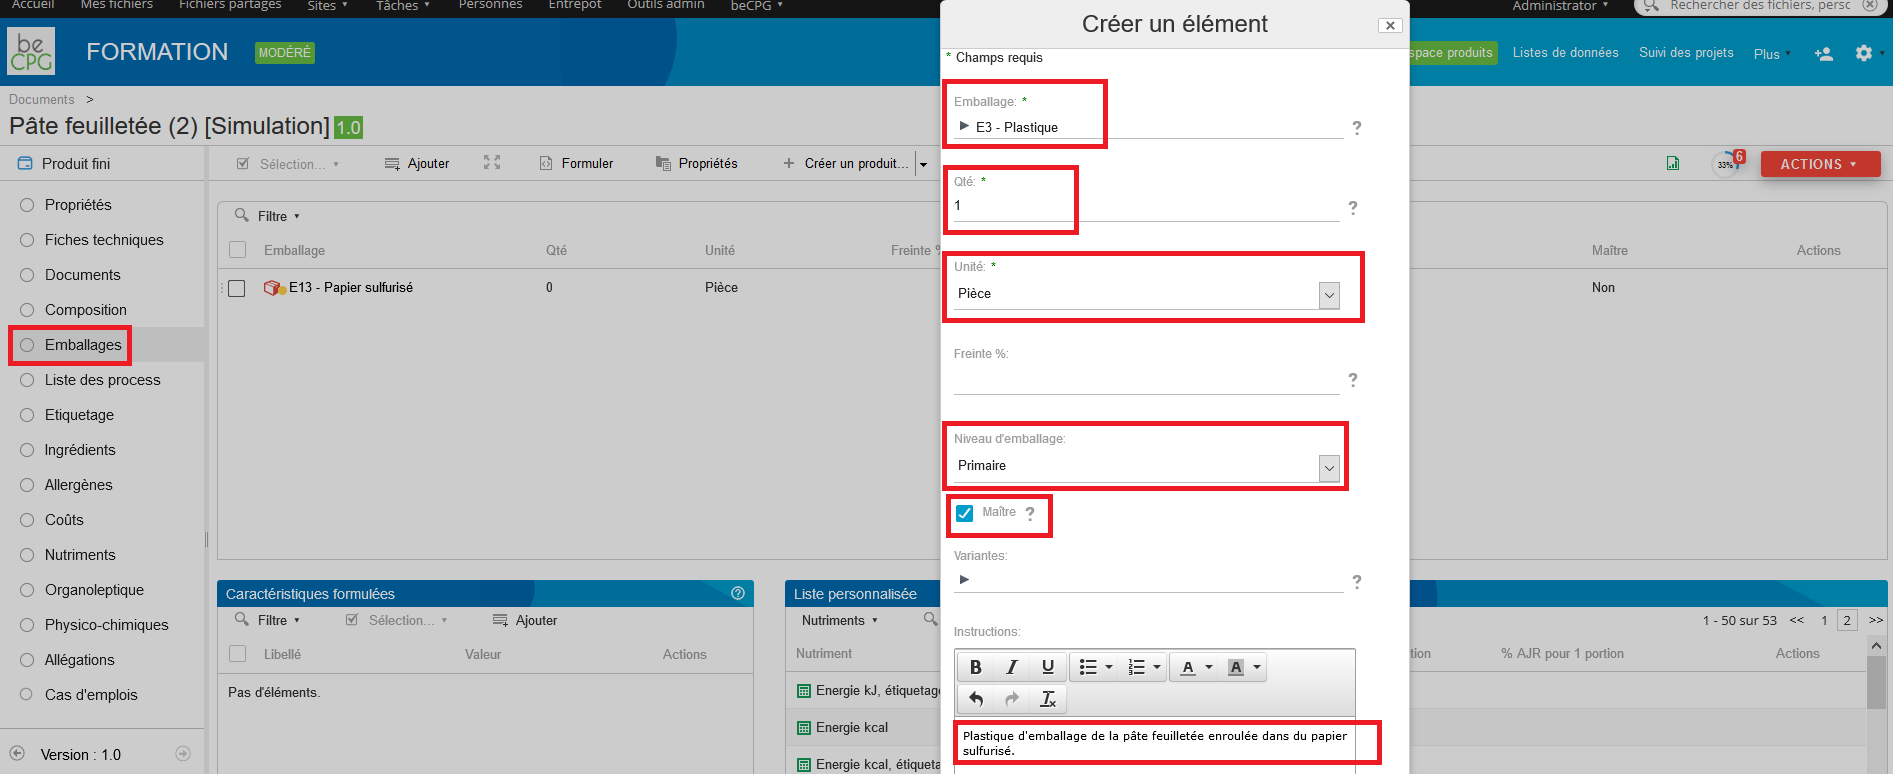
- Click on the « Quantity » field to fill the packaging quantities foresaw by level ;

- Click on the « Unit» field to choose the unit corresponding to the quantity previously chosen. This unit can be of type « Each », « Product per packaging » (allowing to say that we want to put 15 CSU per package), « Meters » or again « Square meters » ;

- Click on the « Packaging level» field to choose the packaging level : primary, secondary, tertiary ;

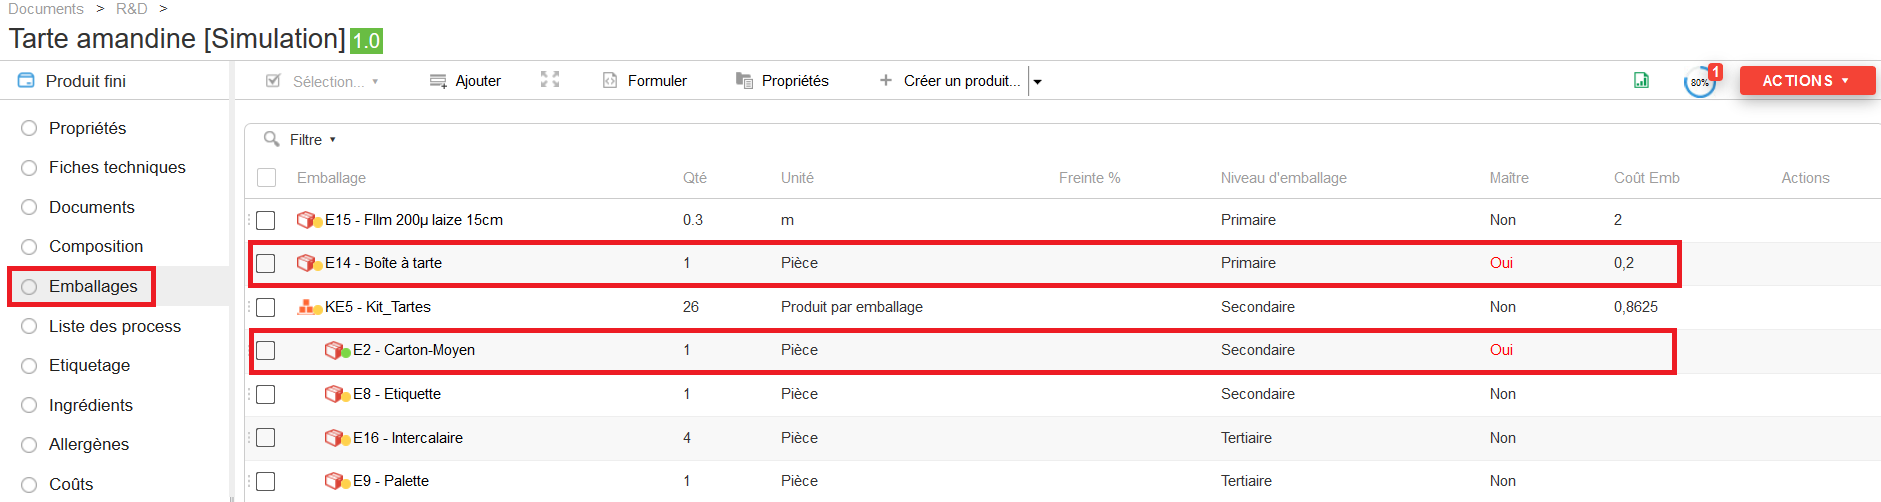
- Click on the « Master » field to say which packaging of the level have the biggest dimensions. It’s possible to know the dimensions of CSU of the primary, secondary or tertiary level. It avoids the filling of each packaging’s dimensions because we only consider the dimensions of the master product of each level.
In the case in which the UVC’s dimensions are bigger than the packaging’s ones (exampke : chicken), it is necessary to add the aspect « Dimensions on the finished product » and fill the fields « Lenght/Width/Height ».

Then, it’s possible to navigate each entity (packaging) by simply clicking on it.

Thus, we access the properties and the different lists of the packaging.

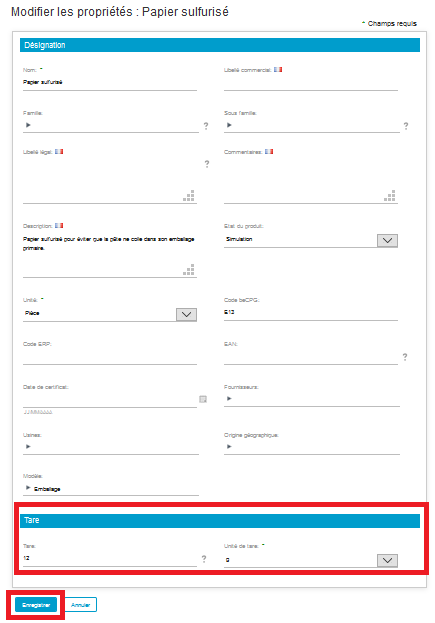
By clicking on « Properties » and « Edit the properties », you can find, at the
bottom of the page, the « Tare » field which allows the filling of the packaging weight.
By clicking on the « Costs » list, it’s possible to complete the packaging costs in the « Value » column and its unit in the « Unit » column. « N-1 » and « N+1 » fields represent the costs of the previous and next year respectively. The « Plants » field is here to complete the costs linked to the plant on the product model (example : storage cost of the plant 1).
By clicking on the « Purchase price » list, you can complete the costs linked to the purchase volumes, the year and the supplier (example : the purchasing of 100 cardboards won’t cost the same price, as the purchasing of 10 000 cardboards). In other words, this list allows to stock the price proposals made by the suppliers.
Click on « Formulate » to compute, for instance, the costs linked to the packaging which will be found in the « Costs » section of the product.
Packaging kits
The packaging kits gather a large number of primary and/or secondary and/or tertiary packaging. They are very useful in two cases :
- When packaging are common (qualitatively and quantitatively) to many products. Example : 3 packaging kits for 1000 products ;
- When the palletisation have to be mentioned. Example : pallet height, number of layers, number of cardboards per layer.
To add packaging kits to a product, there are two possibilities :
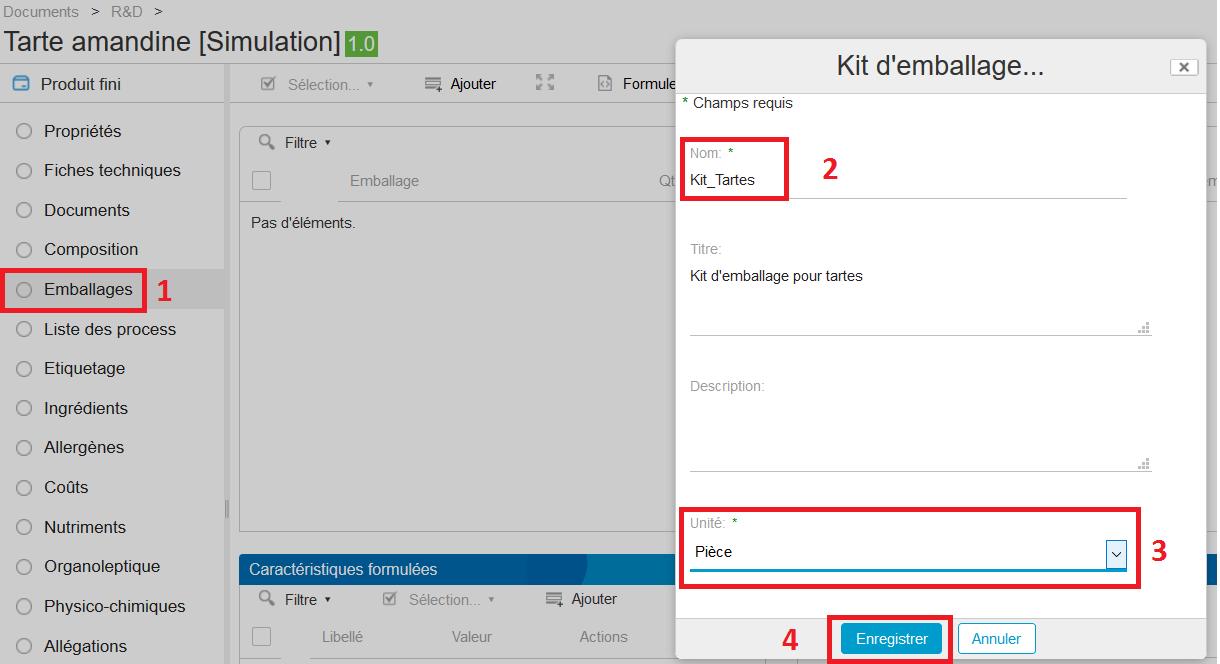
- Go to the « Packaging » section of this latter and click on the arrow at the right of « Create a product » and choose « Packaging kit ». Complete this latter’s name (mandatory field), its description, its unit and click on « Save ».
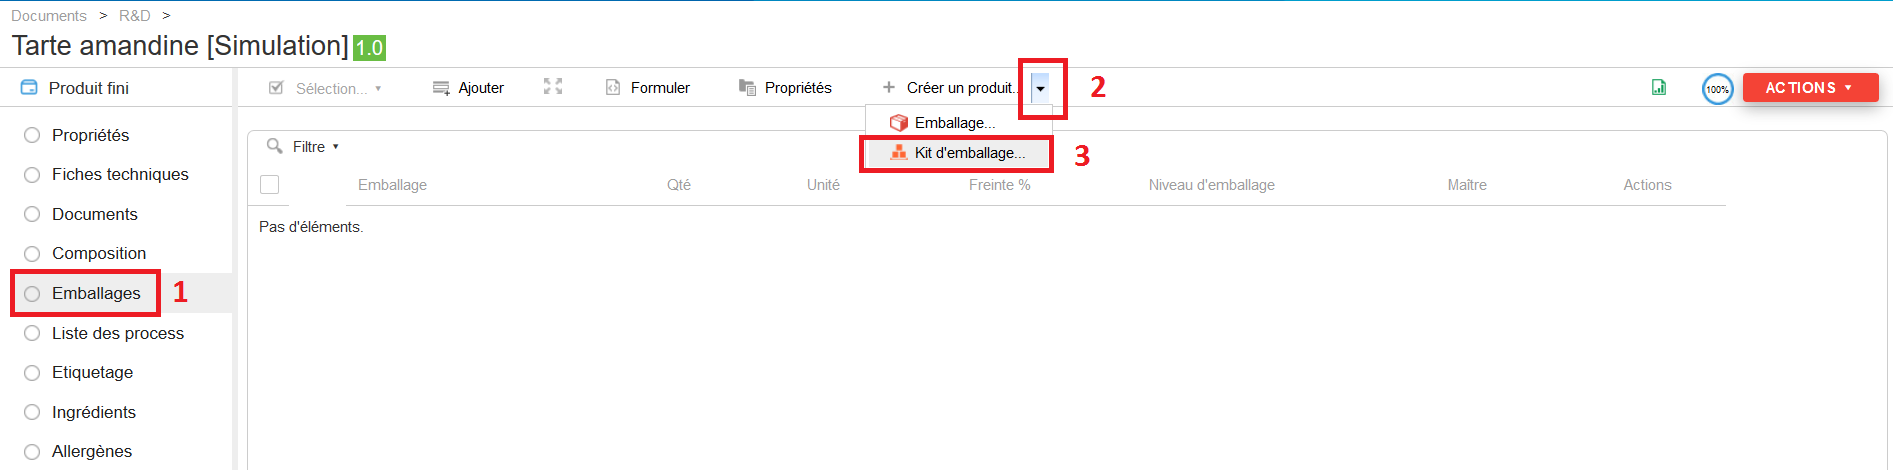
- Go to the « Packaging » section of this latter and click on « Add » which allows the selection of a packaging kit pre recorded.
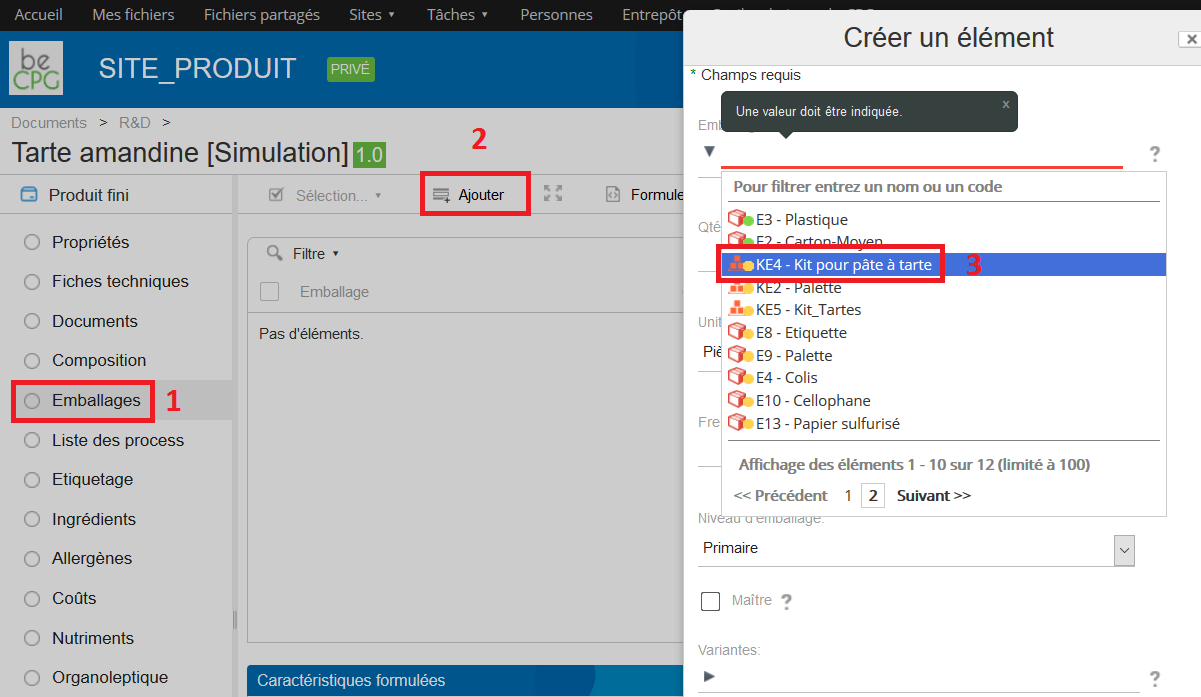
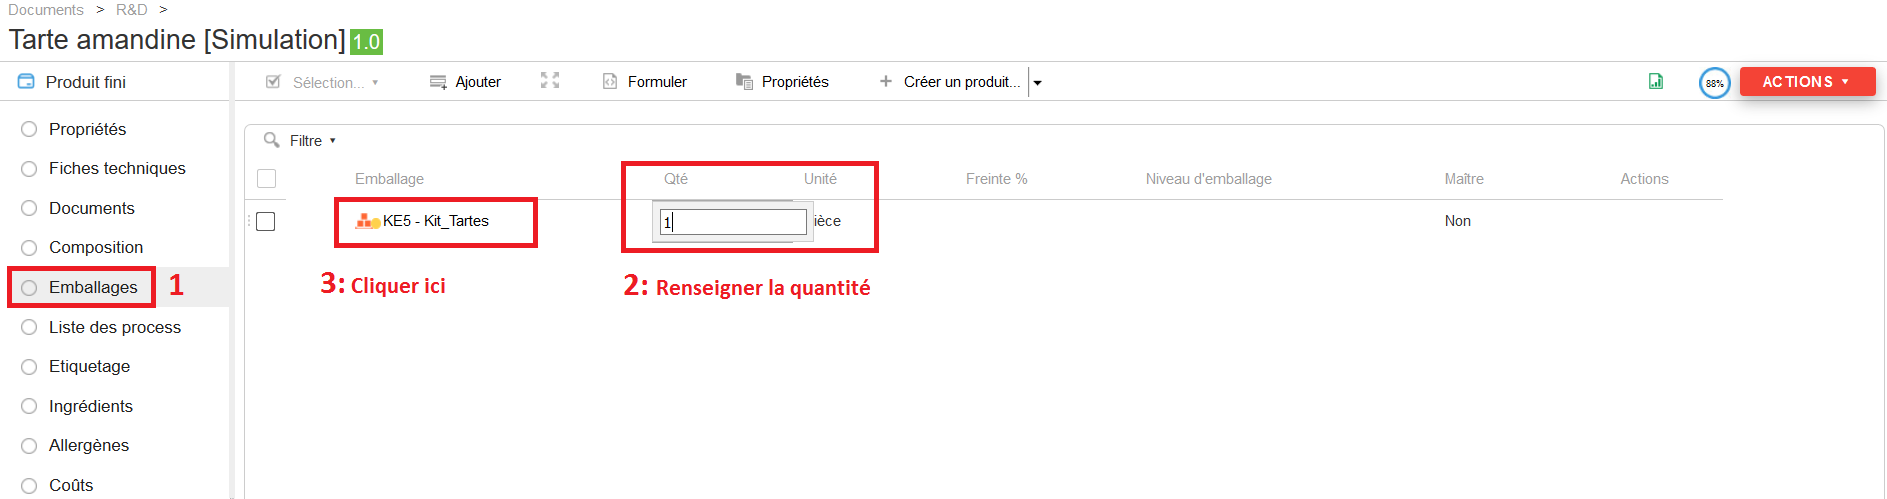
In both cases, packaging contained in the kit are added and completed in the same way of which described in the « Simple packaging » section.
« Palletisation » aspect addition
Palletisation aspect allows to specify the number of packages per pallet, the number of layers per pallet and the number of packages per layer. It can be added on the packaging kit by going to Product>Packaging>Kit>Properties and by clicking on « Add an aspect » and then by selecting « Palletisation ».
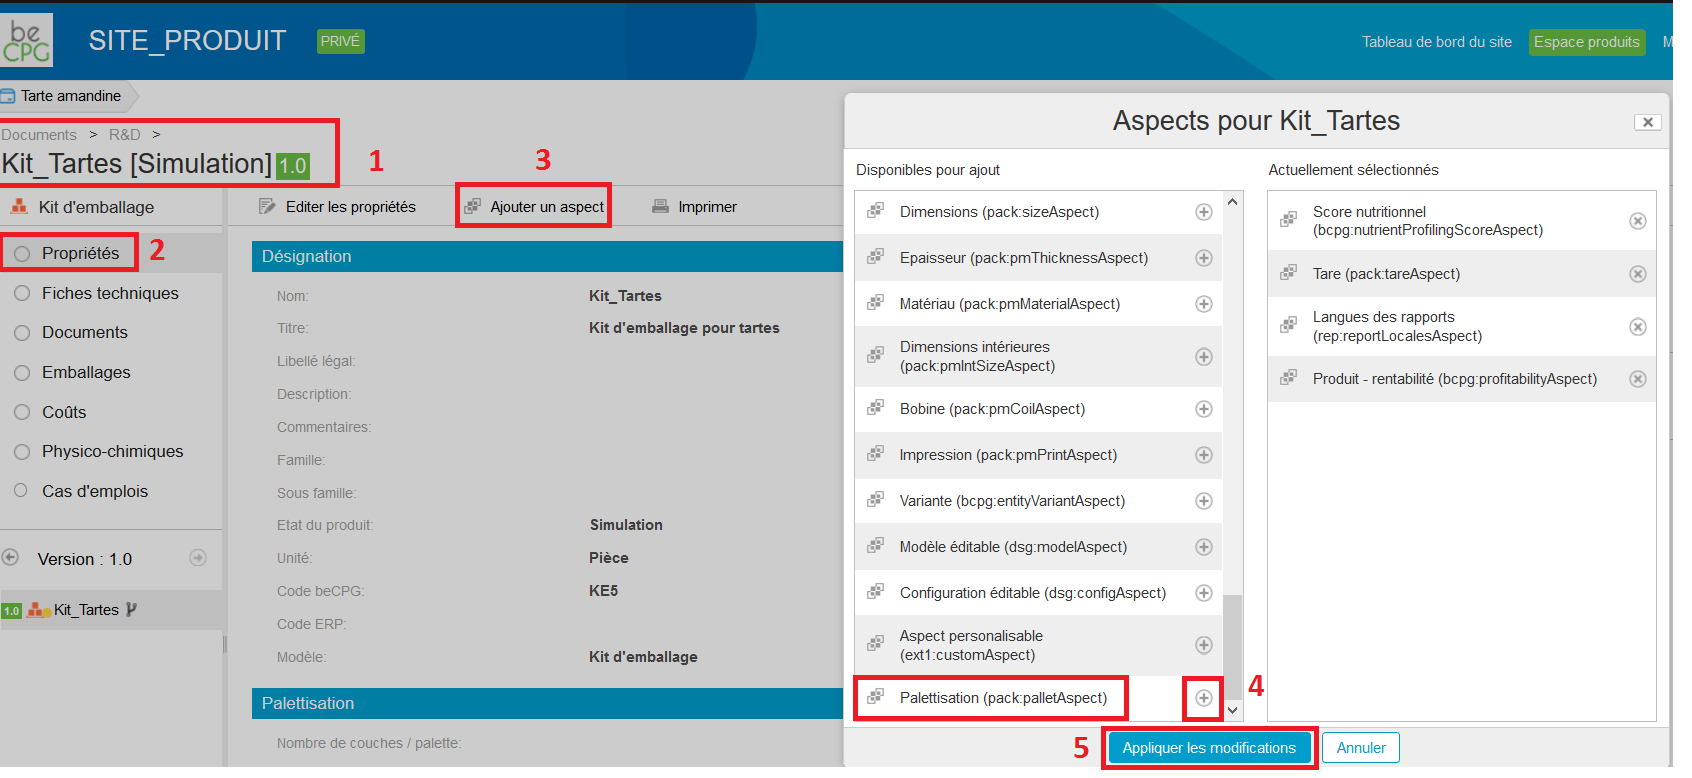
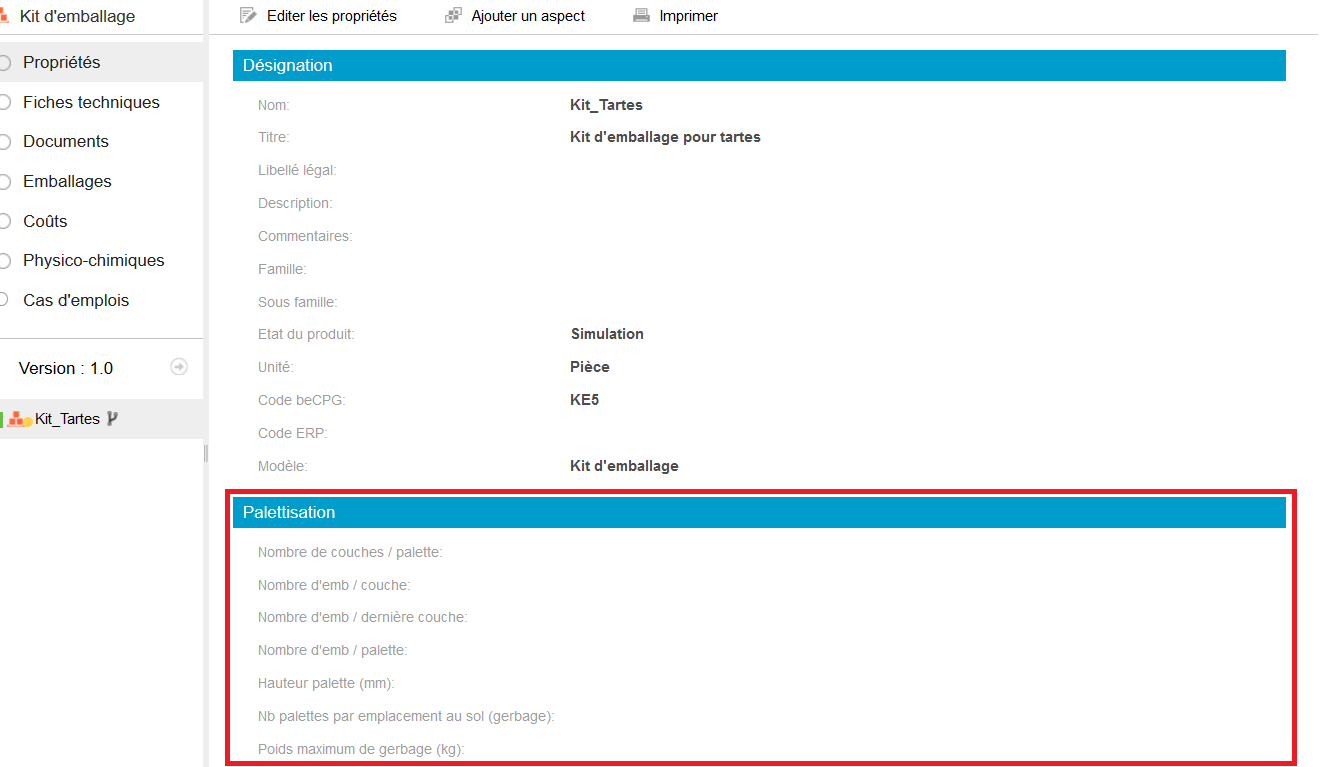
New properties are available on the palletisation kit :
To complete it, click on « Edit the properties ». Then, you have access to the kit designation data (name, description etc.).

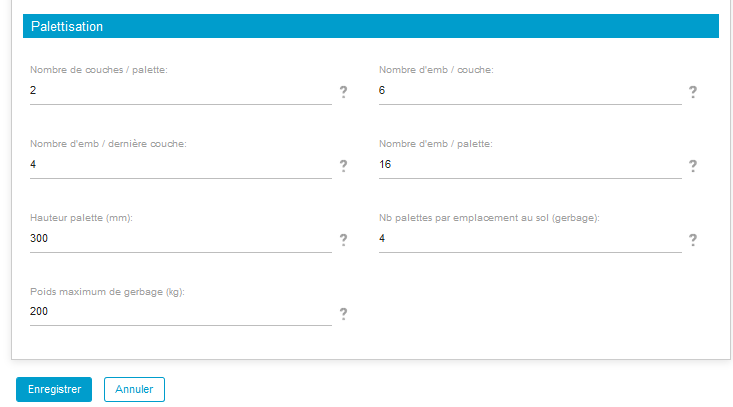
Concerning the palletisation data, you’ll have to complete :
- The number of layers per pallet: here 2 ;
- The number of packagings per layer (in a pallet) : here 6 ;
- The number of packagings in the pallet last layer : here 4 ;
- The total number of packagings per pallet : here 6*2 + 4 = 16.
Then, go to the « Packaging » list to complete the kit with its packagings (cf. Simple packagings).
Then, go back to the product « Packaging » list and click on « Formulate » to calculate the costs due to the packagings.

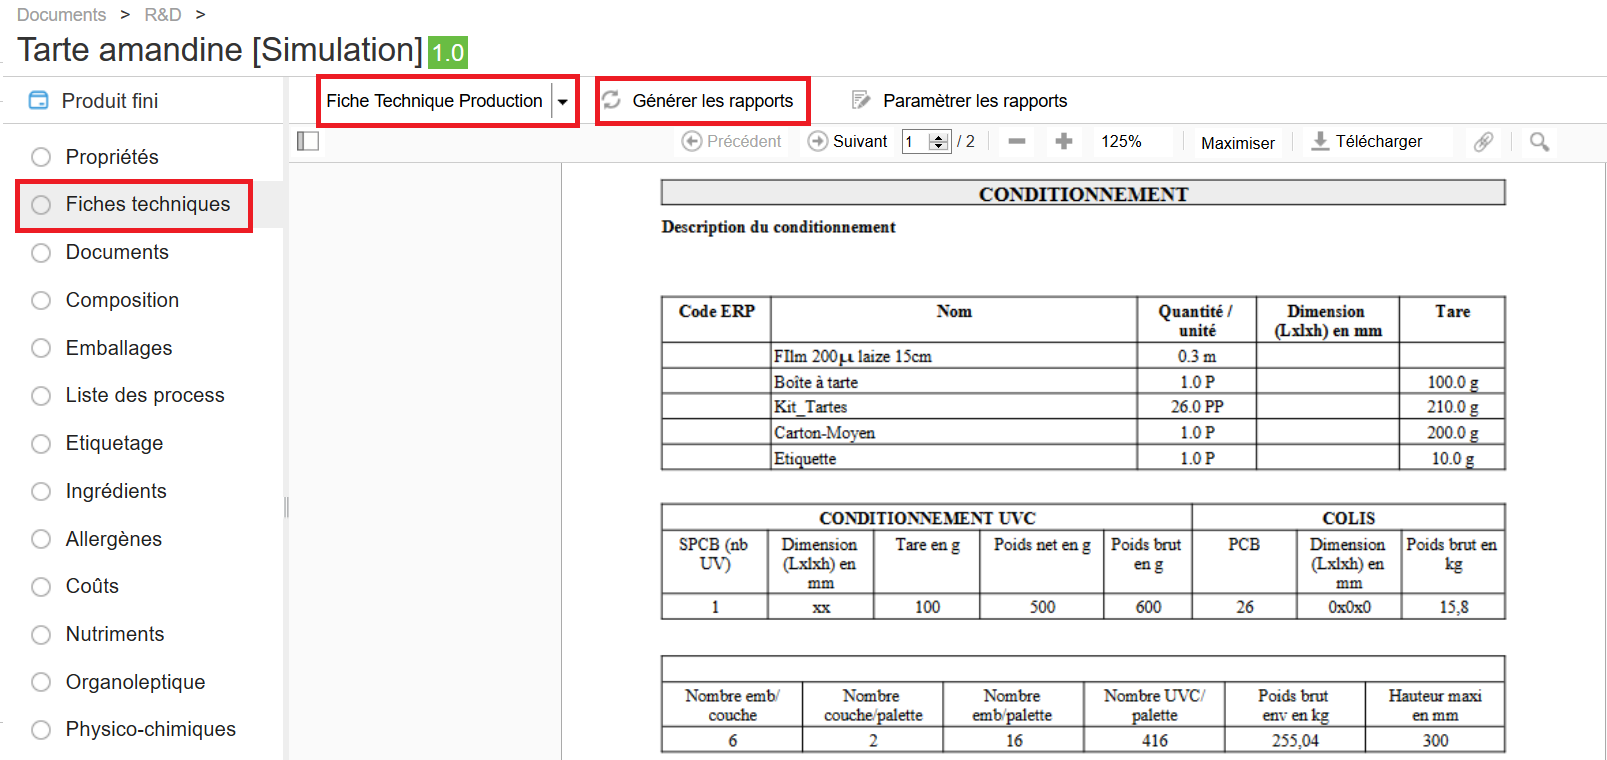
Eventually, go to the « Technical sheets » list and click on « Generate the reports » to obtain the production technical sheet on which will the packaging description will appear.
To indicate the packaging dimensions, click on each master packaging and go to its properties. Click on « Add an aspect » and choose « Dimensions ».
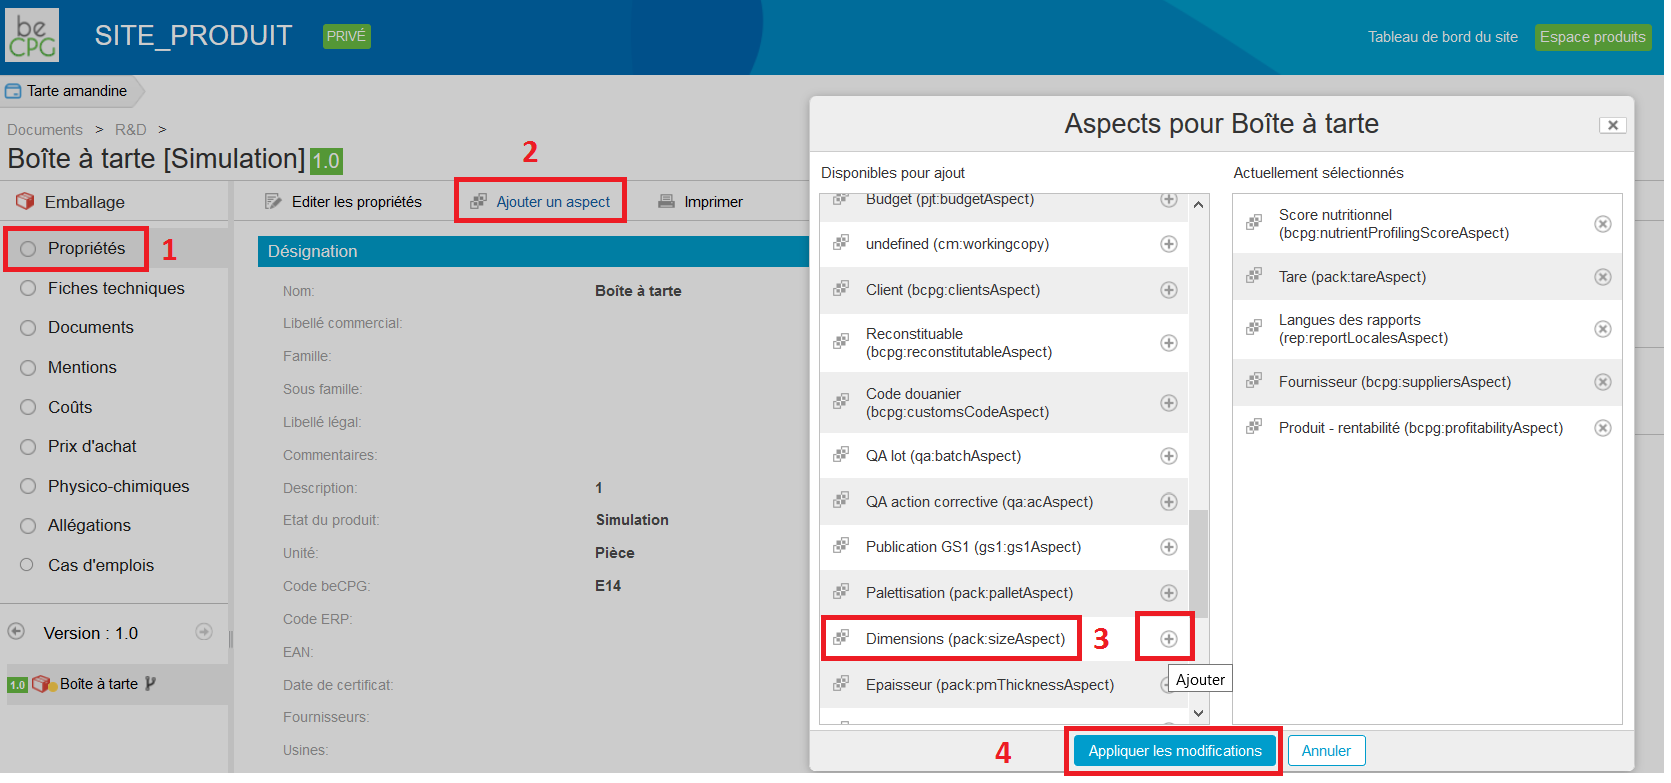
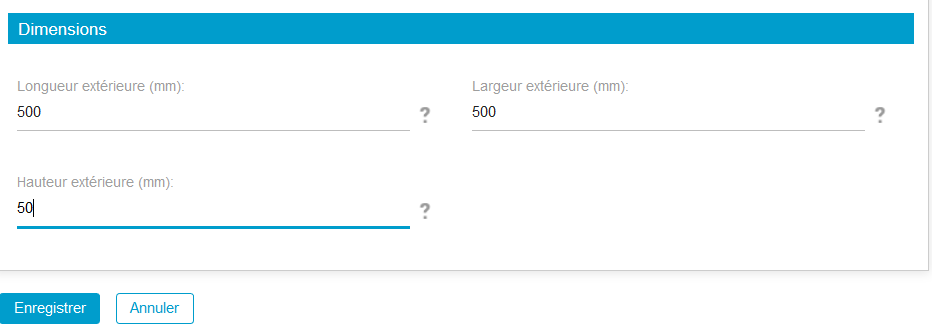
Here, it’s possible to add the dimensions (in mm) of the packaging.
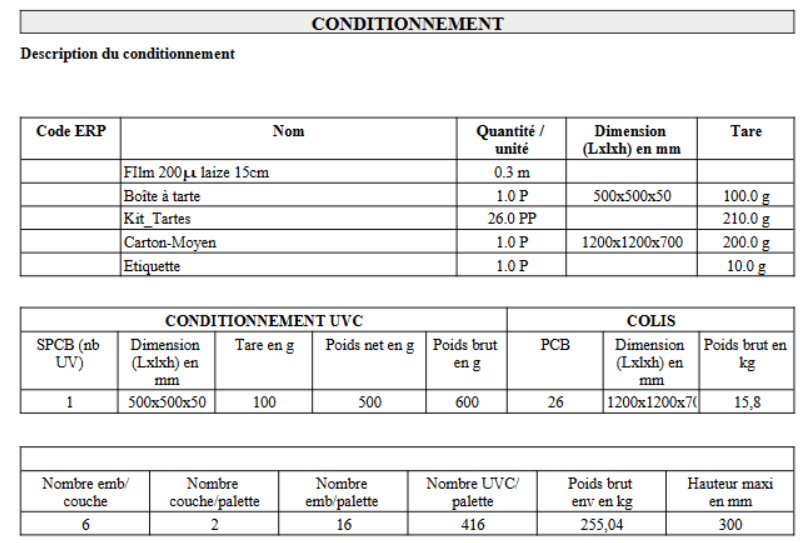
By generating the reports, we obtain :
Yields
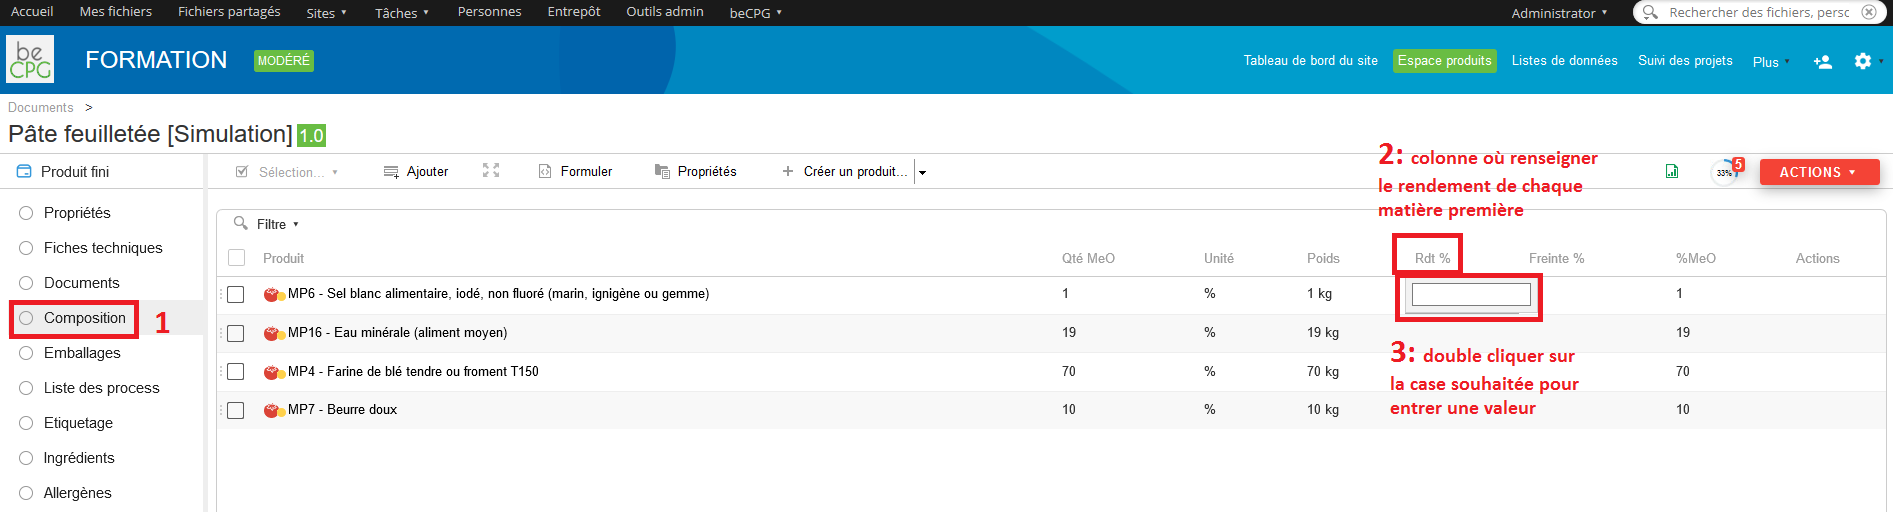
In agribusiness, the yield corresponds to the ratio between the final product net quantity and the initial product net quantity. In fact, this latter undergoes losses during its different transformation processes. Water losses during the cooking process are often the most consequent. Consequently, in the beCPG software, the yield allows the distinction between a raw product (100 % of its water content) and a cooked product (100 %- x % water lost during the cooking). When the yield is taken into account, nutritional values are being impacted. In fact, when the water content decreases, for example, its dry matter content increases.
The yield is computed thanks to the formula : 100 - [ ( Initial quantity – Final quantity) / (Initial quantity) x 100 ]
In the beCPG software, we name « Implemented quantity » the initial product quantity and « Net quantity » the final product quantity. beCPG takes the yield into account according to four ways :
- Whether by entering the yield for each raw material in the product composition :
- Whether by entering the net quantity of the final product in the « Net quantity » field (in the product properties).
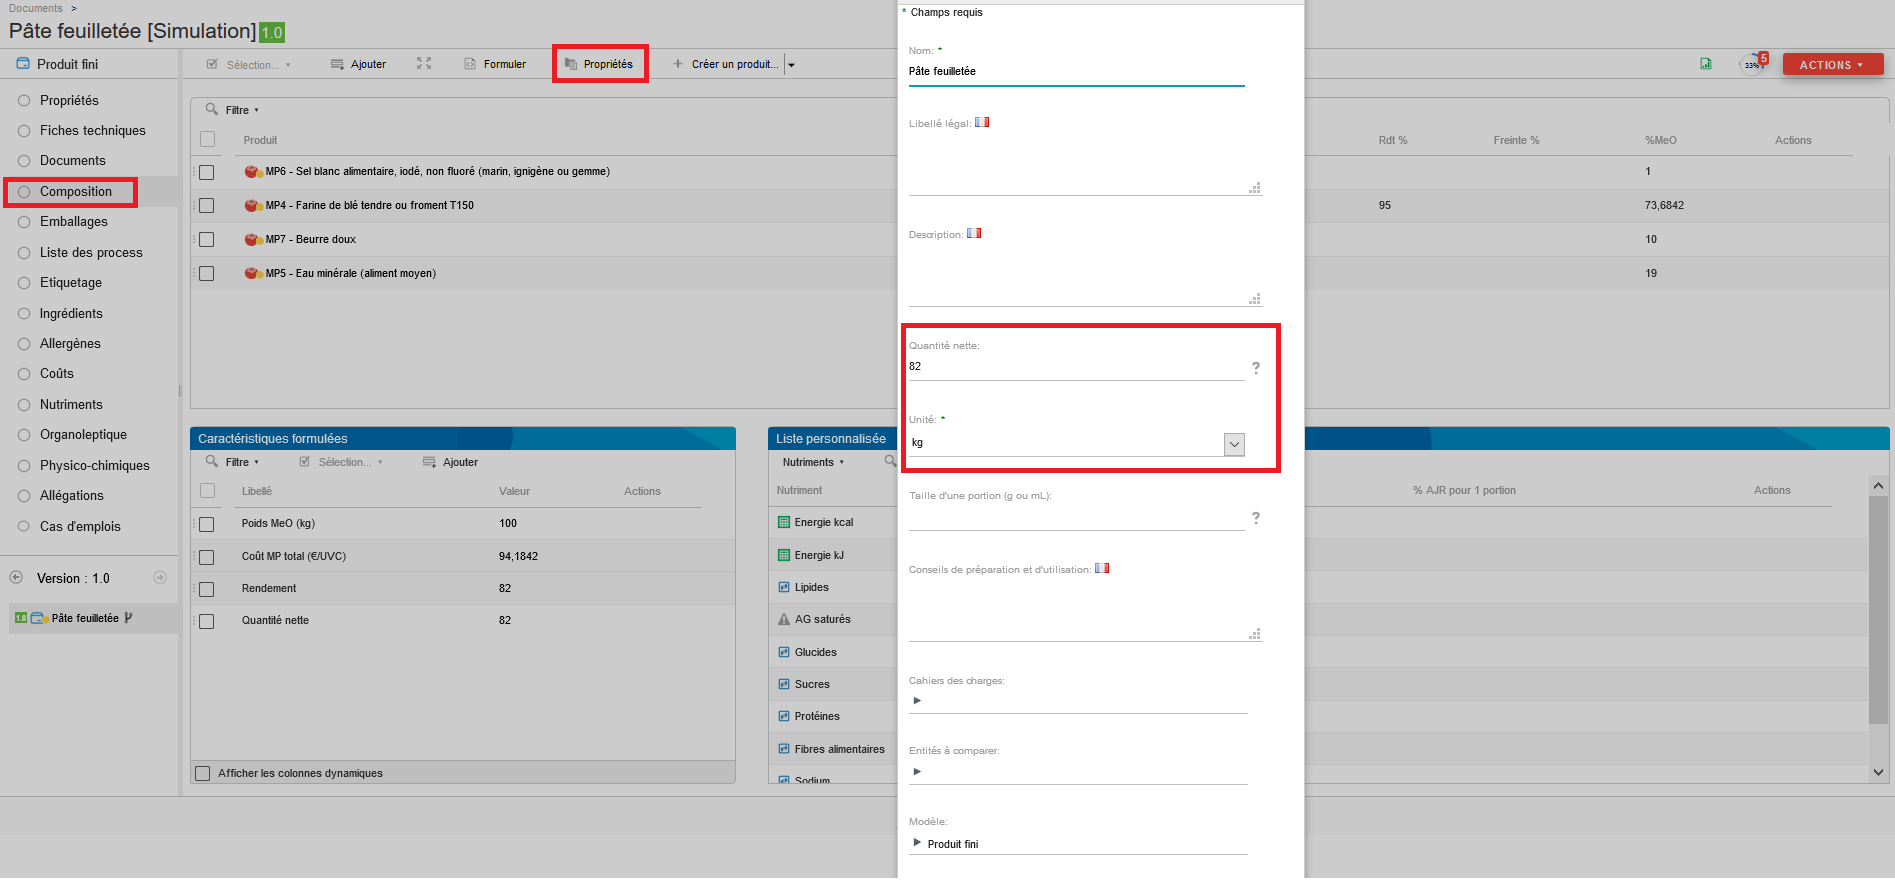
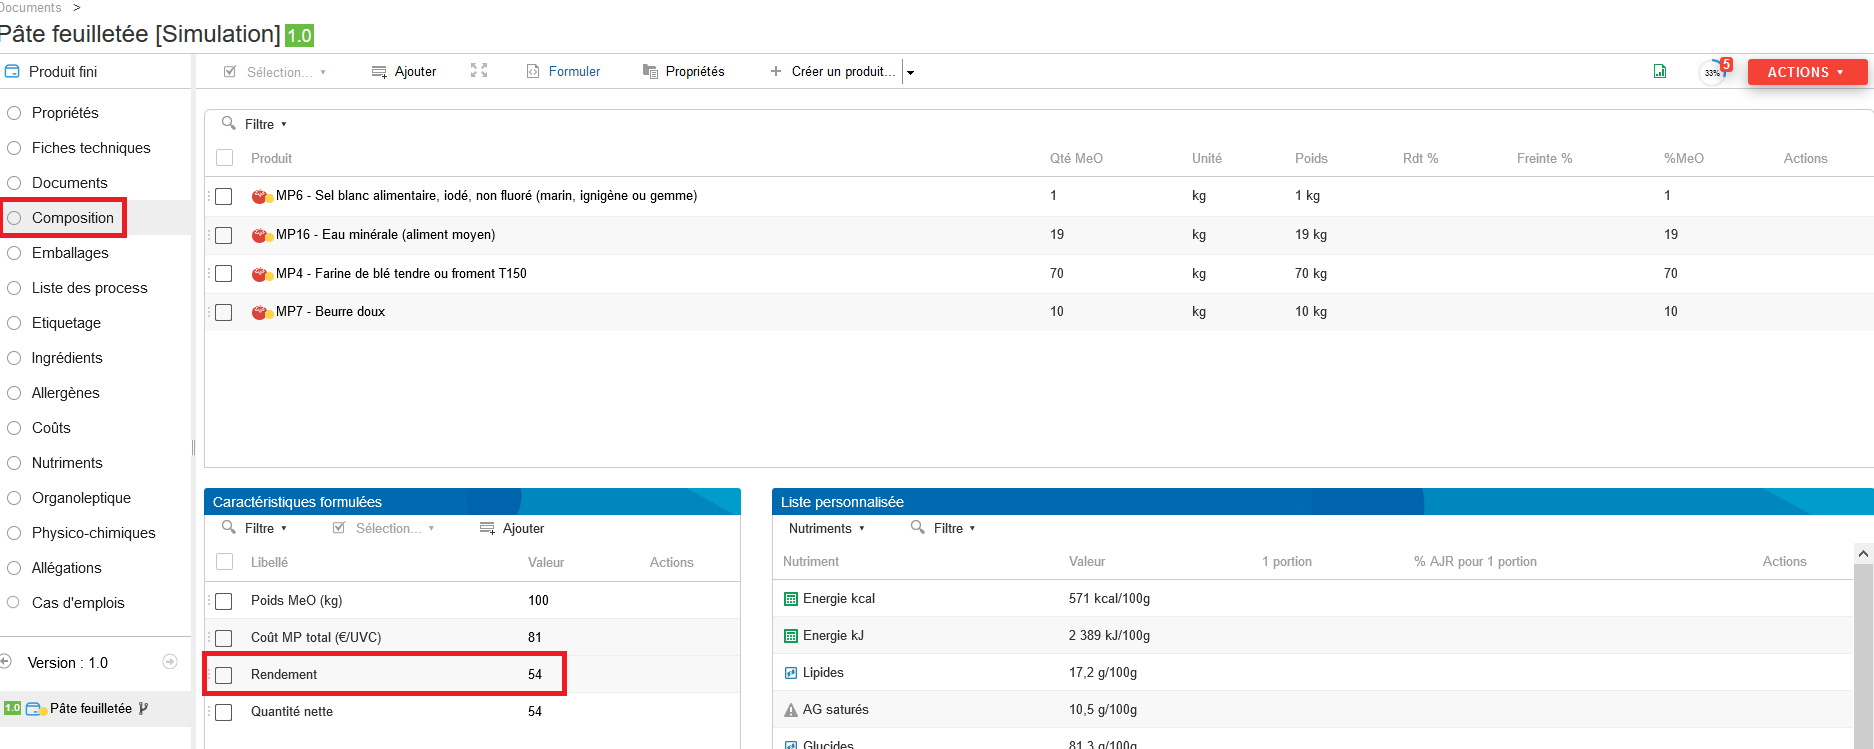
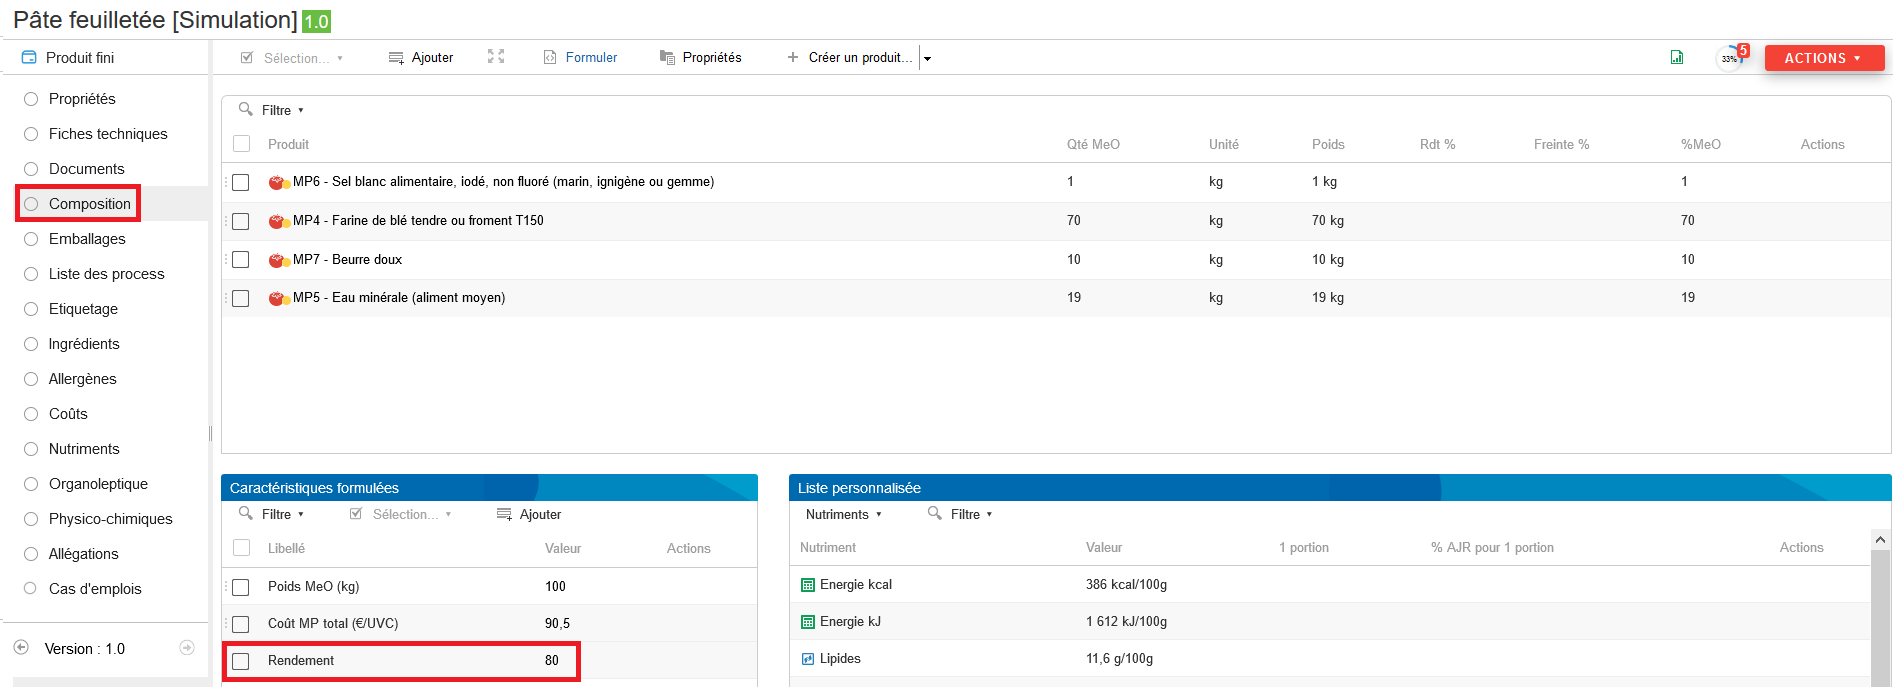
It’s possible to see the « Yield » and « Net quantity » fields in the formulated characteristics.
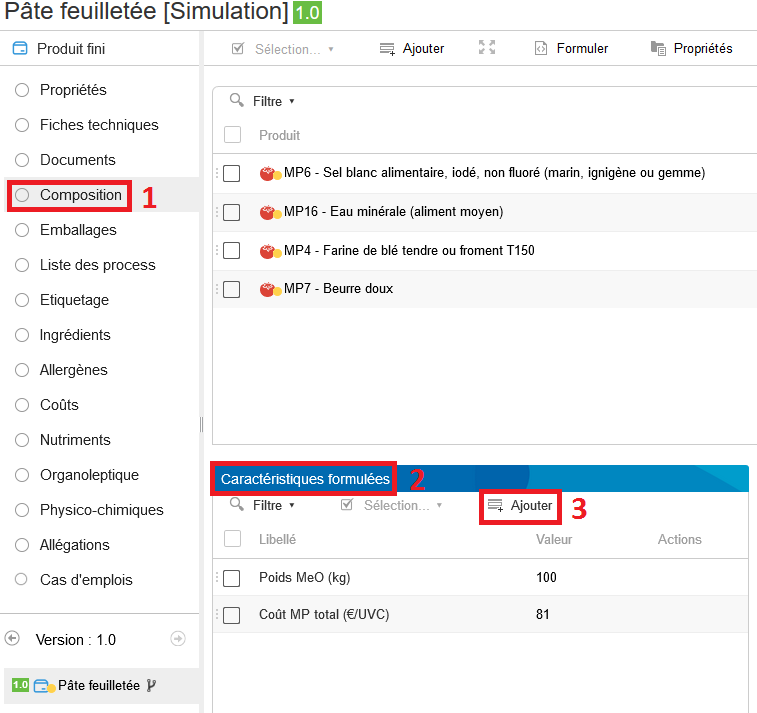
To see the net quantity, go to : Composition> Formulated characteristis> Add> Add a wording (example : « Net quantity »)> Click on « Edit » and choose « Quantity ». Click on « OK » and then on « Save ».
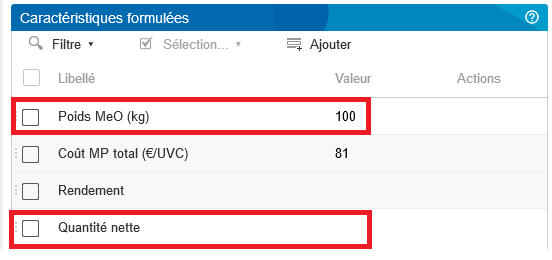
To see the final product production yield, go to : Composition> Formulated characteristics > Add > Add a wording (example : « Yield ») > Click on « Edit » and choose « Yield ». Click on « OK » and then on « Save ».

Labeling
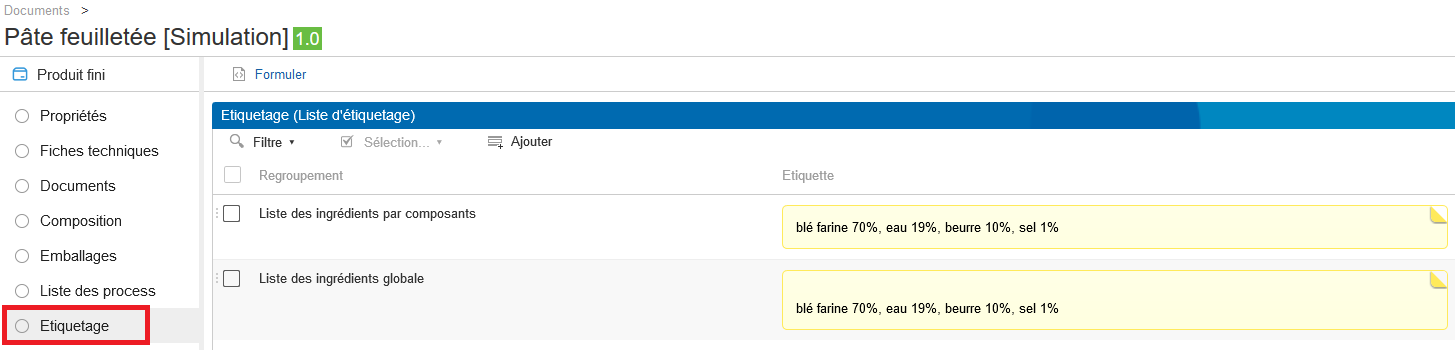
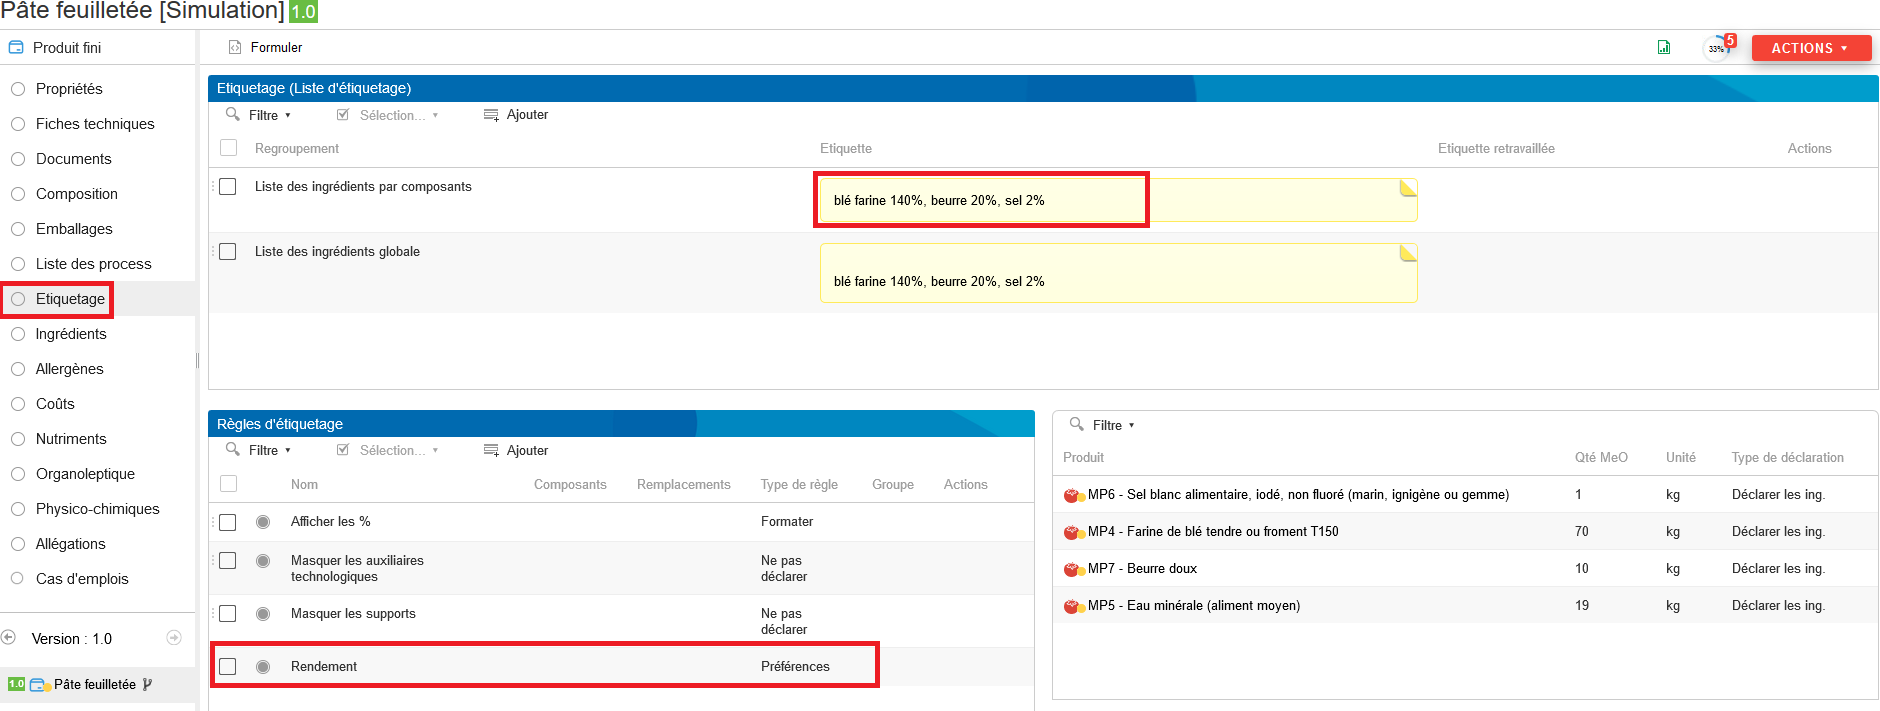
To generate the labeling of your product in one mouse click, access this latter and press the "Labeling" list in the left panel.
By pressing "Formulate", labels are generated automatically. In order to modify the labeling format, you can notably play with the declaration types.
Declaration types
From the filtering list at the right bottom, it's possible to define how raw material ingredients should be declared:
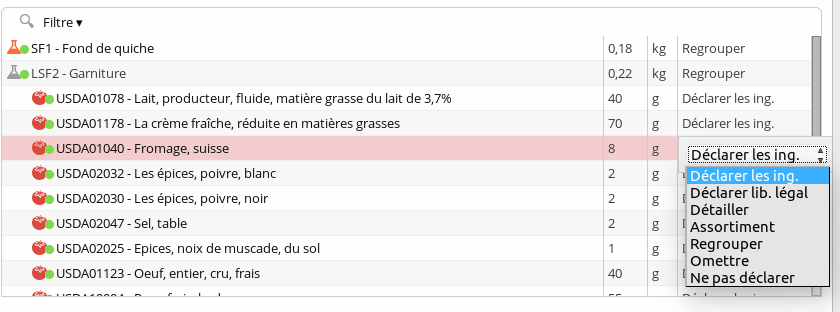
- Declare ingredients will display all the ingredients in a composant;
- Declare legal name will only display the product's legal name;
- Detail will display all the ingredients and their parents, which can lead to duplicates if the ingredient is part of a raw material and a semi finished product for example;
- Gather will display the ingredients as with the "Declare ingredients" type, as well as their quantities in the finished product si "Gather" is choosed for the component. This is useful to label a product per layers (example: garnish 50%: ing1 30%, ing 2 20%).
Labeling and yield
Labeling with or without yield
It’s possible to integrate or not the yield in the product’s labeling.
Labeling which doesn’t take into account the yield
Per default, when the formulation is done, the product labeling doesn’t take into account the yield. Thus, the ingredients percentages corresponds to the implemented percentages in the raw product.
Composition of the raw product :
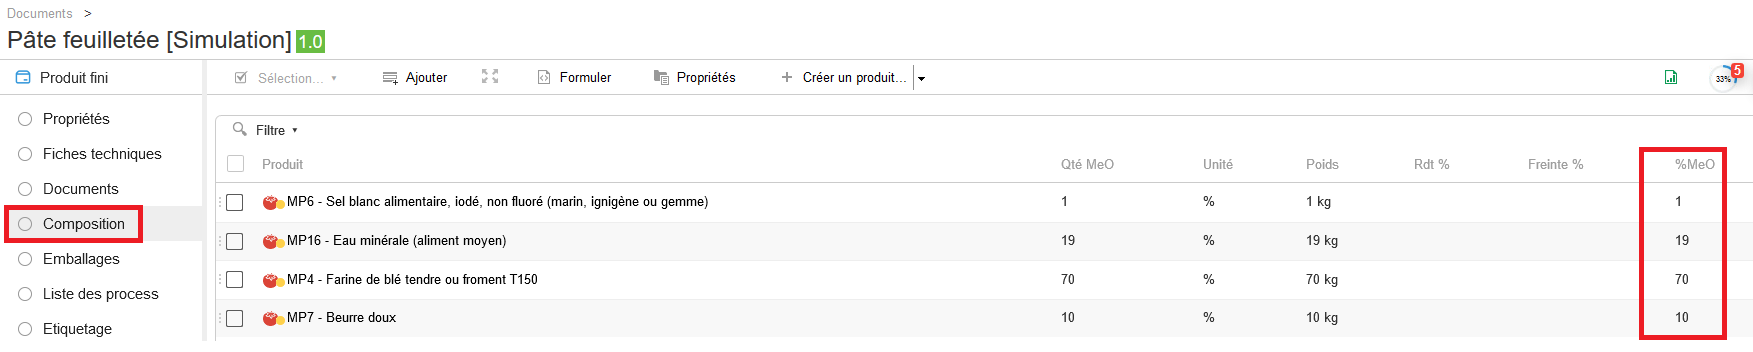
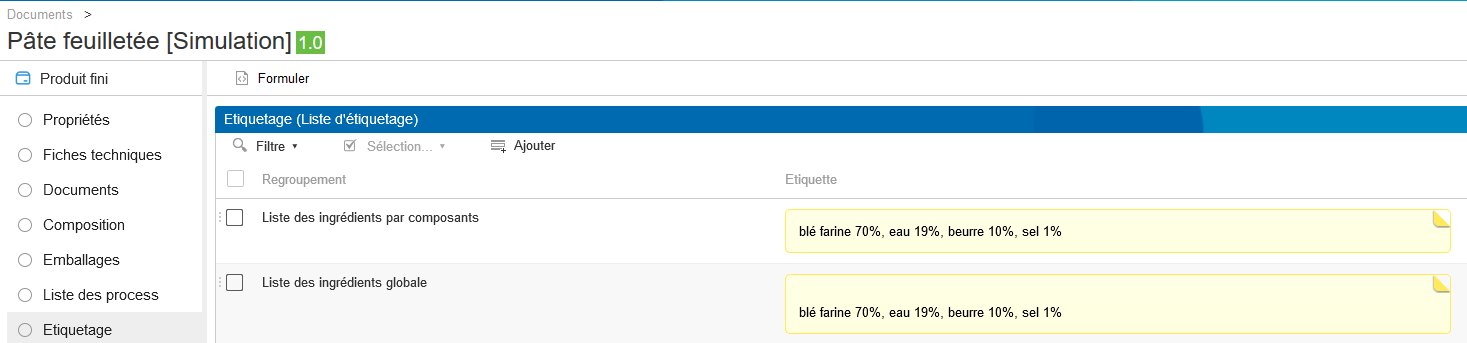
Raw product labeling which doesn’t include the yield :
Composition of the cooked product :
Cooked product labeling which doesn’t include the yield :
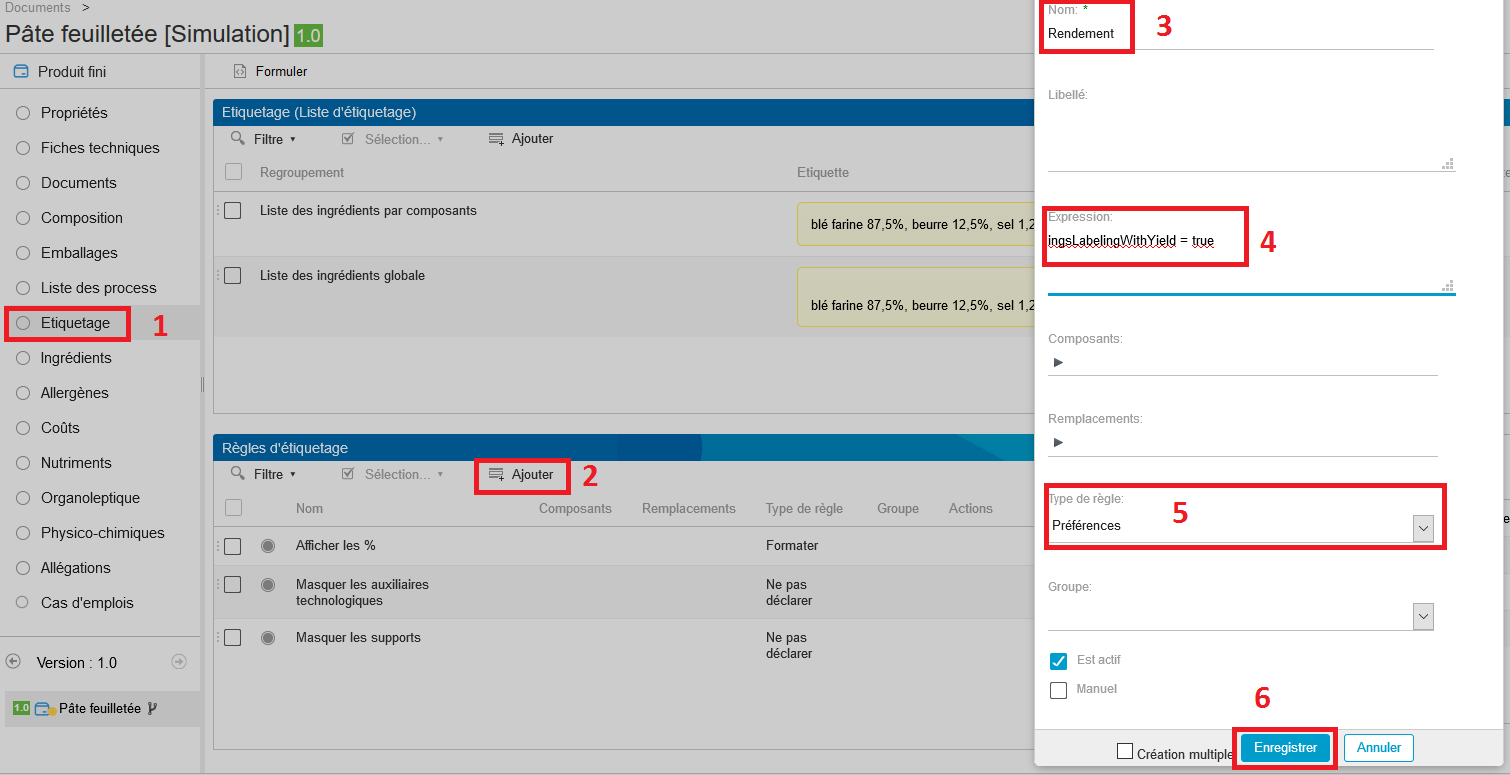
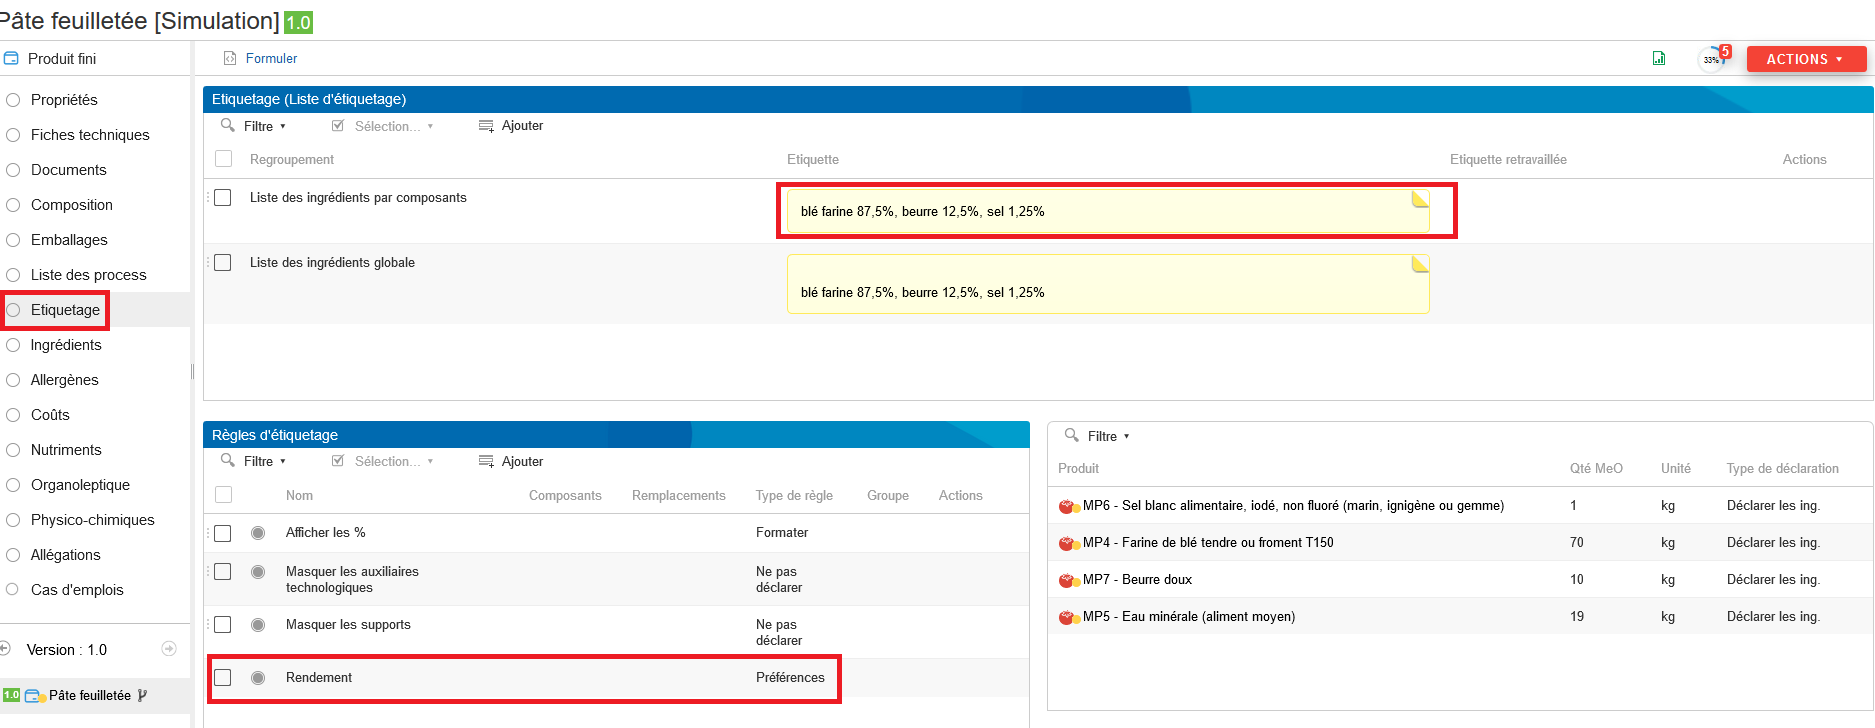
Labeling which takes into account the yield
To take the yield into account when the product labeleling is generated, it’s necessary to create a rule. For this purpose, go to the « Labeling rule » sub-part of the « Labeling » part and click on « Add ». Enter for example « Display the yield » as a rule name and paste « ingsLabelingWithYield=true » under « Expression ». Then, choose « Preferences » in « Rule type » and click on « Save ». Formulate the product.
In the PLM, a product can be parametrized as cooked or raw by manipulating the yield.
Raw products
In the case of a raw product, the implemented weight is taken into account in the nutritional calculations, physicochemical and labeling. If there is a yield, it won’t affect the calculations.
Cooked products
There exists two cases when products are cooked :
Basic assumption : the product contains the « water » ingredient.
Whether a small quantity of water has been evaporated during the cooking process, the water percentage has discreased and the other ingredients have increased proportionnally so that their sum still equals 100 %.
Cooked product composition :
Cooked product labeling :
Whether all the product’s water has been evaporated but also a small part of the ingredients’ water content. In this case, there is no more water ; the other ingredients’ percentages (in which water has not been evaporated) have increased but are still inferior to 100 % and the other ingredients’ percentages (in which water has been evaporated) have increased and are superior to 100 %.
Overcooked product composition :
Overcooked product labeling :
Regulation about the labeling of cooked products
« For food products which have undergone a humidity loss after a thermal treatment or whatever, the quantity is mentioned in percentages which correspond to the quantity ot the ingredients used, reported to the final product, except when the quantity in question or the total quantity of all the ingredients mentioned on the labeling exceed 100 %. In that case, the quantity is indicated in function of the weight of the ingredients used for the preparation of 100 grams of finished product » [Annex VIII of the INCO regulation : http://eurlex.europa.eu/LexUriServ/LexUriServ.do?uri=OJ:L:2011:304:0018:0063:fr:PDF]
Thus, for products which have undergone a loss in water, the computation of their ingredients’ percentages is done like that : [ ( Percentage of the raw product’s implemented ingredient x Raw product weight) ] / (Cooked product weigh)
Alcohol case
Alcohol which evaporates won’t be treated thanks to the yield but thanks to declaration rules by using « Omit » and so on.
Labeling rules
It's also possible to add labeling rules allowing, for example, for one or more ingredients, to change their names on the label, to hide it ...
The documentation about labeling rules is available on: https://www.becpg.fr/redmine/projects/becpg-community/wiki/04_Labeling
Processes - Workflow
Products and documents can be sent in workflow. Workflows automate a process, eg- Assigning a Task to a colleague
- Validation of a product
- Development of a new product
- Consideration of a non-conformitée
- Etc ...
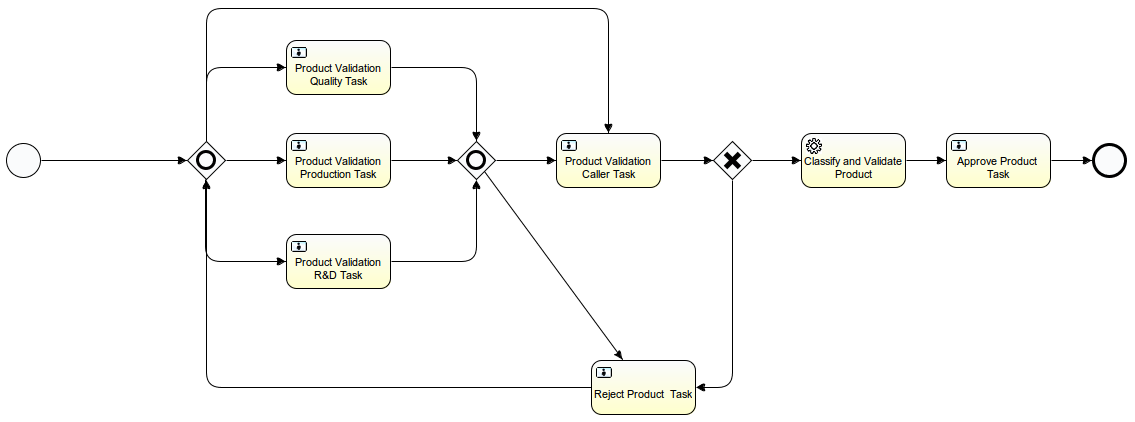
The application then has several processes including:
- Adhoc: assign a task to a colleague
This process helps to distribute a document "for information" or "for action" by setting a deadline with acknowledgment of receipt or not. - Validation and Product ranking
This process is used to validate a product and file it in the warehouse according to the type of product, his family and subfamily.
Workflow Product Validation
Below the standard validation workflow.
Change orders
A change order allows the simulation of one or more changes on a product (MP, Packagings, Semi-Finished) and then to apply this change to the whole use cases concerned.
A change order reformulate and regenerate the products impacted.
It can create a new minor or major version of the products or apply the changes without creating a new version.
Permissions :
If you want to create a change order, you need to have the right permissions.
There are 2 different permissions :
- beCPG Change orders creators (CreateChangeOrder) : you can create a change order but you can not apply one.
- beCPG Change orders managers (ApplyChangeOrder) : you can apply a change order.
beCPG Change orders managers and the administrator are the only ones able to apply a change order.
How to change a user's permission : see wiki N°7: here
Manual : replace an entity by another (RM, SF …)
When an entity has to be replaced by another, a change order should be used. In fact, to replace a raw material in all the recipes in which it is applied would constitute a consequent work without using the change orders.
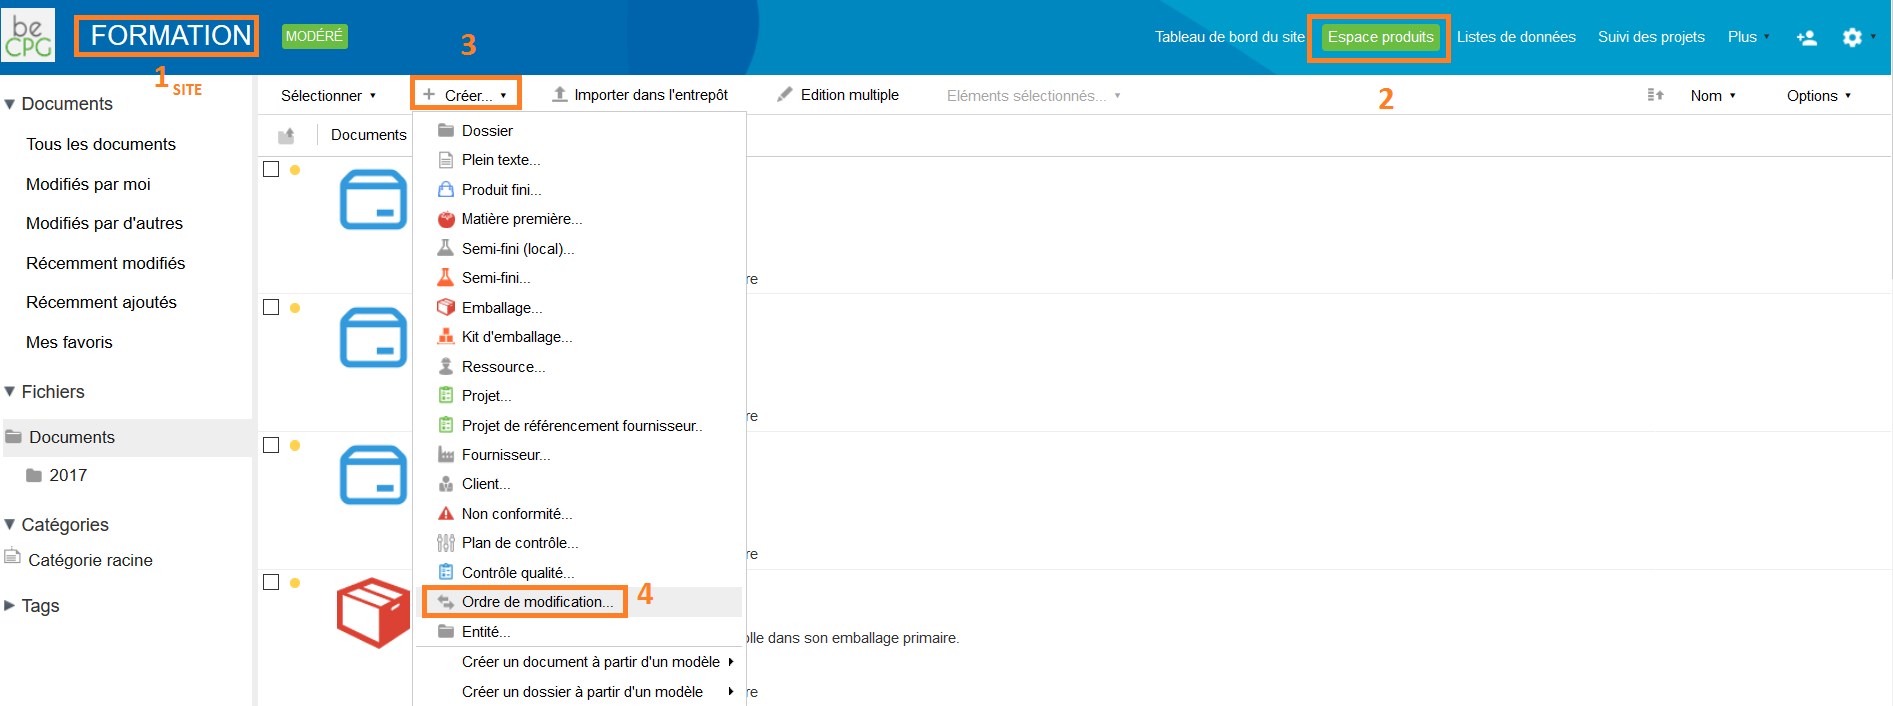
- Create a change order by going to Site> Products Space> Create> change order.
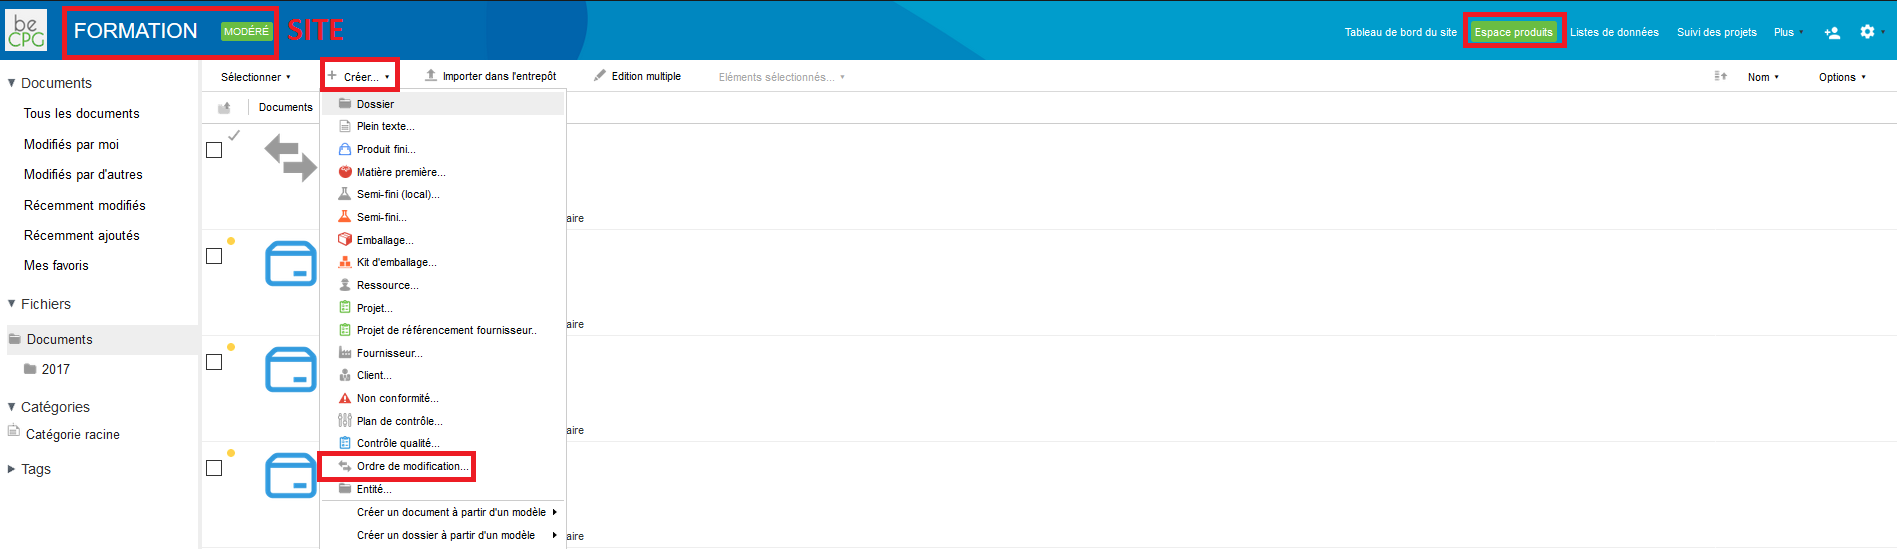
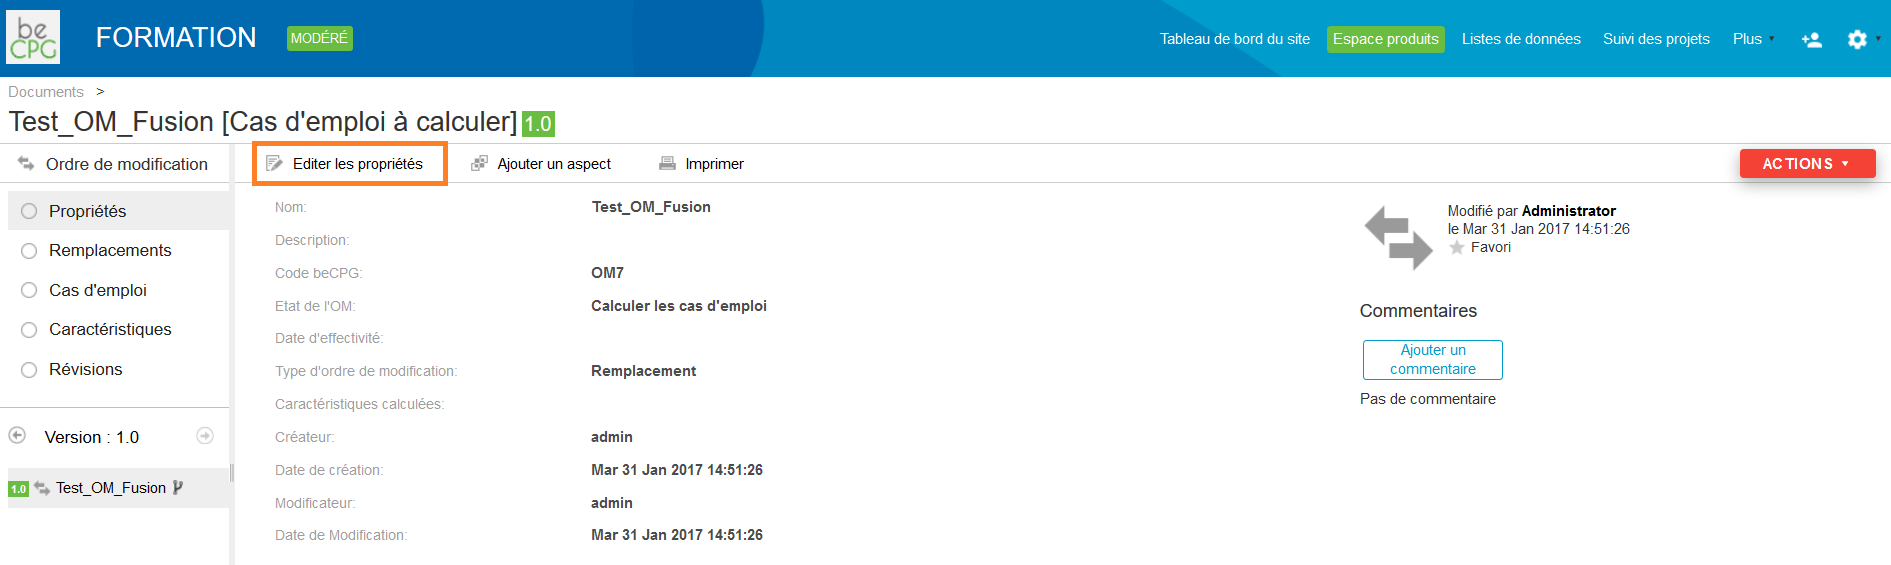
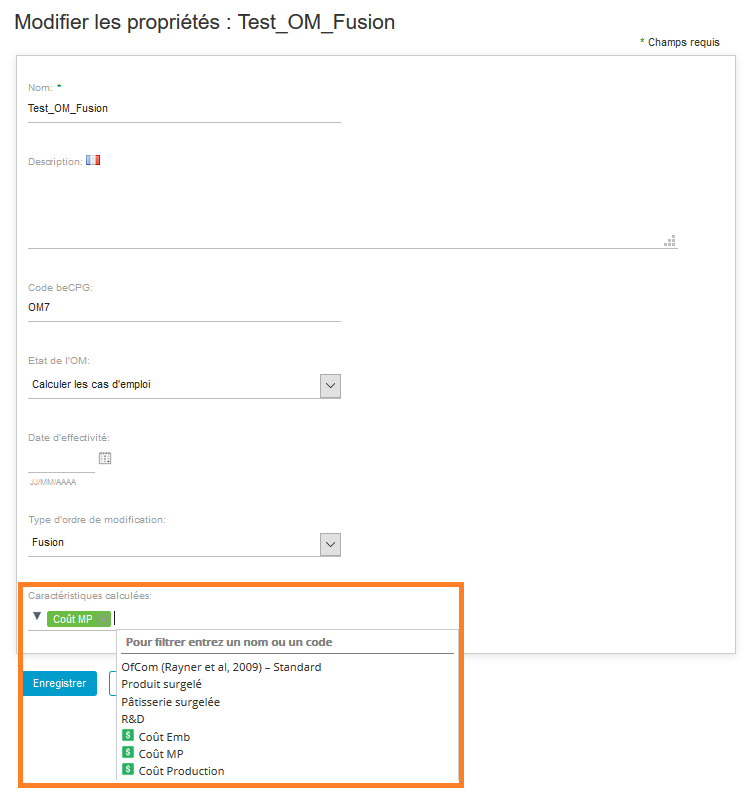
- Fill the change order name, its type (« Replacement » in that case) and the characteristics that must be computed after the entity has been replaced by another and click on « Create ».

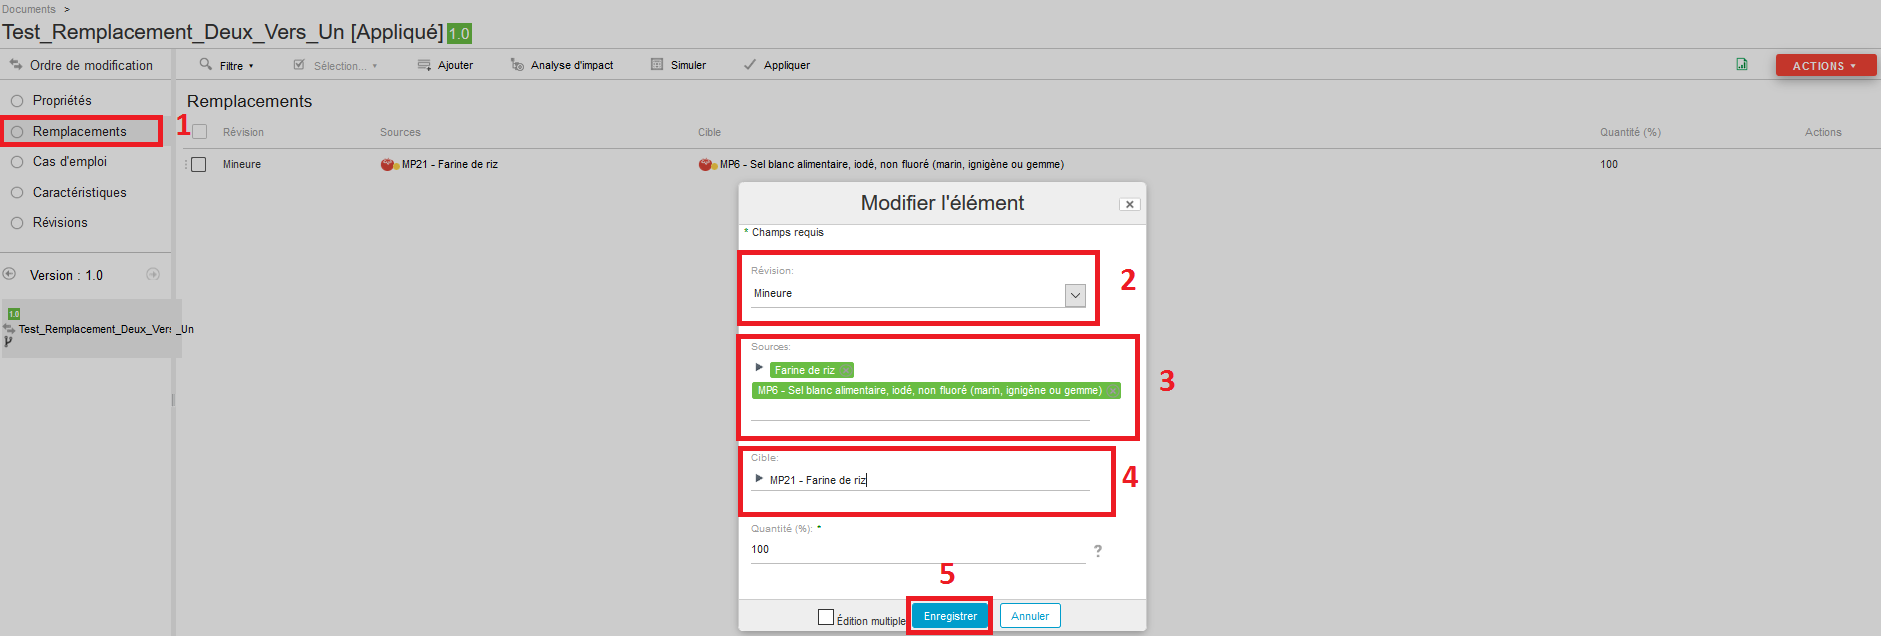
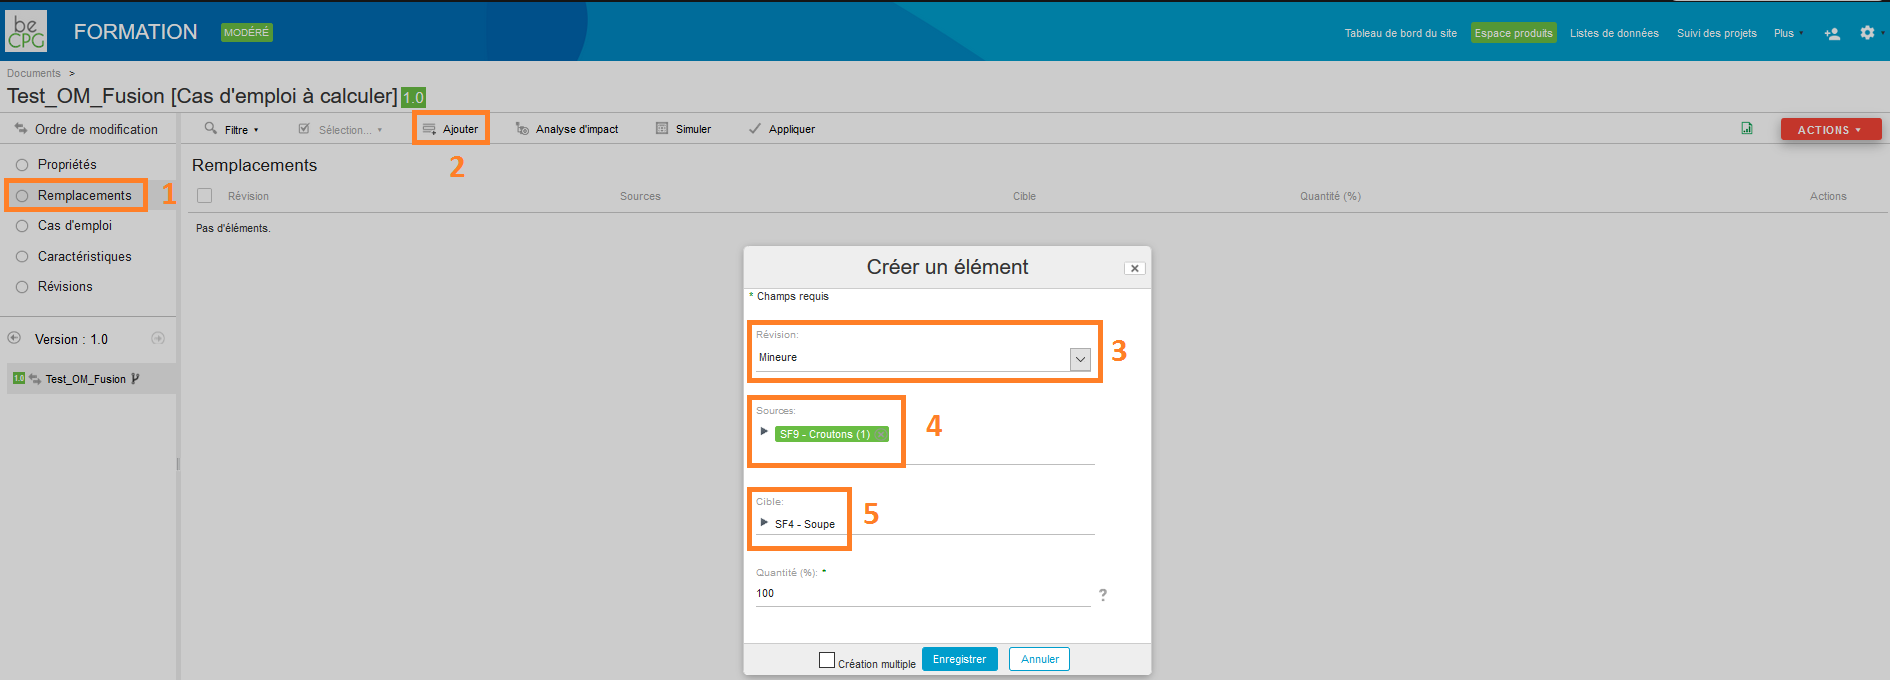
- Go to « Replacements » and click on « Add ». Fill the « Review » field to decide if the replacement must create a new minor or major version of the product impacted, or if the version must stay the same. Mention the entity to be replaced (« Sources ») and its substitute (« Target ») and click on « Save ».
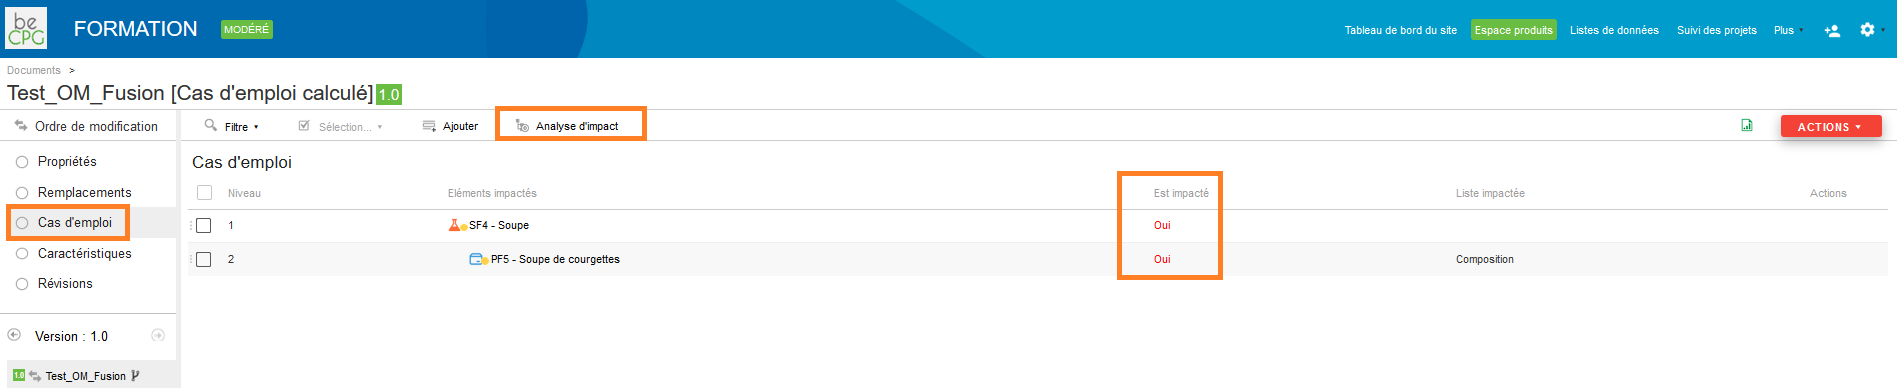
- Go to « Where used » and click on « Impact analysis » to see the whole products concerned by the replacement of an entity by another. Here, we find the raw material impacted (because replaced by another) and the semi-finished and finished products in which it is contained.

- Always in « Where used », define the entities that must be impacted by this replacement by clicking on the boxes of the « Where used » column and by choosing « Yes ».

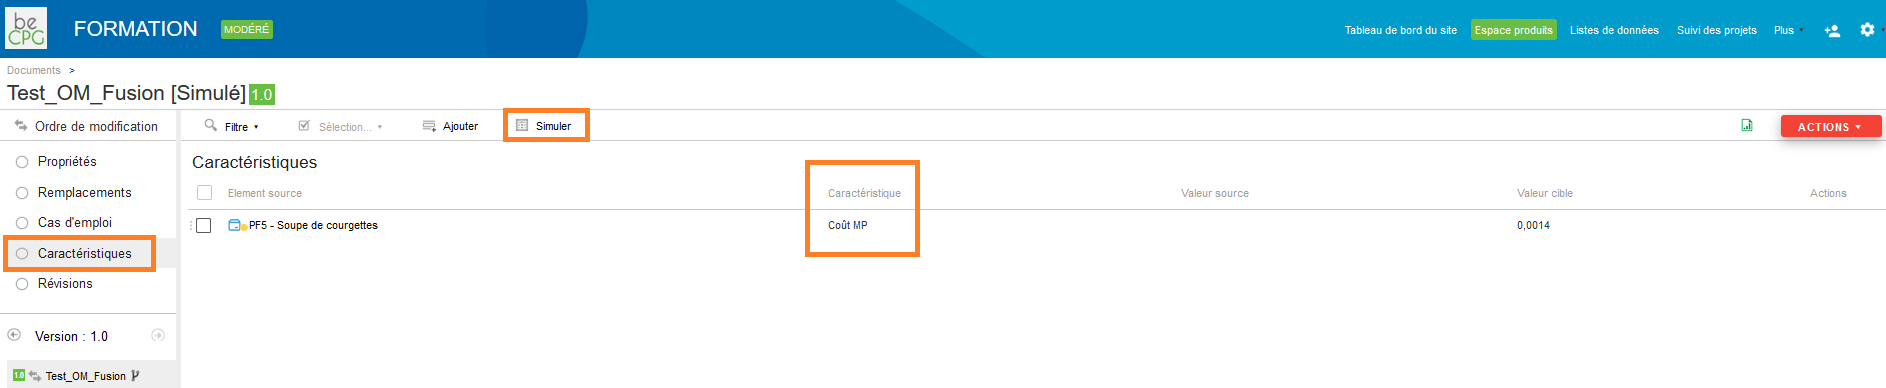
- Go to the « Characteristics » list and click on « Simulate » to see the impact of the replacement on the characteristics previously chosen.

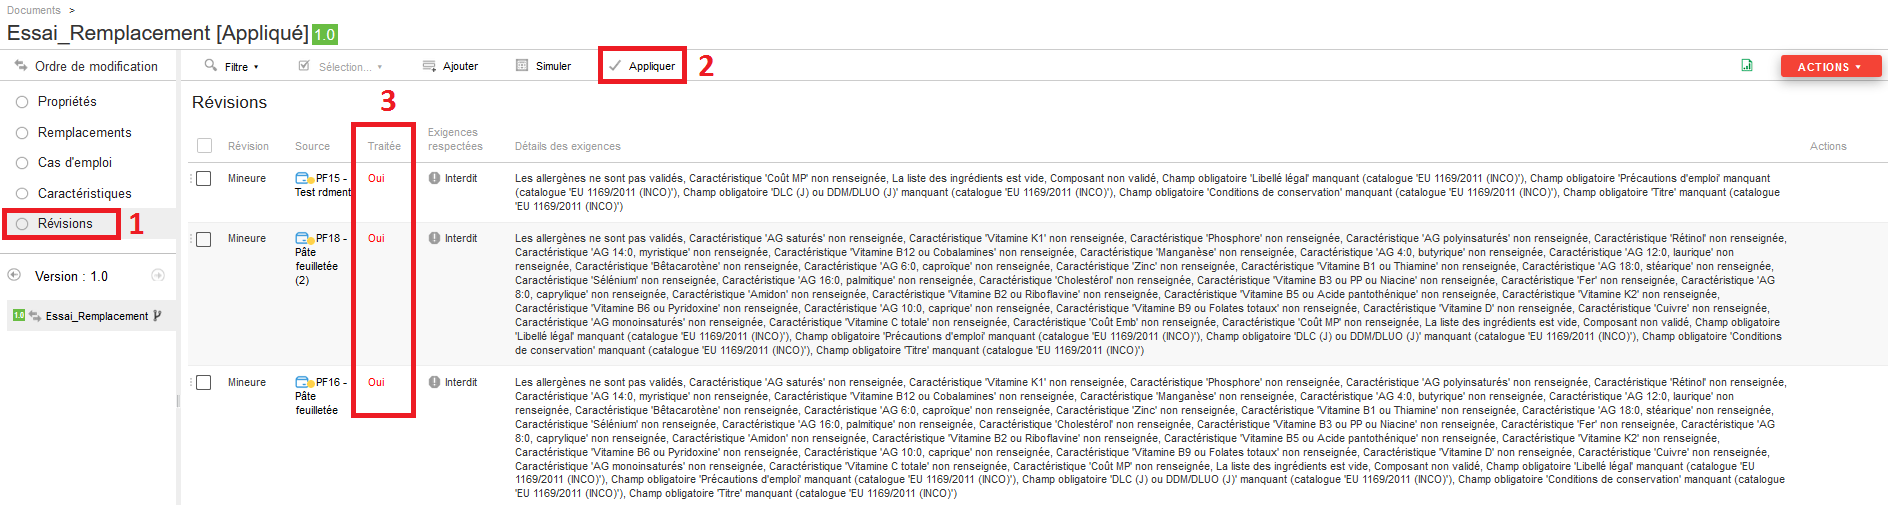
- Go to « Review » to see which missed requirements would appear on the product after the replacement. Then, apply the change order to the entities by clicking on « Apply ». Once the change order has been completed, the « Yes » mention appears in red in the column « Treated ».
Manual : replace an entity by two or two entities by one
Sometimes, an ingredient must be retrieved from existing recipes. When this ingredient is inseparable from another, a change order can be used to replace this entity per two or two entities per one.
Replace two entities per one entity
If salt must be retrieved from all the crackers, it’s possible to replace flour + salt per flour.
- For this purpose, follow all the steps of the « Replace an entity per another » and change only the third step per :
Replace one entity per two entities
If white sugar has to be replaced by a mix of white an brown sugar, it's possible to do it thanks to a change order:
- For this purpose, follow all the steps of the « Replace an entity per another » and change only the third step per :

By putting 50 % in the first line and 100% in the second one, this allows to have White sugar A (100%) replaced by White sugar B (50%) and to have the same quantity of Brown sugar (50%) than White sugar 50%).
Manual : halve an entity in all the recipes
If the flour quantity must be halved in all the recipes, it’s possible to do it at once by using the change order.
- For this purpose, follow all the steps of the « Replace an entity per another » and change only the third step per :

Manual : merge a branch
Sometimes, some finished products’ recipes must be updated from a semi-finished product branch. For this purpose, it’s advised that you use change order.
- Create a new branch of a semi-finished product by going to this latter and by pressing Action> Create a new branch.
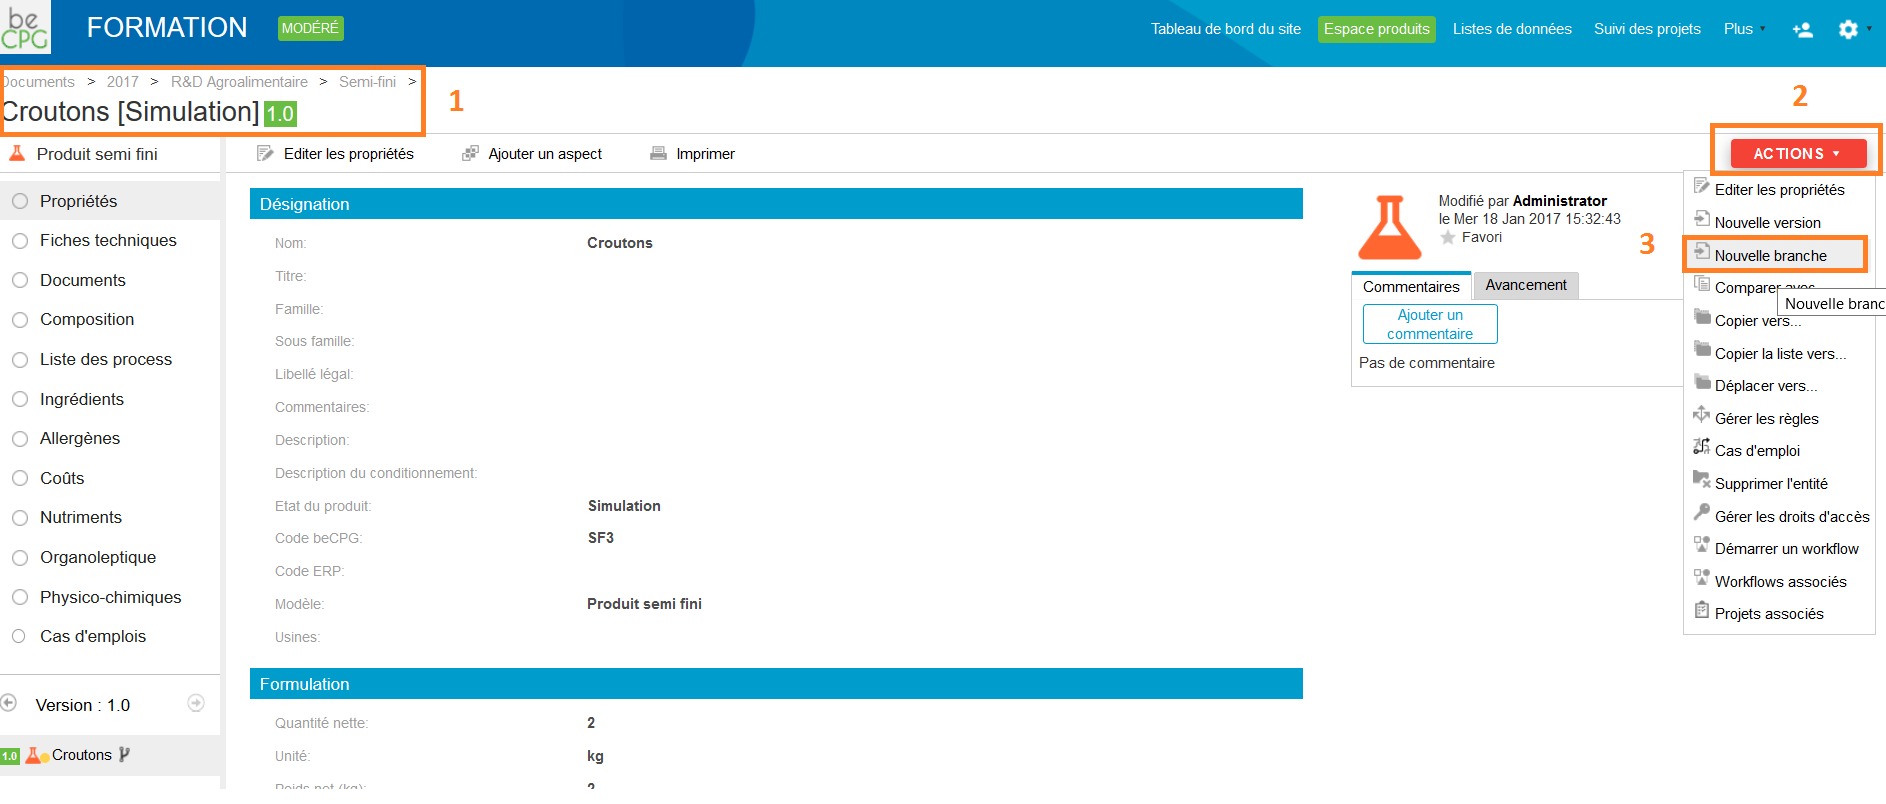
- Bring the desire modifications to the semi-finished product (here, increase of the flour quantity from 0,6 to 60 kg).

- Create a change order by going to Site> Document library> Create> Change order.
- Fill the change order’s name and it’s type (« Merger » here) and press « Create ».
- Press « Edit properties » and in the « Computed characteristics », choose the data for which you want to get a comparative after the changer order have been performed (here, the computed characteristic corresponds to raw material costs).
- Go to « Replacements » and press « Add ». In the «Review » section, choose « Major » or « Minor » or « Without review ». In « Sources » choose the branch you just have created and in « Target » choose the recipe (finished product) in which will be merged the branch. Finally, press « Save ».
- Go to « Where used » and press « Impact analysis ». It’s possible to get the list of the impacted products (all is put to « Yes » per default in the « Is impacted » column).
- Go to « Characteristics » and press « Simulate ». This can take several minutes according to the number of impacted products (don’t hesitate to refresh the page). For each impacted product, each characteristic previously chosen for the comparison is displayed for the source and the target.
- Finally, go to « Revisions » and press « Simulate » to simulate the change order before applying it. If everything is right, press « Apply » to apply definitely the change order.
- When the change order has been applied, the « Yes » value appears in red in the « Treated » column.

Automatic
The automatic change order allows the monitoring of the changes applied on products in the repository, then, to reformulate the uses impacted. It can be configured to monitor products according to their state.
For example : when a raw material with the state « in progress » is modified, it is added to the automatic change order.
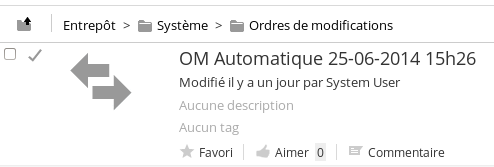
According to this configuration, the module creates a change order and move it to the folder Repository> System> Change order with the date and the time of creation :
This change order is then automatically supplemented with modifications realised at real time in the system.
The change order can either be simulated and applied manually (a new automatic change order is created after a new modification) or simulated and applied automatically after a pre defined period of time.
If the change order is applied automatically, it’s possible to define if a new review is created on the impacted products or not.
It’s also possible to delete automatically this change order once it has been applied.
Configurations examples :
# Comma separated product state to monitor
# Simulation, ToValidate, Valid, Refused, Archived
beCPG.eco.automatic.states=Valid

# Should ECO apply automatically
beCPG.eco.automatic.apply=true

# Should Automatic ECO create new product versions
beCPG.eco.automatic.version=true

# Automatic cron expression
beCPG.eco.automatic.cron=0 0/30 * * * ?

# Deletes automatic ECO after they're successfully applied
beCPG.eco.automatic.deleteOnApply=true
Multiple Edition
Multiple editing allows editing mass of products.
It is accessible in a search result and from a file.


It is possible to edit a field directly:
Or select and edit multiple product selection:
Data sheets / Features
No certification (health estampile)
The health mark must be informed of the factory. To add one, you must:- Administration beCPG> Features> No. accreditation
- BeCPG Administration> Features> Plants> select No. accreditation
- On the product> select (s) plant (s) where the product is manufactured
The Accreditation number should appear on the FT.
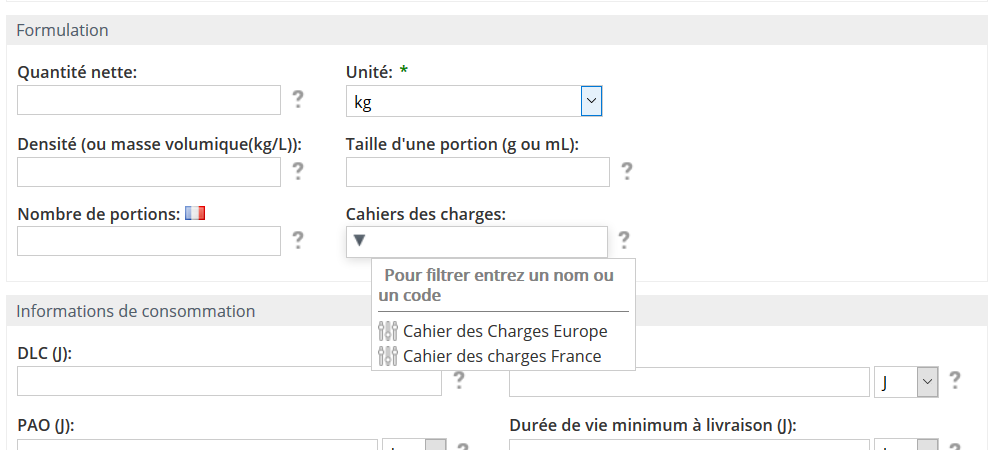
Microbiological criteria and product specifications (client CoC)
Microbiological criteria are defined in the Warehouse / folder Quality / Regulatory / Microbiological.
They help define the microbiological criteria for a product family.
They allow to define tolerances and constraints on ingredients, eg
- The salt should be less than 2%
- I do not want to germany egg
- Rules on the labeling of ingredients
- Stand in the correct folder
- Create the item via the "Create Content" menu -> "Folder".
- Fill properties
- Navigate characteristics
- Inform characteristics
1- product specifications or client specifications
FYI : if you want to add "Documents" to the entity "product specification", see point a5 "How create a list "document".
To add a product specification to a finished product:
Open a finished product > clic on "Edit Properties> product specification> select your "product specification" from the drop-down menu.
1a- How to create a product specification :
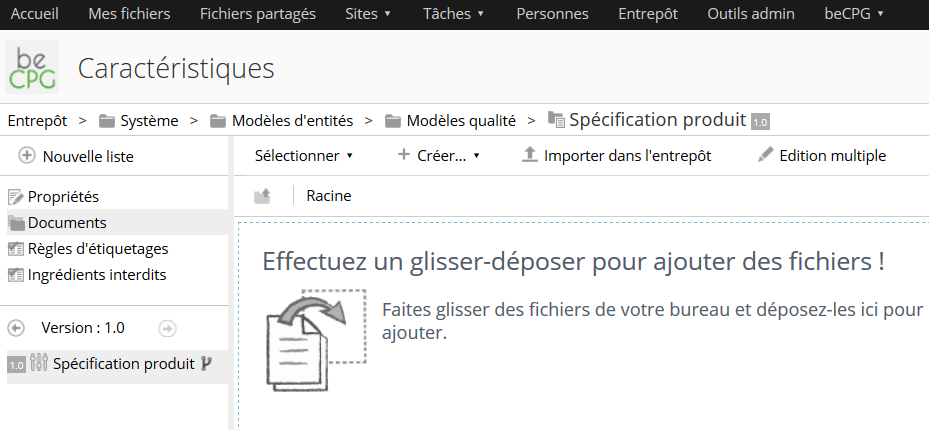
Path:
BeCPG>Administration BeCPG>product specification.
To create the entity, you nedd to:
+ Create> Folder
A windows "New Folder" will open. Complete the required Fields. (It is possible to change the information in the properties'entity at anytime).
Save
You have create your product specification.
You have 3 standard tabs:
- Properties : enable to associate another product specification. for example : the product specifications for the Europe to another one like the product specififation for France.
- labeling rules : enable to create specific labeling rules (example : for 2 different clients).
- forbidden ingredients : enable you to create an alert's list. the system will raise the alert if there is any ingredient.
1b- Properties

1c- Labeling rules/ Labelling rules
see : https://www.becpg.fr/redmine/projects/becpg-community/wiki/04_Labeling
1d- Forbidden ingredients
It is possible to add an alert for the prohibited raw material.
There is four alert's levels:- forbidden (with the sign of prohibited direction),
- tolerated (triangular symbol representing a warning sign ),
- info,
- autorized.
The alerts are dependent on the informations you will provided here.

Once, all the data are entered, you will have a list like the one you can see below.
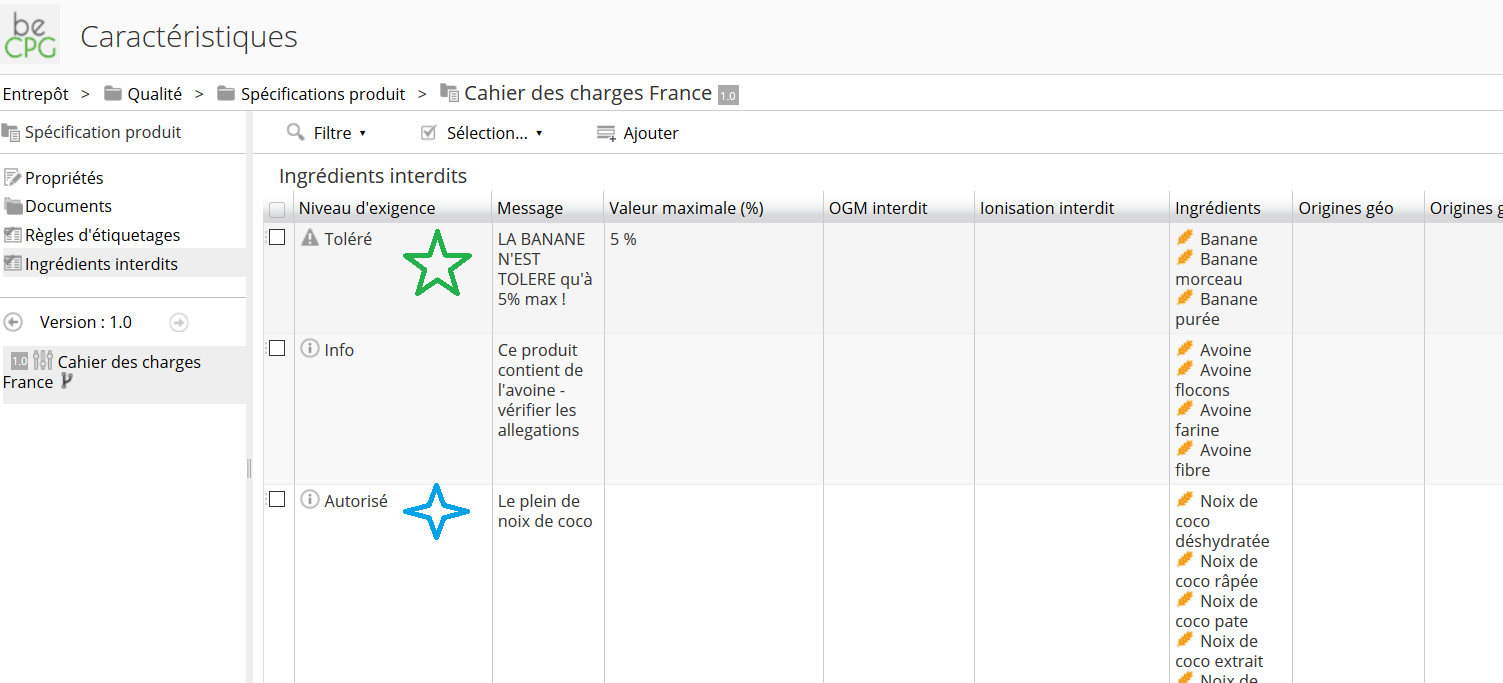
On the finished product, you will see that :

The messages for "info" and "autorized" can be for the Research and Development personnel (internal message)

1e- How to create the list "Documents"
If you want to add files at the entity "product specifications", you need to create a list call "Documents" (like for the finished products, the raw products ...).
The Path :
BeCPG>Administration BeCPG> entity template >Quality template > Product specifications
- click on "New List"
- a window call "New list" will opened,
- Choose : "Custom view" (the last one)
You just need to write :
Custom view type : bcpg:entityListItem
Custom view name (WUsed-,View-,...): : View-documents
Title:: Documents
- Save.

Now, in the left band, you can see below "properties" : "Documents"
Record the modifications
The « Record the modification » tool allows the user to bring major modifications to many finished products. For this purpose, go to the beCPG tab of the headband and clik on « Save the modifications ».
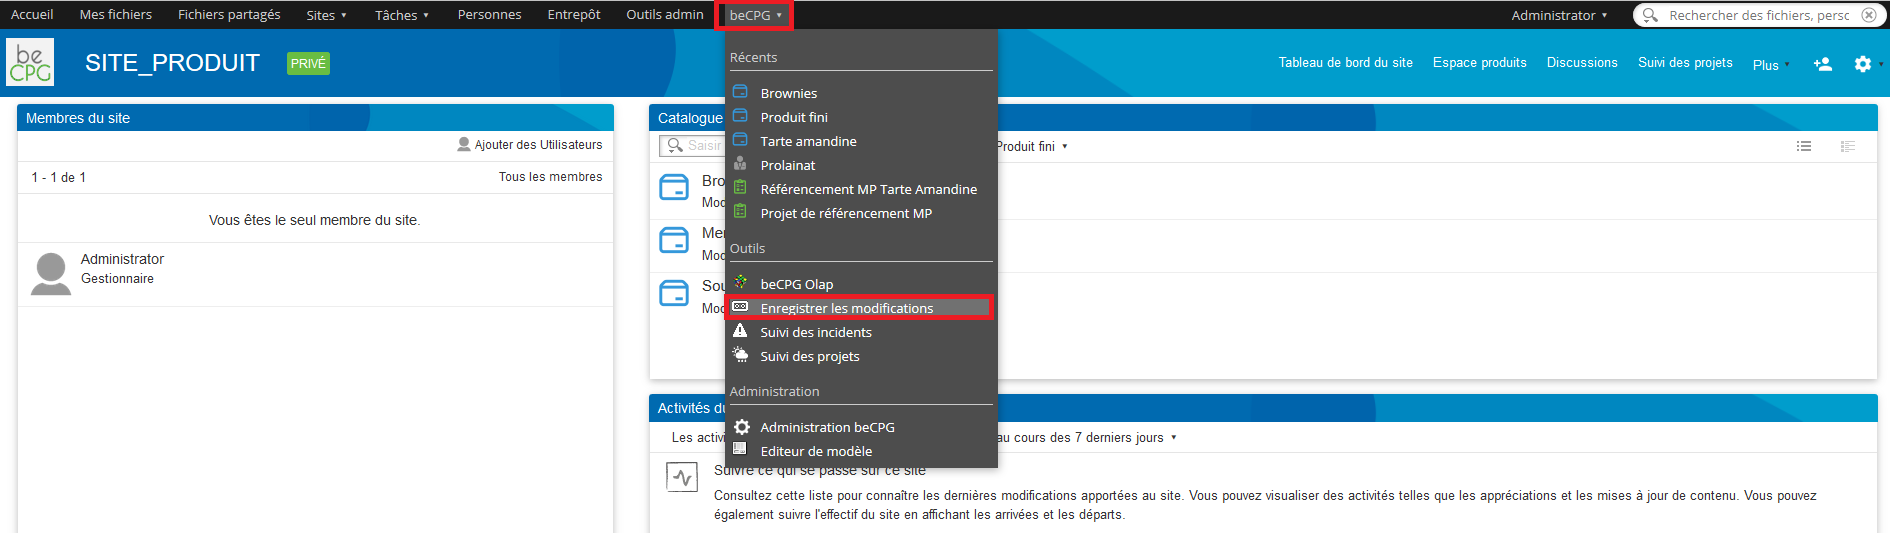
A framework appears in order to name the modification order. This name will figure in the versions tree when a product is modified.
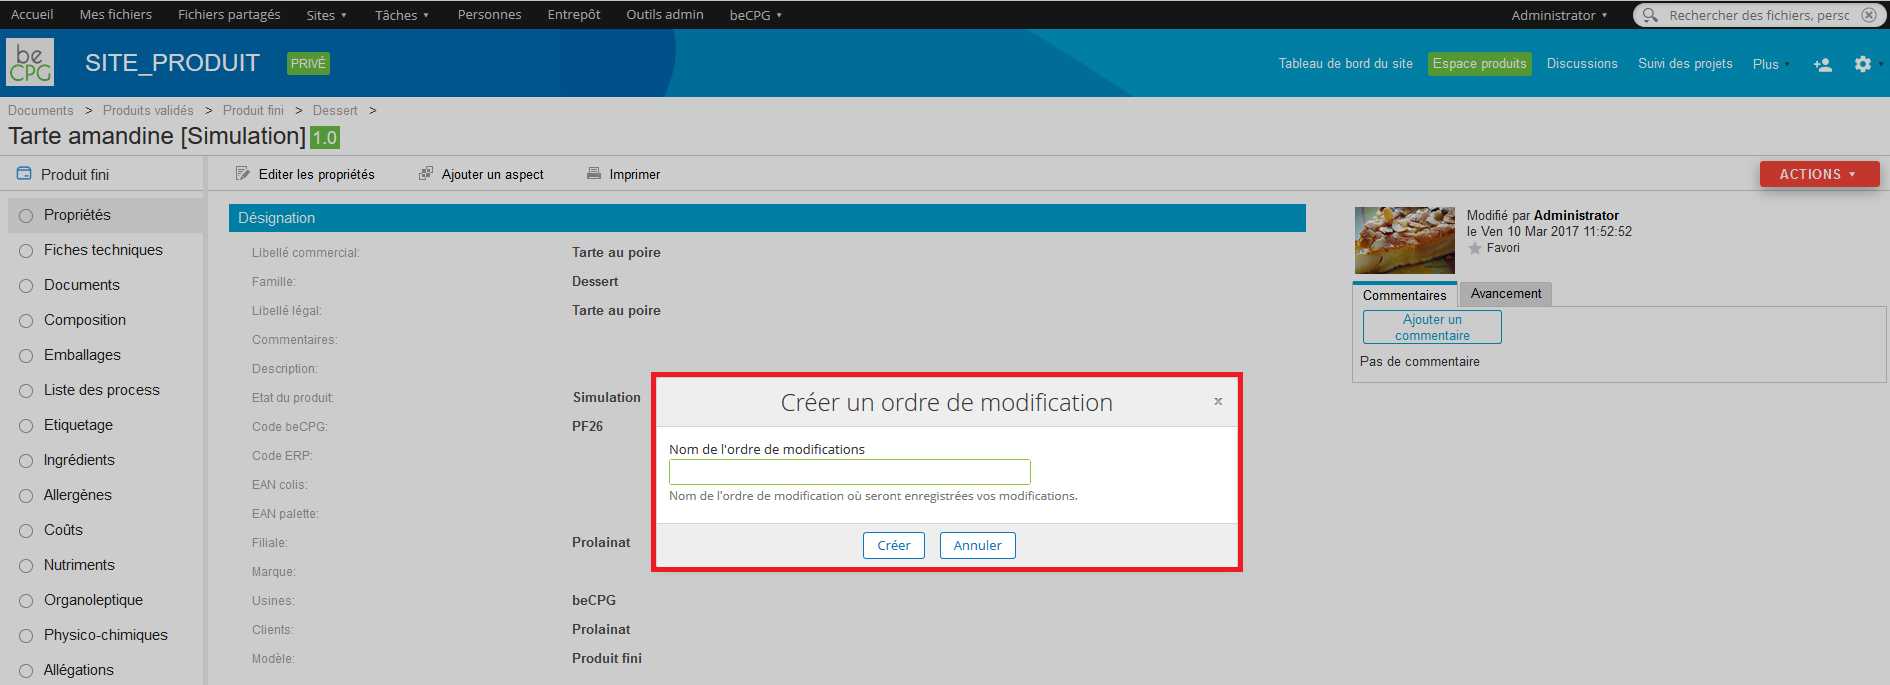
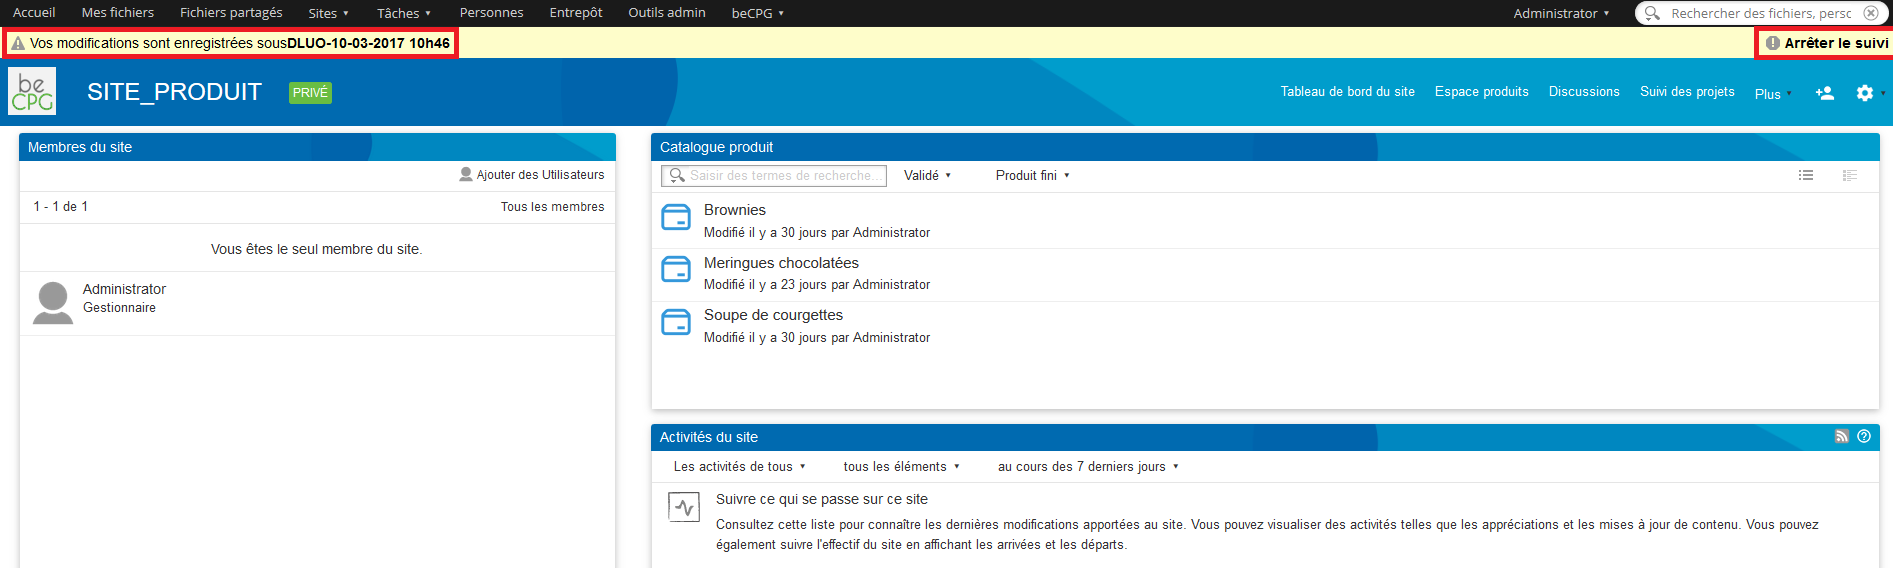
After clicking on « Create », a yellow band appears at the top of the page mentionning that all the modifications brought to the validated product will cause a new version which name will be that of the modification order. To stop the modifications record, click on « Stop the follow » at the right top of the screen.
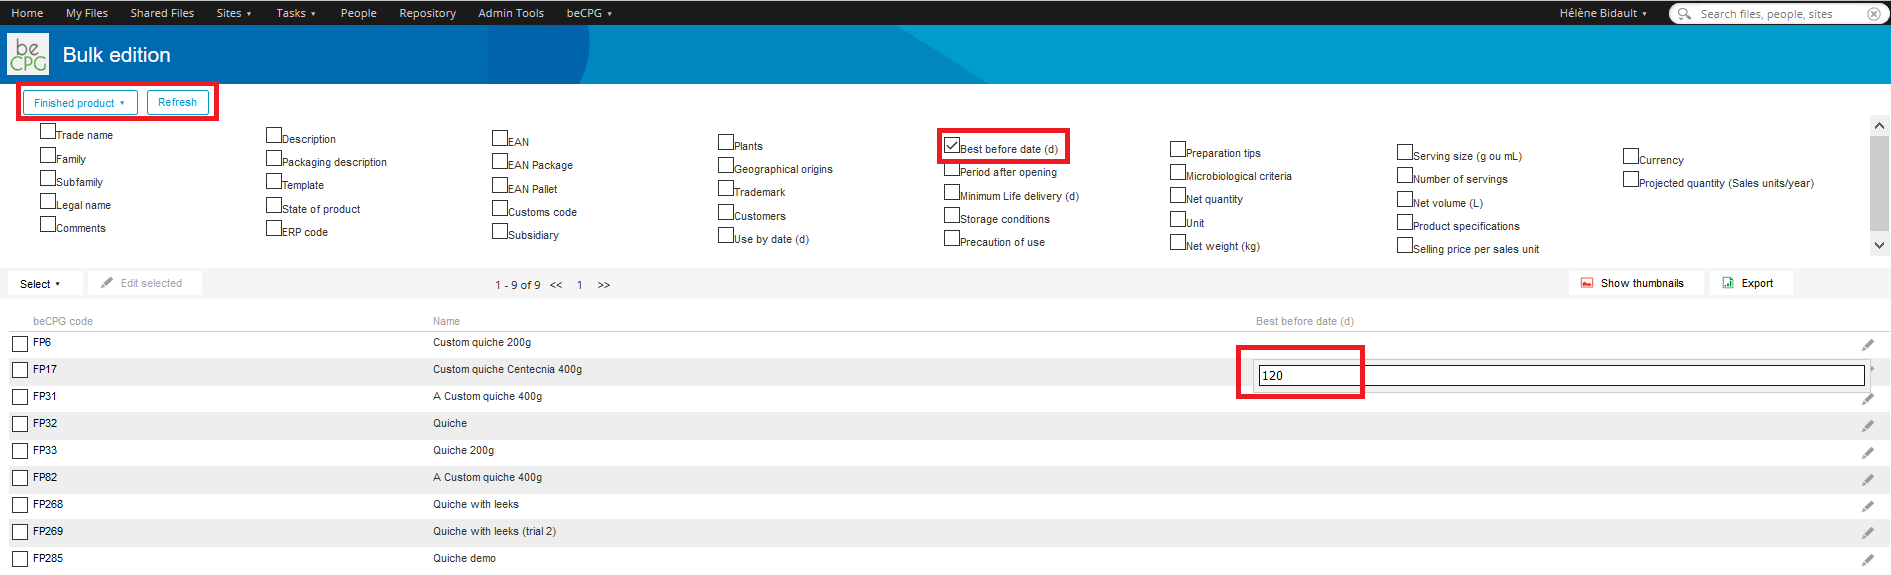
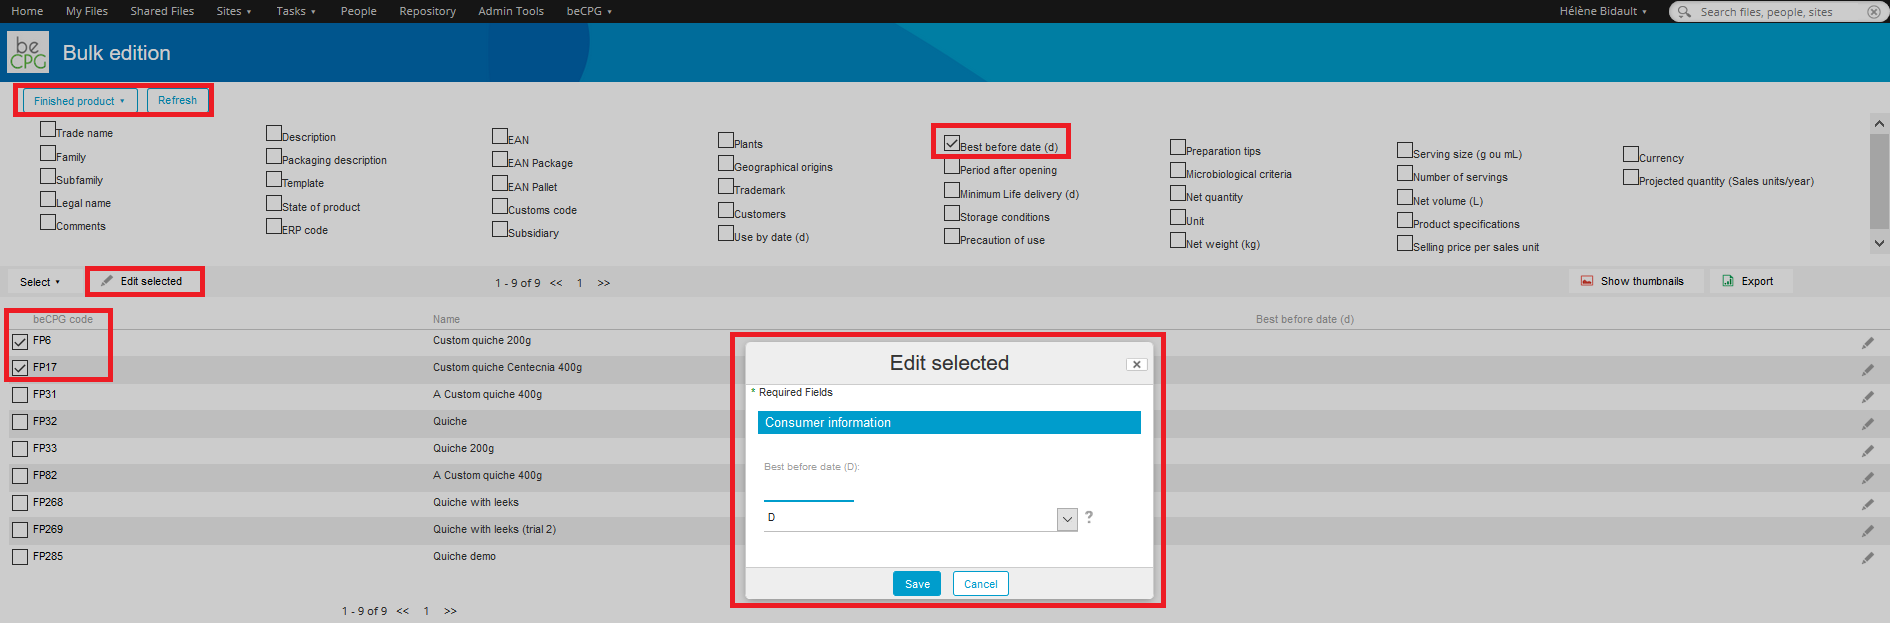
To modify many products at a single time, go to the products space of a collaborative site and click on «Bulk edition ».

Select the products type to be modified and click on « Display ». Then, select the variable and the products which have to be modified and click on « Edit the selection ».
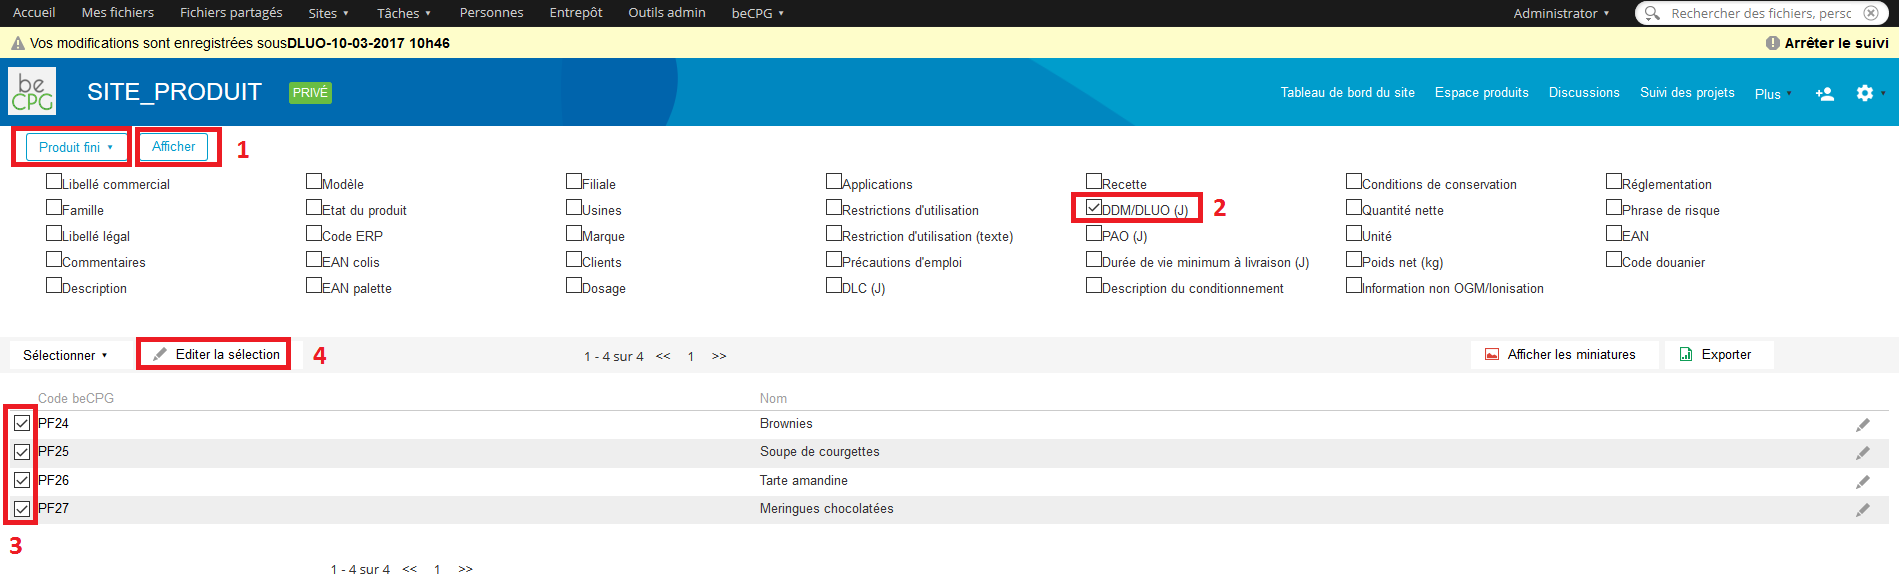
Modify the variable and click on « Save ».

Selected products have been modified.

To see the impact of these modifications, go to the products space of the collaborative site. Select the folder containing the products you’ve just modified.
If the newly-formulated product have a state different from « Simulation » it is subject to a new major version.
Otherwise, if the newly formulated product was at the « Simulation » state, the modification didn’t cause the generation of a new version.